Do-it-yourself kid pump repair: an overview of the most popular failures

For domestic needs, you use the Baby submersible electric pump, but does it, like any other equipment, require intervention over time? Although its design is simple and reliable enough, without repair experience it is difficult to find a breakdown without resorting to the services of a master.
Agree, it would be nice to fix it yourself in order to save on the departure of an employee of a service organization.
We will tell you how to repair the Kid pump with your own hands, without resorting to the help of specialists. The article describes the main types of faults and ways to detect them. Schemes of the device and assembly of the component elements of the unit are selected, which simplifies independent work.
For ease of perception of information, we offer a step-by-step process of repairing breakdowns, equipped with a video. In fact, this is not difficult - it is enough to have a repair kit, which is necessarily included in the delivery of the pump.
The content of the article:
Pump modifications and characteristic differences
Vibrating submersible pumps invented a very long time ago. Back in 1891, a Russian engineer V. G. Shukhov used the principle of vibration for a pump. By the way, approximately such a system is involved in an automobile gasoline pump.
Later, the Argentinean T. Bellock finalized the scheme - it is used without much change today.

The first for domestic needs such devices were produced by Italians. In the USSR, designers of the Dynamo Moscow plant under the leadership of M. E. Breitor took up their development in the late 1960s. And since 1971, a household vibration pump began to be produced at enterprises of the USSR - a passion for unification affected.

Pumps were produced in Yerevan, Livny, Moscow, Bavlyany and many other enterprises. You can name only the most famous brands: "Kid", "Neptune", "String", "Sega", "Trickle", "Harvest", "Bosna", "Chestnut".
All of them, in fact, differed in the names and shape of the body. And that is not always the case. This also includes Italian and Chinese designs. For example, "Dzherelce".

All these are variations of one circuit. Sometimes the names changed, but the essence remained the same. For example, the now known “Kid - M” was earlier a “Sega” and "Brook". therefore Brook damage and methods for eliminating them are very similar to the closest competitor - “Baby”.
If we ignore the confusion with different names, then briefly all the variations come down to three or four types of submersible pumps:
- "Kid" - model of a submersible vibration electric pump with a lower water intake. The most powerful modification of all, but poorly suited for bottom work - it can capture dirt or sludge from the bottom and fail.
- "Baby - M" option in the upper water intake. A little weaker, but does not take dirt from the bottom. Less often, it breaks down due to overheating - simply even if the water level drops and the fence ends, the body is still cooling - it somehow remains submerged.
- "Kid - K" - A model with a lower water intake, but is equipped with a thermal relay and a three-wire wire with grounding. The presence of a thermal relay positively affects the service life and reliability, but increases its cost. Previously, this modification went exclusively for export.
- "Baby - 3" - compact model with a diameter of 80 mm for narrow wells.
In any case, vibration pumps are appreciated for their compactness, low cost and simplicity. In addition, they are quite resistant water hammerthat occur when the waterway is blocked, for example. Although there is no need to get carried away - such a frequent practice still incapacitates the pump.

The device and principle of operation of the unit
The principle of operation is simple. The mechanism of water intake and lifting by means of a piston and valve has been known since ancient times of Heron of Alexandria. The whole difference is that the circuit is redesigned for an electric motor.
Electric alternating current changes its direction several times per second. In Russia, the standard of 50 Hz is adopted. This means that in a second the current changes polarity 50 times.
Accordingly, an iron core placed in a magnetic field created by a current with such a frequency will vibrate with the frequency of polarity reversal. If a piston with a valve is added to such a core, a pump will appear.

The pump housing consists of two halves. In one of them there is an electric coil creating an electromagnetic field, and in the other all mechanics with a steel core are placed.
The coil has a U-shaped core. Assembled, this part is called a yoke. It is pressed into the housing and filled for tightness and insulation with a compound - plasticized bakelite resin mixed with quartz sand for reasons of better thermal conductivity.
In the other half of the body is a hydraulic chamber. It has a core on a rubber shock absorber. The movement of the core is adjusted by the rubber membrane. There is a piston on the core. And in order to direct the flow of pumped liquid, a non-return valve is placed on the intake pipe.
Simply put: the coil is magnetized, the core vibrates, the shock absorber acts as a body gasket and returns the core to the neutral position, the membrane prevents the core from swaying, the piston pushes water, the valve allows it to move in one direction.
That's the whole design - simple and effective.

The main types of malfunctions and their causes
All faults can be reduced to two types:
- electrical part;
- mechanical part.
In turn, each of them can be divided into two subgroups. This is a complete inoperability and partial malfunction.
Partial loss of pump performance does not necessarily mean misregistration. Sometimes the reason lies in the failure of its individual parts. But let's start in order.
Type # 1 - electrical faults
The most common failure is coil failure. Complete burnout or breakdown of insulation on the housing. Less often, detachment from the compound body occurs. The cause of the malfunctions is one - dry running, without water, which causes the coil to overheat.
Then the insulation burns, the compound burns up and, due to the difference in thermal expansion of various materials, the stratification of the filling and the yoke falling out of the housing occur.
Sometimes the pump stops pumping at all, but it can also break the case. This is the most unpleasant breakdown, which can only be avoided by observing the operating rules.

Type # 2 - mechanical breakdowns
There is a complete variety of causes and consequences:
- Liming of parts. Occurs from pumping hard water. This is a white limescale-like scale in a teapot. In operation, this is not particularly felt, but after prolonged storage, for example, in the winter, lime can jam the piston. A malfunction is rare, as a rule it only complicates disassembly and slightly reduces the characteristics of the pump.
- Violation of the integrity of the housing. Impression, just cut off with a file or milling cutter. Usually the upper edge of the body. The reason is simple - contact with the concrete surface of the well during operation.
- Pump cavity clogged. For example, sand. Sand and pebbles, branches, algae - all this violates the tightness of the valve to the bed. Not critical, but unpleasant - the pump does not develop the required power.
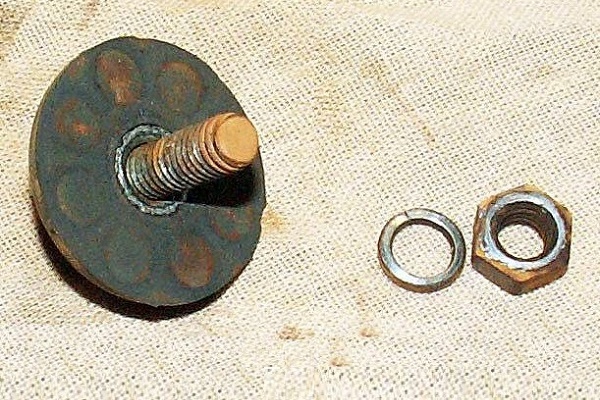
- Loose threaded connections. Occurs from vibration, happen infrequently. For example, the nuts securing the piston are untwisted. The consequences may be the most deplorable - up to the destruction of the hull.
- Violation of the properties of rubber. It leads to a decrease in pump power. In rare cases, there is a complete cessation of performance.
The most capricious and sensitive to weakening properties of the rubber part, oddly enough, is a massive shock absorber. Too elastic rubber contributes to the breaking of the core, too hard - to reduce the amplitude of vibration and loss of power.
In addition, when cranking the core in the shock absorber, the projection of the stem base (a part called an anchor is pressed onto the stem) does not fully coincide with the yoke and is worse attracted to it. A stiff piston moves water worse. A broken piston does not pump at all.
A valve with loss of elasticity works worse, but the pump does not fail at all. We also observe in case of violation of the valve adjustment.
Sometimes just a loss of power occurs. Often the reason is to turn on the pump again without immersion in water. Most often this happens due to neglect of the operating rules.
For example, hanging the pump on a steel cable and without a shock absorber - the pump mount must be shock absorbing! Therefore, a fishing line or a nylon cord and a shock-absorbing ring for fastening are included in the kit.

Troubleshooting Algorithm
If the pump refuses to work or does it somehow unconvincingly, then first of all unplug it and remove it to the surface.
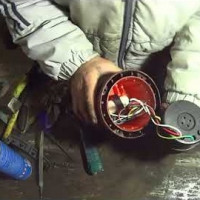
Stage # 1 - a close inspection
The following is the disconnection of the supply hose and visual inspection. Is there any visible damage?
Unfortunately, cracks in the body are treated only by a complete replacement of the body. But here it is worth remembering that just like that they will not appear in injection molding made under pressure - here somewhere else lies a different reason.
If the case is intact, we check the resistance of the coils and the presence of a short to the case with a tester. A working yoke will show resistance of the order of 10 ohms. Any of the contacts (except grounding) should not give a short to the pump housing.
If it is, it’s bad. Replacing the coil yourself is very difficult and the attempt gives poor results. However, recommendations on this issue will be a little later.
If everything is normal with the case and the electrics, you need to blow the pump. That is, just blow into its intake and feed holes. In both directions, the air must pass freely.
But if you blow sharply into the supply pipe, the valve should close and block the air supply.
If this does not happen, then eloquently speaks of a violation in the adjustment of the pump. Then just shake the pump. Nothing should rumble inside him. The cause of extraneous sounds is the detachment of the compound or the destruction of the mechanical part.
If there are doubts about the need for disassembly, and the pump simply lost power, then you can try to do without disassembly. First, flush the pump with a stream of water. The task is to wash sand and debris from the inside.
Then you can try to lower it into a bucket of water. In water, add 9% vinegar (about 100 g per bucket) or a bag of citric acid. Leave for six hours. Then rinse again with a stream of water. The purpose of the procedure is simple - to remove the liming.
Next, check the valve adjustment. It should lie loosely and have a gap of 0.5 - 0.8 mm. Just loosen the lock nut and clamping nut on the pump intake and adjust. As soon as we got it right - fasten with a lock nut. The process is easy to control.
Lower the pump without hose into a bucket of water. So that only the hose nozzle peeks out. And turn it on. In a well-functioning and regulated pump, the water column rises by about a meter.
On this fountain and judge the adjustment. As soon as we got the maximum value - here we fix the result.
We have listed the simplest. For the rest, disassembly is required.
Stage # 2 - a close look inside
The first step is to disassemble the pump. It is preferable to make tags on the case. To then properly assemble.
Unfortunately, just unscrewing the fixing screws only on the new pump - during operation, the threaded connection is so oxidized that disassembling it is still a challenge. The best help is patience and WD40 fluid.
By the way, in the past, at the plant on connecting studs, in order to avoid loosening, they were generally cored. Today, they are arriving a little more humane and apply nuts with a plastic lock. Exactly these must be set during assembly.
If disassembly did not work out, you need to resort to a hacksaw or angle grinder (grinder). Only very neat, without damaging the case.It is better to replace the standard screws with the bolts for the internal hexagon - then it is easier to unscrew them.
By the way, it is necessary to disassemble and assemble according to the same principle as automobile wheels or engine block - we tighten or weaken fastenings gradually, crosswise.

The pump breaks into two halves - the yoke is flooded in the upper compound, and all mechanics are kept in the lower one.
Step # 3 - Troubleshoot an Electrical Problem
In the electric half we look at the compound. If it exfoliates, then by accurately tapping the hammer on the body we determine the area. If it is small, then you can try to cure the malfunction by pouring epoxy.
If the node falls out of the case, then apply a shallow notch (grinder) to the compound no deeper than 1 mm.
And we fix the assembly in place with the help of a sealant, which is used in the repair of automobile windows. Epoxy is not suitable - it is not plastic enough and will simply burst later from vibration.
Pressing the coil in place is difficult - you may need a press with a force of about 300 kg. You can try and rewind the coil if it burns out. But it’s more complicated.
First, they warm the case to remove it. Up to about 120 degrees. Until the compound exfoliates. Doing it better in the fresh air - a burning compound is not very good for health.
Gently chipping, free the coil bodies (two of them) from the remnants of the compound. Unwind the old wire from them. Then winding new windings. Wire diameter 0.65 mm, grade PETV. Turn to turn, approximately eight layers each coil.
The conclusions of the coils are connected by soldering to a moisture-resistant wire with a cross section of 0.75 in double insulation. And then the coil is poured into the casing with epoxy resin with the addition of calcined quartz sand.
But in general, this repair method is not very reliable - equipment and materials at the factory allow doing it better. And repair of the electrical part can be recommended only as a last resort. In the rest it is better to contact the manufacturer.

However, if you have a lot of free time and a winding machine and skills in working with electrical devices, then you can try. But most often it turns out to be cheaper to completely replace the coil with half the body. In factories, by the way, they do so. It can be considered an aggregate repair.
Stage # 4 - Correcting Mechanical Impairment
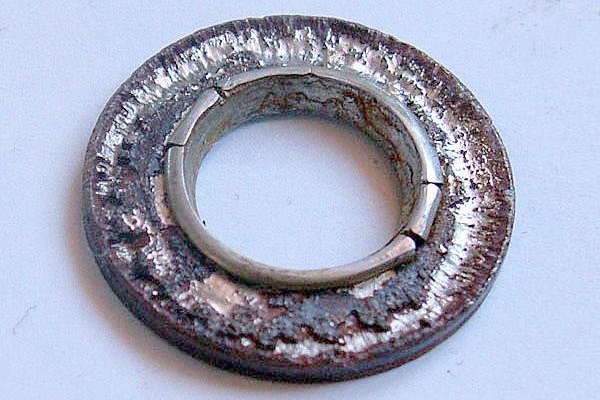
The mechanics are easier. Carefully pull the assembly out of the pump housing. First of all, we visually identify malfunctions: destruction, tears, washer fragments, and so on. If there is blackness and burning, we again check the electrician.
If there are traces of mechanical wear on metal parts, we check the gaps and the shock absorber and once again double-check the electric half for peeling of the compound. This can be done by tapping the hammer - at the place of exfoliation, the sound will be deaf.
It’s just that sometimes the wear of the yoke and the anchor happens because the coil is displaced, falls out of the body. Which is not always noticeable on the old pump due to contamination.
When disassembling, sometimes tears of the membrane and shock absorber occur. The membrane does not particularly affect the performance of the pump and, if it is possible to glue it with rubber glue, then this can be limited. But the shock absorber in this case is better to replace.
We wash the inside of the pump from sand - if it is there. We remove limescale according to the same principle as the scum in the kettle - citric acid, vinegar, descaling agent. Just do not use strong alkali and other powerful means - you need to clean the case, and not dissolve it.

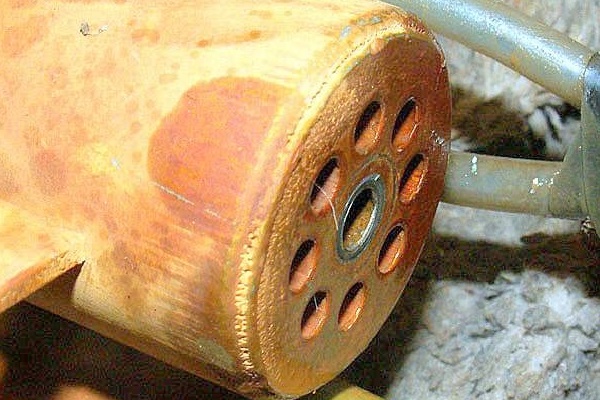
Next, see how the rod anchor is oriented with respect to the coil. Their projections must match. No - rotate by loosening the fixing nuts. The distance from the anchor to the yoke should be 5 - 8 mm.
This clearance is controlled by washers and locknuts on the stem base. More distance will not allow the pump to develop power. Less leads to the breaking of the yoke and anchor, and sometimes the hull.
If the anchor on the rod loosens - which is extremely rare - it is fixed with a core. Sometimes the rod itself ruptures in the area of the piston mounting thread or the thread loosens - there is already only a replacement.
If the piston is worn out or it has lost elasticity, then everything is simple. We change it to a new one from the repair kit and adjust the gap between it and the bed in the case. This distance should be between 4 - 5 mm.
It is easy to adjust - by adding or removing 0.5 mm spacers. You will find them on the stem above and below the piston.
When changing the piston, remember the steel sleeve pressed in the center. It is easy to get it from the old and press into the new. No special tools required. As a rule, it comes in at the touch of a hand.
Sometimes a vise or just a bolt with a pair of washers and a nut is helping out - just put the piston and the sleeve on the bolt in series and tighten it with the nut - the sleeve fits into place as it should. You can even try to do it directly on the stock.
A membrane is changed extremely rarely - only if it has completely crumbled. And so, if it is intact and the rubber has not lost its elasticity, then especially do not pay attention to it. The main thing is that she is.
A caliper with a depth gauge will be a good help in the work. They measure the distance from the landing edge of the body to the valve bed, and then from the valve to the shock absorber. And bring them in line.
The pump valve is also easy to change - a screw and two nuts. The distance between it and the intake hole is adjusted by simply tightening the screw. As already mentioned, the gap should lie between 0.6 - 0.8 mm.
Shock absorber stem check valve and piston are locked with locknuts. We take this seriously.
If this mount is unscrewed later from vibration, it can lead to serious damage - just one of the main reasons for the destruction of the case or the failure of rubber parts.

We collect carefully. We draw attention on pumps with an upper water intake to the coincidence of the holes in the casing and the shock absorber - for this we made marks before disassembling the pump. In appearance, both sides are the same and they are easy to confuse. If this happens, the pump will simply refuse to work.
The screws of the case, as was said, are pulled crosswise, gradually. And very tight. Nuts are necessarily new, with a plastic lock. Grover washers do not interfere at all. Remember that the pump vibrates during operation, which threaded connections do not like.
We check everything again. We measure the resistance of the yoke winding, blow the pump back and forth. If everything is fine, go to the test on a bucket of water. We lower the pump into the water, leave the hose pipe outside. Or we use for this purpose scraps of a short hose. And we see how water is pumping here. Everything is fine - good. Weakly - adjust the valve.
After recovery the pump sets into the well or into the well.
Conclusions and useful video on the topic
A small video prompt for repair and diagnostics that will help to make repairs:
Always remember safety! And therefore, even making sure the coils are intact and there is no short to the housing, we never hold the pump when checking for the housing! Always only on a dielectric spring suspension!
And we never use a power wire for such purposes. Security is never superfluous.
Have something to supplement, or have questions about troubleshooting pumping equipment? Please leave comments on the publication. The contact form is located in the lower block.
 Do-it-yourself water pump repair: an overview of the most popular failures
 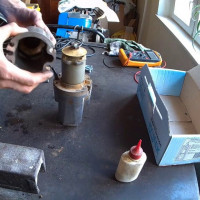 How to repair the Do-it-yourself Pump repair: repairing popular breakdowns
 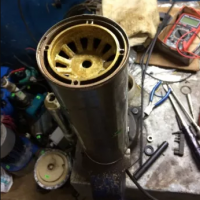 Do-it-yourself repair of the Aquarius pump: an overview of typical breakdowns and their elimination
 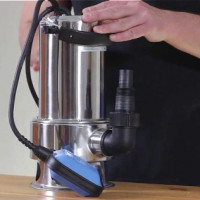 How to repair the drain pump yourself: an overview of frequent breakdowns
 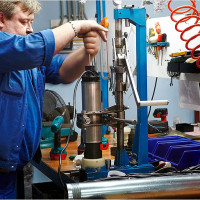 Repair the pump “Gnome”: an overview of popular breakdowns and how to fix them
 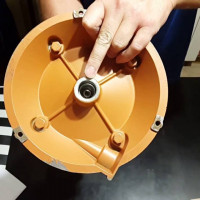 How to repair the Agidel pump: an overview of typical breakdowns and how to fix them
  How much does it cost to connect gas to a private house: the price of organizing gas supply
  The best washing machines with dryer: model rating and customer tips
  What is the color temperature of light and the nuances of choosing the temperature of the lamps to suit your needs
  Replacement of a geyser in an apartment: replacement paperwork + basic norms and requirements
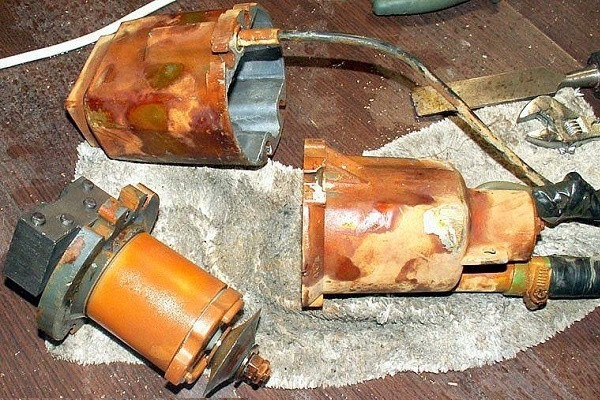
An excellent compact pump, how many he used it never really let down. As for me, its main disadvantage is that it vibrates a lot and agitates the water in the well so that in the end it becomes quite dirty. That is, it is not necessary to hope that he will get clean water, but for private needs a great thing. For all the time I had to disassemble it only once - to clean it.
In the country, we collect water from the well. There is an electric pump “Baby”. He worked uninterruptedly for almost five years, but now he has flunked. I thought that I would have to buy a new pump, but I decided to try to repair it myself. To my surprise, this was not so difficult. While it works fine. I hope it will last more than one year.
The pump has been running for almost 2 years. Now I stopped pumping - it is noisy, but there is no water. I try to lower it into the barrel - it works normally, in any well. What can be wrong?
And you yourself exactly read what you wrote?
“In the other half of the casing is a hydraulic chamber. It is located ̲с̲е̲р̲д̲е̲ч̲н̲и̲к on a rubber shock absorber. The movement of ̲с̲е̲р̲д̲е̲ч̲н̲и̲к̲а corrects the rubber membrane. On ̲с̲е̲р̲д̲е̲ч̲н̲и̲к̲е there is a piston. And to check the flow of pumped liquid, a non-return valve is placed on the intake pipe. ”
Judging by the drawing, we are talking about the stock.
Why show these videos. The master is there “all hands”, he has the pump valve and then “put upside down”, I'm not talking about the adjustment.