Do-it-yourself well without equipment: how to independently arrange a water source

To organize a source of your own drinking water on the site, you can invite a team and pay for services. But for a skilled craftsman, a do-it-yourself well without equipment is a perfectly feasible task.
The process will take a lot of time and require effort, but will save a lot of money. Where to start and what tools can come in handy for drilling? We will talk about all this in our article. We also consider the types of wells that can be built on their own without special equipment.
The content of the article:
Types of water intake
Three types of wells are distinguished depending on the depth of water:
- on limestone, it is often pressure head, i.e. artesian;
- on sand, it is pressureless or filter;
- Abyssinian well or needle-hole - a simplified type of well on the sand.
Artesian structures considered inaccessible for independent drilling. They lie deep, more than 40 meters, it is highly likely that you will have to go through fairly hard layers. One cannot do without a powerful drilling rig and equipment. Such wells give a lot of water, often they are ordered to fold for several sites at once.
Filter wells - the most common option. The aquifer lies in sandy horizons. The drilling depth will be about 20-40 meters. Such a construction usually provides enough water to cover the needs of the average family and provide a household.

Abyssinian wells - This is an option for those who are lucky with an aquifer that lies close to the day surface. A long pipe with a sharp tip is driven into the ground. Put on top pump or column.
Such a structure does not produce too much water, so sometimes two or three wells are made.
Site preparation and equipment
Before starting work, you need to choose:
- location and type of well;
- drilling method;
- casing diameter;
- pump equipment;
- tools for performing work.
It’s best to start by interviewing the closest neighbors who have already built the well. They can find out the approximate depth of water, soil features, etc. It does not hurt to ask if they have any drilling tools left to borrow.

The type of well will become apparent after such a conversation. Most likely, this will be the option “on the sand”. The place is determined by sanitary standards. It is necessary to make the water source closer to the house and as far as possible from the cesspool, septic tank, livestock buildings, etc. The Abyssinian well is sometimes put even in the basement of the house.
Casing diameter and pump equipment need to be selected at the same time. The most effective are submersible pumps. The difference between the diameter of the device and the walls of the casing must be at least 5-10 mm.
Tool and drilling methods
To select the soil from the mine intended for the arrangement of the well, use a screw drill or bastard. The drill is rotated, the chipper is thrown from top to bottom. Sometimes these methods alternate in order to pass rocks of different composition and properties.
Cohesive soils, which include loam and sandy loam, are drilled with a screw or a hollow pipe - a glass, incoherent - sands, gravel, pebbles pass through the bellow, because they cannot be removed with a screw.
The auger drill is rotated, deepening it by about half a meter, then removed to the surface, freed from the ground and again lowered into the shaft. The bailer is thrown down several times to the bottom so that its internal space is filled with soil, removed, cleaned, and then shock-rope drilling is continued.
So-called hydrodrilling can also be carried out with a bailer. The principle of operation is the same, but a jet of water under pressure is supplied to the face. It erodes the soil, and the bailer forms a cylindrical shaft under the casing installed at the same time as drilling. A mixture of water and soil is pumped out by a pump.

Water can also be used for auger drilling, when it is necessary to go through difficult sections. Water is poured into the mine, the soil becomes softer, it is easier to drill and remove. When drilling, there is a danger of introducing contamination into the well. This point needs to be considered when the time comes. flushing and buildup of the structure.
Use different types of drills, for example:
- coilespecially effective on clay soils;
- drill spoonsuitable for sand and clay;
- chiseluseful for hard layers.
You can buy a finished drill, garden or fishing, the main thing is that it be strong enough and match the size of the casing. Industrial products usually allow 40-50 mm holes.
If this is not enough, you can make the tool yourself. For this, parts of the steel disk are welded at a suitable angle to the steel bar. The edges of the disc should be sharpened. A spoon tool is made from rolled steel sheet or from a piece of pipe.

There are different types of bailers: with a ball valve, with a pressure valve and no valve at all. The latter are appropriate on dense layers.
The soil is stuffed inside the “glass” and does not fall out of it, so the valve is not needed here, the sharp edge is more relevant below.

Narrow cuts are made along such an instrument. It is convenient to insert a rod into them to free the cavity from viscous contents.
Tripod, winch, drill rods
Most often, a tripod is used for independent drilling operations. Such a structure can be bought or made from metal beams, wooden beams, etc.
It should be large enough so that two people can move freely under it, and strong enough to withstand the load of equipment with the destroyed rock stuffed into it.

At the upper point of the tripod, they put a block through which a cable is attached to the winch. Using such equipment will make it much easier to get equipment out of the mine to free it from the ground. It is better to use a winch with an electric motor.
Drill rods are attached to the drill and gradually build up. Use elements with a locking or threaded connection. It must be reliable so that the rods do not break when removing the soil to the surface.
A tripod is also needed for the auger; another guide design of casing is required so that the tool moves strictly vertically. To build up the rods and disassemble the drill string to extract the drill, a tripod or metal frame will also be required.
It is better to carry out the work together or three, it is more difficult to drill a well alone. To speed up the auger drilling process, some use electric drills with a capacity of 1 kW or more.
An interesting option may be the use of a small-sized drilling rig. Such a device is expensive, but you can rent it if you wish. We have detailed instructions on the website drilling rig manufacturing do it yourself.
Well Instructions
Consider how to build a pressure-free well and a gouge-needle, having only materials at hand.
Option # 1 - drilling a well “on sand”
To drill a well, perform the following basic operations:
- They dig a hole with a size of about a meter or a half.
- Set up a tripod.
- Fasten the winch.
- They put a drill and deepen it by about half a meter.
- Remove the tool and clean it from the ground.
- Drilling continues, gradually adding drill rods.
- If necessary, replace the drill with a chisel or chute.
- Work is carried out until the aquifer is discovered.
- Drilling is continued until a watertight layer appears.
- Perform well buildup by flushing it with a pump.
- Lower the pumping equipment, equip the tip.
At the first stage, they dig a spacious pit if it is supposed to arrange a caisson to equip the head. In other cases, you can simply drill a hole about a meter deep to set the direction of the structure. After that, you can continue to work with a drill and a chipper.
The auger is best rotated under load. They do this together: the first cranks the bar, holding it with an adjustable wrench, the second strikes with a sledgehammer on the bar. Markings should be applied to the drill rods, this will help to understand how much soil has already been passed when it is time to remove the tool to the surface.
When the soil becomes wet, you need to continue drilling in order to achieve a more dense waterproof layer. But the casing should not abut against it, if it sank too low, it must be raised so that the edge is approximately in the center of the aquifer.
In order for drilling to be effective, use the appropriate tool:
- for clay soils it is better to take a drill coil, a glass or a spoon tool is also suitable;
- on sands, it is preferable to use a bailer and a drill in the form of a spoon, work will go faster if supplemented with water;
- hard layers are broken with a chisel, flat or cross-shaped;
- on quicksand, a good solution is to use a bailer with a valve;
- it is convenient to break pebble formations with a chisel, and then remove it with a bailer; here, the use of drilling fluid may also be appropriate.
After the casing is installed, the filter column should be lowered down. You can buy this design or do it yourself. Perforation is applied to a piece of casing, and from above this part is covered with a filter mesh. The filter protects the water and the pump from sand.

The casing is placed at the same time as the penetration, regardless of the type of projectile the soil was drilled on. At the same time, the well is washed: a stream of water is fed inside and the slurry returned from the bottom is taken into a sump dug near the well.
Now spend well buildup, i.e. A large amount of water is pumped out of it until a clean stream is obtained. The procedure can be performed by the pump, having cleaned the bottom with the chipper before this.
Do not take a submersible model designed for clean water for swinging. You need to use equipment that can pump water with a large admixture of sand and clay particles.

An alternative is an inexpensive pump that is easy to repair, for example, "Kid" or The trickle. Sometimes it is necessary to use several pumps, because due to the increased load, the device can simply burn out. If there is no electricity in the area, you can use a hand pump.
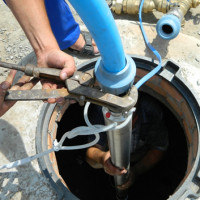
After that, it remains to lower down the pumping equipment, equip the head and connect the hose to the water supply.
Option # 2 - creating the Abyssinian well
The creation of such a structure is carried out in a fundamentally different way, there is no need to take out the soil. A narrow pipe, pre-equipped with a filter and a sharp tip, is simply driven into the ground until water appears. This pipe will become the casing.

You can buy a ready-made kit or make it yourself. On the first pipe in the drill string, perforation is made and this part is wound with wire or tightened with a net. Between the pipes following it and this filter, a check valve must be installed.
It is easy to make from a diaphragm and a steel ball. A cone should be welded to the bottom edge of the filter. Its diameter is made slightly larger than that of the pipe in order to protect the structure from damage during advancement in the soil.
The finished pipe is driven into the ground, gradually increasing its length with drill rods. They are screwed or welded. The connection must be very reliable. Of course, you can’t beat right on the top of the pipe, it will damage it.

Therefore, after the pipe with the needle is installed vertically, a sub-crib is attached to it. A grandmother is placed on this platform - a steel or concrete load with an opening for the pipe. At the top of the pipe you need to put a block. Two cables are passed through it, which are attached to the headstock.
Now you need to raise the headstock with the help of a winch and throw it down, repeating this operation, until the headroom mounted on the pipe reaches the ground level. After that, they attach the drill rod, rearrange the pit and block, and then again throw the headstock.
When water appears in the pipe, it means that the filter has sunk into the water-carrier, the work can be considered finished. The pipe is cut, put an electric or hand pump. You can leave the crib, it will come in handy when the Abyssinian well is clogged and you need to remove the needle from the ground for cleaning or repair.
We have a detailed instruction on the website that describes device technology well-needles.
Conclusions and useful video on the topic
Self-drilling by bailer:
Creating a well manually with a drill with rods:
How to make an Abyssinian well:
Creating a well yourself is difficult, but possible. Each case of drilling is individual, it is impossible to accurately predict how the structure will behave during work and during operation.
But subject to technology, you can provide the site with a source of water that will last several decades.
Do you have experience in hand drilling? Tell us what tools you used for this and how much time you spent? Write your recommendations, add a photo of the well in the block under this article.
If you are only thinking about the construction of the well and you still have questions after reading our material, ask our experts.
 Do-it-yourself water well setup: how to properly equip a water source
 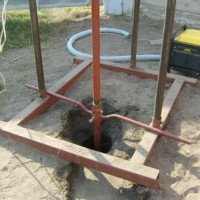 DIY water well: arrangement rules + analysis of 4 popular drilling methods
 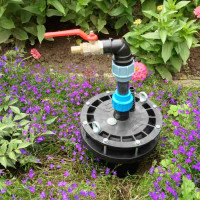 Do-it-yourself well in the country: a review of technology and tools for manual drilling
 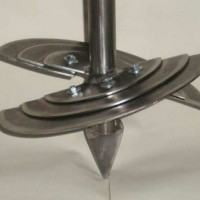 How to make a drill for a well with your own hands: the best homemade schemes
 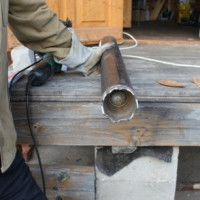 Well bumper: device, options and do-it-yourself manufacturing schemes
 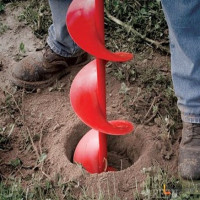 How to drill a well with your own hands: ways to budget independent drilling
  How much does it cost to connect gas to a private house: the price of organizing gas supply
  The best washing machines with dryer: model rating and customer tips
  What is the color temperature of light and the nuances of choosing the temperature of the lamps to suit your needs
  Replacement of a geyser in an apartment: replacement paperwork + basic norms and requirements
Hiring professionals for such a thing is indeed an expensive pleasure. They called me a price of $ 40 per meter. I looked at how much this is messing around, besides, I myself don’t know at all how to do it competently, that I decided to better save some money and, in fact, remove this headache from myself and entrust it to those who understand this better. I don’t even have an idea where to get such an instrument.
Tell me, please, how can I determine the type of potential well: artesian structure, filter well or Abyssinian well? After all, before starting work, you need to decide whether the sheepskin is worth a mint? The fact is that there are no neighbors near my house who could be consulted about the nature of the occurrence of water layers. What are the methods of low-cost intelligence?
The only adequate way of exploration, in my opinion, is drilling exploration workings. If you do this in a screw way, then you can do it inexpensively, or even independently. From scientific there is still seismic exploration using instruments. But I personally have not encountered it, and I cannot speak about its effectiveness. All other methods give a very approximate result and I do not recommend contacting them.
First of all, you need to conduct reconnaissance, there are several ways to do this. We have already been advised above to drill with a screw method. I recommend still considering geological exploration with radar monitoring. With this method, you do not need to drill anything, but only specialists with experience and the necessary equipment can do it.
You can also drill test pits using a small diameter hand drill. But the disadvantage of this method is that the depth of exploration is limited to 7-8 meters.
You can determine the type of construction for the well in advance, for example, if you need drinking water, then you definitely have to erect an artesian structure.If the aquifer is at a shallow depth, then the best option would be abyssinian well.
In general, you can conduct reconnaissance on the upper layers up to 8 meters on your own. Further to the specialists who will conduct exploration and voice the price list for the implementation of a full-fledged well.