Do-it-yourself well arrangement at the cottage: step-by-step instruction + advice from experienced craftsmen

You look inside the neighbor's well and wonder how such a thing can be done? In fact, any owner of a summer cottage can build this simple and useful hydraulic structure. The main thing is to want.
We will tell you how and in what order the arrangement of the well is carried out, tell you which method is more convenient and faster to carry out work. In the article we presented, the technology for constructing a mine water intake structure is described in detail. Tips are given, following which you can easily build an autonomous water intake.
The content of the article:
Well construction instructions
Any work begins with the acquisition of building materials and equipment. In this case, the list of building materials and tools is quite extensive. It’s better to prepare everything ahead of time, so that later you don’t have to go back and forth to the hardware store and get distracted from work.
And the following should be prepared:
- A shovel with a short handle that fits in the shaft.
- Scrap.
- Pump, preferably drainage modelcapable of pumping water with the inclusion of sand particles, in other words, slurry.
- A strong rope, preferably kapron, or a sling for hanging the pump, if the submersible version is used.
- Hose to pump of appropriate length - shaft depth plus cutoff distance from the work site.
- Buckets, preferably a couple.
- Lighting carrying extension.
- Normal carrying to reach the nearest outlet and allow you to power the same punch and pump.
- A tripod with a hoist, if the rings are installed after the pit has been dug up to the upper boundary of the aquifer.
- Auxiliary boards and timber, with the help of which it will be possible to move, raise, install rings, if a hoist with a tripod is not provided.
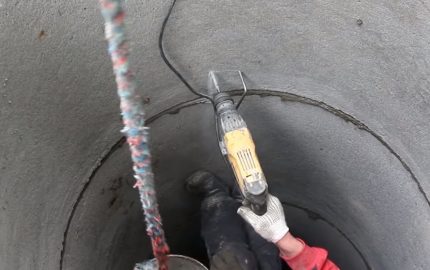
- Hammer drill.
- Staples or anchor bolts with metal plates.
- Hammer in case staples are selected.
- Mortar - ready-mixed or cement with sand.
If everything you need is cooked, proceed to the briefing on the direct arrangement of the well with your own hands.
Stage number 1 - marking and start of work
Initially, the pit should be slightly wider in diameter than the ring. We mark the circle of the desired diameter, and proceed to digging. At the first stage, the land may be solid; in some cases, scrap may be required. But then things will go much easier.

It will be unnecessary to say that the edges of the future well shaft should be strictly vertical to the horizon, and since the construction level in this case cannot be used, we will control the vertical along the construction plumb line. If it is not, you can make such a tool yourself from a weight and an ordinary rope.
Stage number 2 - digging a well mine
At this stage, you should immediately decide which method you will dig the well, open or closed. If the soil on the site consists of sand, sandy loam, flooded with gravel and crushed stone deposits, interspersed with sand aggregate, the well is digged in a closed way.
To avoid landslides and washings first reinforced concrete ring it is installed in a hole dug by its diameter at the initial stages of digging. The soil is removed by a shovel from under the ring and it sinks down due to its gravity.

If the soil is of dense composition, the walls of the mine do not collapse, since clays and loams prevail in the section, it is better to build a well in an open way. In this case, the shaft is deepened without installing rings in it until the worker performing the digging reaches the upper horizon of groundwater.
After this, the rings are lowered into the shaft, fastened together, and further deepening occurs according to the closed type method.
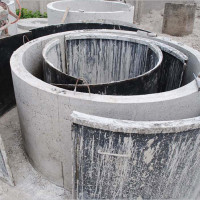
Stage 3 - installation of concrete rings
If the shaft was dug open, a tripod is mounted on top to lower the rings, in the center of which a hoist is fixed. Each ring is mounted strictly lock in lock. Before installing each subsequent link to the lower lock, a special solution is applied with the addition of plasticizers from cement of water-resistant grades.
When they are all set on top of each other, in the upper parts of the lower rings and in the lower parts of the upper holes, holes are drilled into which the stainless staples are driven with a hammer. Three brackets or strips with anchor bolts are enough to prevent the rings from coming off from each other as a result of heaving.

When constructing a well using the closed type method, each of the rings is placed on the subsequent one as it goes deeper. Smearing with mortar and stapling here is done as the concrete trunk builds up.
Stage 4 - Equipping a Filter
In order for the filter in the well not to be retracted, but to actually fulfill its function, it should consist of three layers:
- Lower - 25 cm of large quartz sand.
- Medium - 25 cm of small river pebbles.
- Upper - 25 cm of large river stone.
It’s clear that when rigging a well so powerful and efficient bottom filter, you’ll have to deepen it as low as possible, equipping it with a kind of sump, since only one filter will occupy an entire ring in your capacity.
Also, do not forget that the filter periodically (the best is once a year) will have to be serviced, that is, rinse or change stones. Otherwise, water quality will drop.
If the well is intended only for watering the garden and other household purposes, then you can do without a filter. And what is sump and how it looks well seen in the following diagram.

Stage No. 5 - clay castle and formwork
At the final stage, around the circumference of the well - at a distance of 3-5 meters from the rings of the mine, the upper layer of the earth rises and is covered with clay. This layer, later covered with sand and gravel, will be called clay castle. On top of a sand and gravel pillow, it would be desirable to make concrete blind area. Not necessarily the same area as the castle, but not less than 2-3 meters.
Everything is closed so that the upper edge of the sand-gravel cushion (sand 15-20 cm, gravel 15-20 cm) goes to the level of the upper layer of soddy soil, and the formwork (7-10 cm) rises above it by 5 cm.
A clay castle will protect the mine from reinforced concrete rings, which can be done with your own hands, from the plentiful supply of moisture to their outer edges. This will prevent excessive heaving and, thus, protect the structural elements from shifts and the penetration of dirt into the well shaft.

Formwork is needed in order to, in turn, protect the clay castle from leaching and enhance its protective properties. In the end, a well with a formwork in a circle just looks more aesthetically pleasing.
Stage number 6 - arrangement of the upper part
It is possible to insulate the formwork, as well as the upper ring of the well, from frost. It is especially recommended to do this in regions where winter is harsh and the top layer of the earth thoroughly freezes. In the role of insulation, polystyrene foam of solid grades is excellent, on which a crate is installed on top, and then plaster is applied.
Trying hard, you can make a real work of art from the top of the structure that not only diversifies, but also greatly embellishes your country landscape. Most often, the head is lined with stone, but with the help of a tree you can give it a delightful appearance.

To protect against debris caused by the wind, the head of the well must be closed with a tight lid. And in order to extend the service life of this cover, as well as the skewer and other equipment, a visor is made on top of the top.
Tips for Specialists
Choosing a place for digging a well in the country or personal suburban area is subject to a number of rules.
It is erected according to certain rules, and here are the main ones:
- The water source cannot be positioned closer than 8 meters from the outdoor toilet.
- If in the country the sewerage is arranged as an absorbing cesspool (septic tank without a bottom), and the well will be designed for drinking water, then the well shaft should be located at least 50 m from it.
- In the case of a sealed cesspool or if the water will be used exclusively for watering the garden, this distance can be reduced to 20 m.
- Also, the water source should not be located close to silo pits. The distance to them should also be at least 8 m.
It should be borne in mind that the greater the distance of your well mine from all kinds of structures polluting groundwater, the better.

Council number 1 - time for work
It is best to start work when the mirror of the aquifer is at the lowest possible level.And it decreases significantly either during periods of prolonged drought, or after a month after the first frosts hit.
Why in these periods? During these periods, water horizons are not fed by water - in summer due to insignificant precipitation, and in late autumn and winter because the freezing top layer does not let water through the earth.

Can dig a well and at normal times, but in this case at the last stage you may not be able to go deep enough into the aquifer.
If you plan to make a filter, and this is at least 60 cm, and have at least one ring water at a height of 80 cm, you will have to dig about one and a half meters below the upper groundwater threshold. And the easiest way to do this is in conditions where water does not stay constantly and at high speed.
But, if you are completely hoping for a good pump that can pull a slurry mixed with sand, then this is not a problem. You will have to tinker with slimming in both cases. And, of course, it is better if it will be in warm time.
Tip # 2 - groundwater search
Many could see how some specialists in the search for water go around the site with two frames. Where they intersect, there, supposedly, the aquifer passes close to the surface.
To this we want to note that any real hydrogeologist will tell you that:
- Water is everywhere and always, except, of course, those cases when you live on the side of a mountain. If the terrain is more or less even, then the groundwater belt lies, as a rule, at the same distance from the surface of the earth. If your site is hilly, in this case, it will be more acceptable to consider digging a mine in a lowland. You can save money for 1-2, or even 3 rings, depending on what elevation differences your country landscape has.
- Searches with the framework do not give anything at all. The effectiveness of this method by scientists has not been proven. Therefore, if you hire a homegrown specialist practicing this method, you should know that this specialist most likely hangs noodles on your ears. Another thing is that you will not prove it. As already mentioned, water is everywhere. And the fact that he made a mistake a couple of rings up or down, he will write off the costs of the method, which he will warn you about in advance.
- The best way to find out how far the water lies is to either ask a neighbor on whose site there is already a well, or ask local geologists, drillers and meteorologists. They have geotechnical maps, by which they will determine the depth of groundwater.
Well, when you have decided on the place, we go for the rings and for the necessary tools and equipment, if one is not available at your summer cottage.

Tip number 3 - the choice of rings
It all depends on what diameter your mine will have. If you want to have a wide well, you can take the rings wider. Of course, it’s longer to dig, but it’s more convenient to dig and use. You can properly turn around, use a shovel with a shank more authentically, etc.
If you are satisfied with a narrow design, you can stay on the rings of small diameter. In order to “feel the situation”, right at the company you can climb into one of the rings and try to turn around in it. In which it will be more convenient to work, take these.
The best option for a country well will be KS 10.9 tongue-and-groove made according to GOST 8020-90. Of these, installing a mine is a pleasure.

Tip number 4 - what to do with quicksand?
Quicksand is a layer of silty clay sand soaked in water. It resembles an outwardly dirty slurry, it is very difficult to get water from it: it is possible only as a result of prolonged settling. And then it will be too small, and therefore it makes no sense to extract water from a quicksand.
In general, the presence of quicksand in the context is an extremely rare geological situation. They are found only in glacial deposits, which, for example, are in the Leningrad region. However, if caught, it would be desirable to go deeper below this layer. Only in this case it will be possible to ensure a constant and quick filling of the mine with water.
The process of overcoming the quicksand is very laborious. Feet are constantly sucked in, and accumulating water and slurry create additional difficulties in work. But if you want the well to be full, you will have to do it.
Tip number 5 - do not delay work
It is advisable to carry out work on the arrangement of a well in the country as soon as possible. Tightening with work according to an open methodology will lead to a collapse of the walls of the pit.
And if in a situation with an open method, you can correct the situation by cleaning the pit and filling the crumbling edges with soil after installing the rings in the shaft, then in the second you may need to use a crane.
Upon completion of digging the well and filling the bottom filter, it is advisable to pump out the first water from it. Then you must take water sample for analysisto pass it for laboratory tests. Only then can it be decided whether it can be used for technical or drinking purposes.
Conclusions and useful video on the topic
Those who are interested in listening to specialist advice in a slightly expanded and different way can watch the following video:
Work on the arrangement of a well mine is not as complicated as time-consuming. And it is not always necessary to dig the earth's surface, delving into it by a dozen meters.
More often, the aquifer passes at a depth of 4 to 7 meters. Changing alternately, two strong guys can dig such a shaft in two days. The main thing is desire and tool!
Tell us about how you dug and built a well in a summer cottage with your own hands. Share the technological subtleties that visitors to the site can use. Leave comments, post photos and ask questions in the block below.
 DIY rings for a well: step-by-step technology for manufacturing reinforced concrete rings
 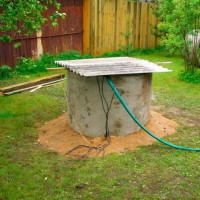 A do-it-yourself well in a country house: a guide for arranging a typical well from rings
  How to make water supply in the country from the well with your own hands: we carry water into the house
 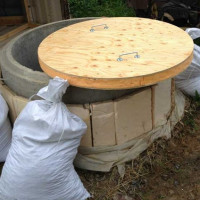 Do-it-yourself well warming for the winter: an overview of the best materials and methods of warming
  Digging a well with your own hands: types of well structures + an overview of the best digging technologies
 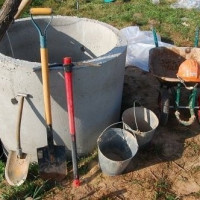 Do-it-yourself deepening of the well: a review of the best methods to get to the aquifer
  How much does it cost to connect gas to a private house: the price of organizing gas supply
  The best washing machines with dryer: model rating and customer tips
  What is the color temperature of light and the nuances of choosing the temperature of the lamps to suit your needs
  Replacement of a geyser in an apartment: replacement paperwork + basic norms and requirements
We started work in the winter, and even if the groundwater level was minimal, we ran into difficulties. It is difficult to dig frozen ground, so they heated it with a gas cylinder, and the layer of gravel was completely crushed with a jackhammer. I had to rent it, since the company was found in the city. We had to plow for three days almost without stopping. And this despite the fact that water is only at a depth of 5 meters. So digging wells at any time of the year is complicated.
Hello. Let me supplement your article with practical advice. Firstly, I would advise you to treat the outer side of the rings with bitumen before installing, which will prevent surface water from entering the well through microcracks.And secondly, instead of staples to hold the rings from shifting, you can use a design in the form of a letter - H welded from plates. Just put a pair of these on top of the bottom ring, and put the top in the groove. The connection is secure and there is no need for a hammer drill.