How to conduct water in a private house: arrangement of a source of water supply + water supply to the house

Asking the question of how to bring water to a private house, any landlord has the ultimate goal of being able to gain independence from centralized networks and other common water distribution systems outside the home, by equipping an autonomous source.
But often, the device of such a water intake is, and the only possible option for providing homeownership water. One of the ways to equip an autonomous water supply source and supply water from it to the house will be described below.
The content of the article:
Preparing for water production
Autonomous ways of using water resources are of priority importance in the design and practical implementation of the water supply of a private house. When choosing the most optimal solution for arranging a source of water intake, it is necessary to take into account the main condition - the presence of an aquifer and its depth on the site, as well as the purposes for which the produced water will be used.
Therefore, the first and important step in arranging any type of water source will be correct determination of the place of water intake. For this, one should take into account the absence in the immediate vicinity of the planned source of trees whose roots will interfere with the work or will threaten the condition of water intake in the future, power lines, own or neighboring outbuildings.

An equally important condition affecting the choice of the method of extracting and transporting water, as well as the location of the source in the home ownership area, is the distance from the surface of the earth to the aquifers.
Well Installation Instructions
The well is one of the oldest water intake facilities, but has not lost its relevance to date.
Option c conventional well device in a private house has several advantages, the main of which are:
- simplicity of execution;
- relatively low costs for materials and work;
- lack of need for registration of permits for the use of a water supply source.
Well water is extracted from the upper horizons of the soil.
Step 1 - preparatory work
Before constructing a foundation pit for a well, one should determine the method of strengthening its walls. More often it’s reinforced concrete rings, but also wooden log cabins are used, less often - brick or natural stone.

To determine the required number of rings, the depth of the shaft, the density of the soil and its composition, if possible, test drilling is carried out. But a reliable result can only be obtained by digging a mine.
Step 2 - Digging a Pit
Having decided on the location of the well and the material for the walls, the earth is sampled. Though trenching It is physically hard work, but it is with this method, in contrast to the mechanized one, that the wall density is maintained much better and the necessary shaft depth is achieved.

Subject to safety precautions, a ring is laid in the pit, after which four small digs are arranged under it, in which reliable wooden or brick supports are laid under the ring. When laying the first ring, it is necessary to set its exact verticality. For this, a level or plumb line is used.
Step 3 - mounting rings
After the ring is fixed in place, you can continue to work on the excavation under it. Digging is done in such a way that the ring can freely fall under its own weight after removing the supports.

A new ring is laid on top of the shaft that has plunged into the mine and a deepening of the pit continues according to a similar scheme, with a gradual build-up of the structure. To transport the ring to the pit and lay it on the already buried part of the well, you can use a trolley whose platform is higher than the part of the ring embedded in the shaft that protrudes above the ground.
Structural joints are carefully sealed with tarred hemp and lubricated with sealant. Additionally, joints are sealed with concrete mortar.
If the well will be used for drinking water, then it is necessary to go through the high water layer of the soil and go deep to the second or third aquifer.
The excavation is carried out before the abundant flow of water into the mine, after which work in the pit is stopped for about a day. If the water in the well is raised by more than 1 m during this period, further deepening can be stopped.

Step 4 - installing the bottom filter
Having reached the aquifer, the need for a device is determined bottom filter.
A filter is required for the following types of well bottom:
- soft clay and eroded, which is why the water in the bottom of the well is cloudy;
- sandy - water slowly seeps into the mine;
- at the bottom of the well, in the form of muddy streams of sand extremely saturated with groundwater.
There are many materials for arranging a bottom filter.

To achieve a greater effect, a three-layer, 30 cm each layer filtration is arranged. Washed quartz sand acts as the first layer, river pebbles are laid in the second layer, and large stones are poured on top.
To protect it from floaters, a bottom filter shield is built at the bottom of the well, shot down from boards with holes with a diameter of 1 cm. The shield is wrapped with geotextile, pressed to the bottom with a layer of stones and covered with a layer of small pebbles - 10-15 cm.
Step 5 - arrangement of the aerial part
Further arrangement of the well consists in filling up the gap between the walls of the shaft and the rings with crushed stone or simply soil, as well as installing a clay castle. This ensures that the well is protected from rainwater and other domestic drains.

The built-in waterproof lock can be lined with brick in one row, tiled or poured onto a concrete blind area, raising it slightly higher above ground level.
Work is being completed with the equipment of the aboveground part of the well. It all depends on the imagination and financial capabilities of the owner, but in any case, the well must be protected from rain, snow and dirt. In addition to the usual or decorative roof, it is necessary to build a cover that closes the very hole of the well itself, and it is better to lock it.
Organization of water supply to the house
An ordinary well can also be used as a source of water in the permanent water supply system of a private house.
Therefore, if the grandfather’s way of lifting water from the well - with buckets, delivering it to the house on the yoke, does not suit the owner of the household, and the water supply is used in the winter, then it is not worth rushing to fill in the well shaft. The reason is that access will be needed to get the water pipe into the well in its deepened part.
The water supply from the well to the house is carried out according to the following algorithm.
Stage №1 - preparation of tools and materials
At the initial stage, it is necessary to decide on the method of automatic transportation of water to the house, outbuildings or for irrigation, as well as which pump will be used for this — submersible or superficial.

The power of the pump is chosen so that the water pressure in any part of the pipeline is within 1.5 atmospheres, and the performance exceeds the maximum water flow rate by 25%. In addition, the pump should be linked to the debit of the source, to prevent air from entering the unit after all the water from the well has been exhausted.
If the water level in the well does not exceed 7 - 10 m, then the best solution would be to equip a pumping station with a surface pump.

When choosing pipes, it should be borne in mind that the modern method of laying a water supply system involves the use of pipe products from metal plastic. The most popular are pipes with a diameter of 32 mm.
Well, of course, you need to calculate and purchase the necessary set of fittings:
- fitting;
- tees;
- bends;
- adapters.
The most simplifying process for working with pipes are compression fittings. Their use does not require additional and expensive welding equipment.
Stage 2 - arrangement of a trench for pipes
The practical part of arranging the transportation of water to the house begins with digging a trench for laying water pipes.
When choosing the depth of the communications tab, the following factors are taken into account:
- the need for a device at the bottom of the trench pillows of sand and gravel mix with a thickness of at least 10 cm;
- soil freezing depth.
The degree of freezing of the soil in a particular area can be suggested by specialists from the nearest construction organization.

It is recommended to dig a trench to a depth of 30-50 cm below the freezing layer and with a slight slope from the well, about 10 cm per 1 meter of pipe length.
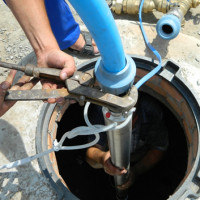
Stage 3 - connection to a water supply source
An important stage is the work on the device passage of the pipe through the wall of the well.
Mandatory conditions that must be observed in this case are:
- The hole for the input of the pipe is equipped at the same level at which water utilities will be laid.
- The input node should not be placed at the junction of the rings.
A hole is drilled in a concrete ring, usually under an inch bend.

The option of connecting to the tee internal fitting is also recommended for implementation, on which, in addition to the vertical intake pipe, a drain tap can be installed on the horizontal outlet. This will be useful if the house is not used for living in the winter, and the water from the system will need to be drained.
The hole in the concrete ring of the well into which the through-flow is installed is carefully sealed with a special waterproofing mastic, which includes reinforcing fibers.
On the same composition, applied to the inner and outer walls of the well, wide rubber gaskets are planted on both sides, after which the squeeze is clamped with nuts and washers.
Stage 4 - installation of the pipeline
After excavation and equipping the well, you can backfill and ram the remaining gap between the walls of the shaft and the outer walls of the well. Perform waterproofing and proceed directly to the installation of the water supply.
Work begins with the preparation of the intake pipe section. To calculate its length, the fact that the water should be taken from the middle part of the water level in the well is taken into account.

And in order to prevent the penetration of large suspensions into the pipes and pumping station, it will not be superfluous to install a filter on the intake pipe. Ready-made corrugated intake pipes, already equipped with a check valve, are on sale.
Having equipped the inside of the well, you can begin laying water pipes in the prepared trench - from the well to the house. It should be borne in mind that a prudent owner will not save on additional materials, the use of which will be able to protect in the future from more costly troubles.
Therefore, it is recommended not just to fill the pipeline with earth, but to carry out some insurance measures:
- mechanical protection of pipes;
- pipeline insulation;
- reservation of communications.
To protect the pipe from soil pressure and other influences, inexpensive technological polyethylene or corrugated pipes can be used.
On sale there are both ordinary corrugated pipes and pipes with insulation, which allows you to comprehensively solve the issue of protection and insulation.

Given the relatively low cost of plastic pipes, in order to not have to perform labor-intensive work to open the entire trench, in search of a faulty section and repairing the main, it is recommended to lay a water pipe next to the main and backup ones.
Stage number 5 - final work
The final stage of the water supply to the house from the well is the equipment of the pumping station. It allows you to save the resource of work of such expensive equipment as a pump. Using maximum power when pumping water into accumulator, the pump starts to operate in an economical mode, squeezing the required amount of fluid into the system.

At the pump inlet, a non-return valve is mounted to protect it from flooding the house from the main pipeline in case of system malfunctions.
To control the pressure of the water supply system and automatically, if necessary, turn it off and on, the pump is equipped with an electric contact pressure gauge.
The hydraulic accumulator is installed no lower than 1.5-2 m from the floor level, it is better in the attic, in order to ensure gravity flow of water during a power outage.
Given the expensive equipment used, installation and connection of the pumping station, without special skills, it is advisable to entrust to professionals.
Recommendations for work
It should not be ignored sections of the water supply in the places of their exit to the surface, the entrances to the basement of the house or unheated basement. These areas are subject to enhanced thermal insulation or their electric heating is equipped.

As insulation, a water pipe can be laid in a sleeve from a sewer pipe with damping polyethylene insulation.
For the convenience of a possible replacement of the pipe, in places of passage through the base or ceiling, it is recommended to wind it through a sleeve from a pipe of a larger diameter.
Conclusions and useful video on the topic
Video about the technology of laying the rings when installing the well:
Useful tips for supplying water from a well to a house, taking into account the use of water supply in winter:
A variant of the device of an autonomous water supply source in your home ownership, the instruction on which is given above, is the most affordable for implementation.
Step-by-step mining tips water and bringing her into the house from the well will avoid undesirable errors, the correction of which can result in high costs.
If you yourself had to deal with the arrangement of water supply on the site, please share your experience with visitors to our site. Perhaps there are nuances to which you need to pay attention? Leave your comments in the contact block located under the article.
 Do-it-yourself water well setup: how to properly equip a water source
  How to find water for a well: an overview of the most effective ways to find water on a site
 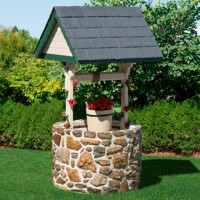 How much does it cost to dig a well under water: a list of necessary works and their prices
 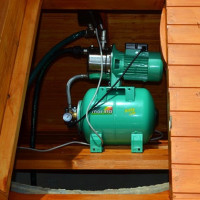 How to make water supply in the country from the well with your own hands: we carry water into the house
 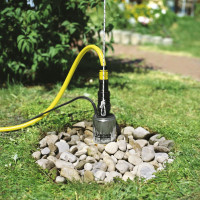 Installation of the pump in the well: how to properly install the pumping equipment
  How much does it cost to connect gas to a private house: the price of organizing gas supply
  The best washing machines with dryer: model rating and customer tips
  What is the color temperature of light and the nuances of choosing the temperature of the lamps to suit your needs
  Replacement of a geyser in an apartment: replacement paperwork + basic norms and requirements
We have a well in the country at the site, but there is also a water supply system that goes from the SNT water pump. The hose is connected to the column (or I don’t know what it is called correctly). It is convenient to water the garden, but more and more often the idea is that it would be nice to bring water into the house - it’s really annoying to wash the dishes in the rain after dinner, or just when it’s cold. I’m thinking, but this same water supply, which we have with a hose, can be brought into the house? Or let it remain better for watering the garden, but let it into the house from the well as described here?
The HDPE pipe does not need protection when laying in the ground. But putting on an insulating shell does not hurt. We have a depth of trenches of 1.5 m. The pumping station was installed in a concrete underground bunker with a depth of 2 m. Why do not put the accumulator in the attic, I do not understand. Firstly, in this case the attic should be heated so as not to defrost the equipment, and secondly, the accumulator is already under pressure. And here a power outage. As long as there is pressure in the pear, there will be water in the house.
Hello! Tell me where to find a person who can carry out these works?