How to drill a well with your own hands: ways to budget independent drilling

Have you decided to build a well on your own site to provide the house and family with enough clean water? However, you were shocked by the amount that it will cost to drill? Agree that this event, although quite expensive, is absolutely necessary.
The high cost naturally makes us look for an alternative to the services of drillers. We will tell you how to drill a well with your own hands. We will help you deal with the specifics of driving and arranging a water source - this is a feasible task for those who are not afraid of hard work.
The article discusses different methods of well construction. After reviewing them, you will understand whether you can perform all the necessary operations. For better assimilation of the above information, the article is equipped with step-by-step photos and videos, which record the process of drilling and manufacturing of drilling tools at home.
The content of the article:
Types of water intakes and soils
Before starting drilling operations, one should study the soil composition at the site in order to at least approximately imagine its future well.
Depending on the characteristics of the aquifer, three types of wells are distinguished:
- Abyssinian well;
- filter well;
- artesian well.
The Abyssinian well (or needle-hole) can be built almost everywhere. They pierce it where the aquifer lies relatively close to the surface and is confined to the sands.
Drilling technology is used for its drilling, which is not suitable for the construction of wells of other types. All work can usually be completed within one business day.

But the flow rate of such wells is small.To provide the house and the plot with sufficient water, sometimes it makes sense to make two such wells on the site. The compact size of the equipment allows you to build such a well right in the basement without any problems.
Filter wells, which are also called “sand” wells, are created on soils where the aquifer lies relatively shallow - up to 35 meters.
Usually these are sandy soils that lend themselves well to drilling. The depth of the filter well usually varies between 20-30 meters.

Work in good alignment will take two to three days. Filter well needs good maintenance, since the constant presence of particles of sand and silt in the water can cause siltation or sanding.
The typical life of such a well can be 10-20 years. The term may be longer or shorter depending on the quality of the well drilling and its further maintenance.
Artesian wells, they are also “limestone” wells, are the most reliable, since the aquifer is confined to bedrock. Water contains numerous cracks of rock.
The siltation of such a well is usually not threatened, and the flow rate can reach about 100 cubic meters / h. But the depth to be drilled, usually turns out to be more than solid - from 20 to 120 meters.
Of course, drilling such wells is more difficult, and it will take much more time and materials to complete the work. A professional team can cope with the work of 5-10 days. But if we drill do-it-yourself well, It may take several weeks, and even a month or two.
But the efforts are worth it, because artesian wells can last half a century, if not more, without problems. And the flow rate of such a well allows supplying water not only to one house, but also to a small village. Only for the device of such a development manual drilling methods are not suitable.
Physico-mechanical properties of soils are also of great importance when choosing a drilling method.
In the course of work, you may need to go through a variety of layers, for example:
- wet sandwhich lends itself to drilling in almost any way is relatively easy;
- water saturated sand, which can be removed from the trunk only with the help of the chipper;
- coarse rocks (gravel and pebble deposits with sand and clay aggregates) that are drilled with a bailer or a glass, depending on the aggregate;
- quicksand, which is a fine sand, supersaturated with water, you can only scoop it out with a bailer;
- loam, i.e. sand with abundant clay inclusions, plastic, well amenable to drilling with a screw or core glass;
- clay, plastic rockwhich auger or glass can handle.
How do you know which soils are below the surface, and at what depth is the aquifer? Of course, you can order geological studies of the soil, but this procedure is not free.
Almost everyone chooses a simpler and cheaper option - interviewing neighbors who have already drilled a well or built a well. The water level in your future water source will be at approximately the same depth.
Drilling a new well at a short distance from an existing structure may not follow exactly the same scenario, but it will most likely be very similar.
Simple Well Drilling Methods
Professional drillers have the equipment and tools to drill quite deep well in just a couple of days. But an amateur craftsman usually has neither such tools, nor skills to work with them. However, there are drilling methods that do not require this. The most commonly used auger drilling or shock-rope method.
Method # 1 - auger drilling
As the name implies, this method of drilling uses a screw or drill. The device is a rod, to the end of which is attached a working tool. This drilling method also uses a chisel to break up boulders, if necessary. The design of the screw resembles a screw, the diameter of which may be different.
It is literally screwed into the ground, and the rotor blades help to remove the cuttings from the trunk.

Drilling is carried out as follows:
- Rotating the drill rod, a vertical recess is made in the soil.
- As the well deepens, the drill with loosened soil is periodically raised to the surface.
- As the shaft lengthens, the bar increases, adding new parts to it.
- To build the rod use a reliable threaded connection or clamps.
- Well walls are immediately protected by casing.
- Drill clean and continue to work.
- Drill until an aquifer is reached.
- The aquifer is recommended to go all the way and go deeper into the underlying soil layer by about 0.5 m.
- The drill is removed from the well.
- Using a drill rod, a filter is lowered into the casing.
- The casing is raised so that its lower edge is approximately in the center of the aquifer, and does not rest against the ground.
After that, the actual drilling can be considered completed. The well should be pumped, lowered into the pump, equip the head, etc.
It is believed that only a relatively shallow borehole can be drilled with a screw - about 20-30 m deep. However, much depends on the state of the soil. For drilling loose sand and coarse deposits, it is recommended to use a bailer.
When auger drilling, you can use a drilling rig that holds the equipment in the correct position. To raise the drill up, you can use the motor. If the so-called “wet” drilling is performed, a place should be provided for wet soil removed from the well, water sedimentation, etc.

When choosing auger drilling, it should be remembered that the presence of water in the wellbore has a destructive effect on its walls.
Sometimes it is possible to meet recommendations to perform drilling first, and only then proceed with the installation of casing pipes. With auger drilling, as well as with any other, it is more reliable to set the casing immediately as it goes deeper.
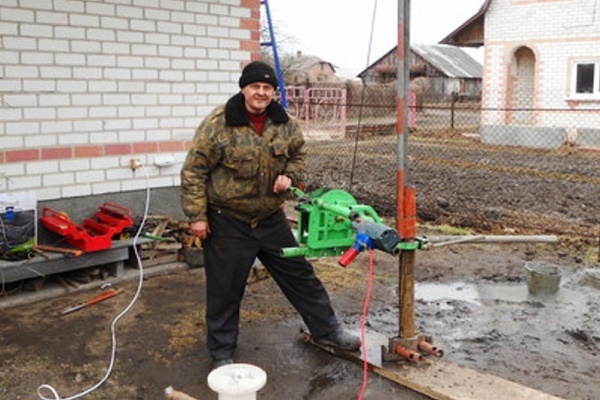
Method # 2 - rotary drilling
Speaking about rotational drilling methods (namely, the screw method refers to them), it is worth mentioning drilling using a rotor.This method is most often used by drillers for sinking in rock formations. For its implementation using a special drilling rig with a rotor.
Drilling is carried out using the same drill, but it is not rotated manually, but with the help of a motor. The rotor transfers the moving moment to the drill rod, i.e. and on a shell located deep in the ground.
The soil is destroyed, the tool goes deep into the rock. To remove it, water is injected into the well under pressure, which washes out small fragments of soil, or scoops out everything with a bailer.

The rotary method is not very suitable for independent drilling, since the equipment for it cannot be manufactured in a couple of hours “on the knee”. It is necessary to buy, rent or borrow a special drilling rig with a motor. By the way, such devices work not only on electricity, there are gas generation models.
In addition to the installation, equipment for intensive flushing of the well and / or a powerful compressor for purging it are necessary. Finally, skills are needed with such devices.
The drill should rotate almost continuously, and the emerging nuances, such as its sticking in the rock, should be solved skillfully and promptly. It is usually easier for a novice master to work with a home-made drill or a chipper.

Rotary drilling still has a number of indisputable advantages - this is the fastest method of drilling, and almost any type of soil is usually amenable to it. However, with this method of drilling, when water is almost always present in the mine, it is especially important to immediately begin installing the casing to prevent collapse of the walls.
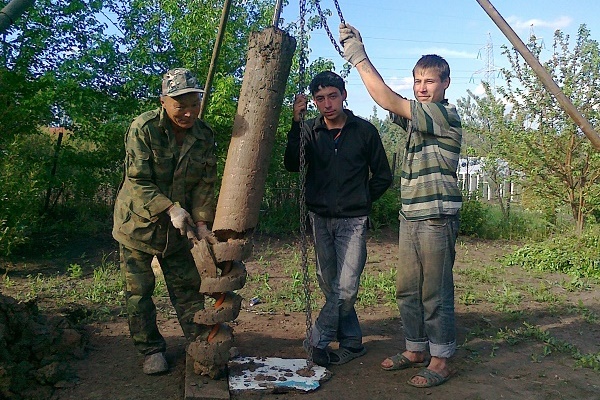
Method # 3 - drilling with a bailer (shock-rope method)
The shock-rope method or borehole drilling differs significantly from screw and rotary drilling, since in this case nothing needs to be rotated.
Bailer represents a long and narrow length of pipe with a valve and a pointed lower edge. Shock-rope drilling is performed according to the following scheme:
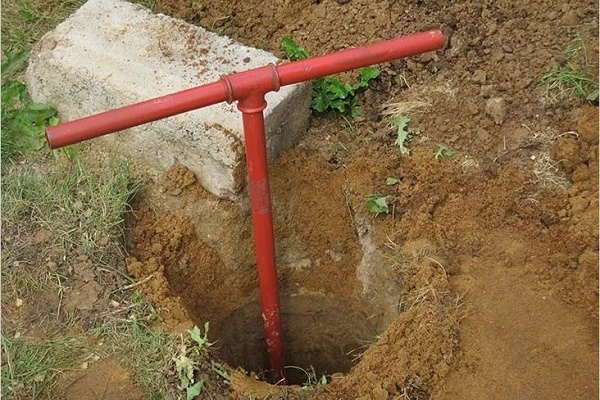
- A hole is made in the ground using a garden drill (it is easier to get started).
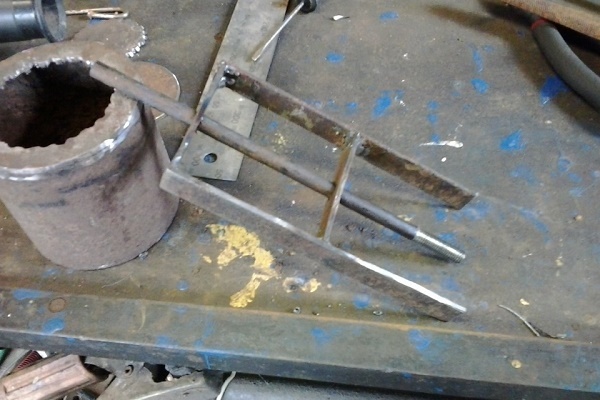
- A tripod with a block is mounted above this hole.
- A cable is placed on the unit to which the bellow is suspended.
- The bouncer is dropped into the shaft from a height of about 1.5-2 meters above the ground.
- Hitting the ground, the sharp edge of the flap loosens the rock, which is then captured by the valve of the device.
- The valve prevents the spilling of soil back into the shaft.
- Impacts are repeated several times so that as much soil as possible gets into the bailer.
- Then the bellow is removed from the mine and cleaned of soil.
- The operation is repeated until the aquifer appears, after which it is recommended to continue drilling and go deeper into the next layer.
- As the trunk deepens, the casing is lowered into it, gradually increasing it.
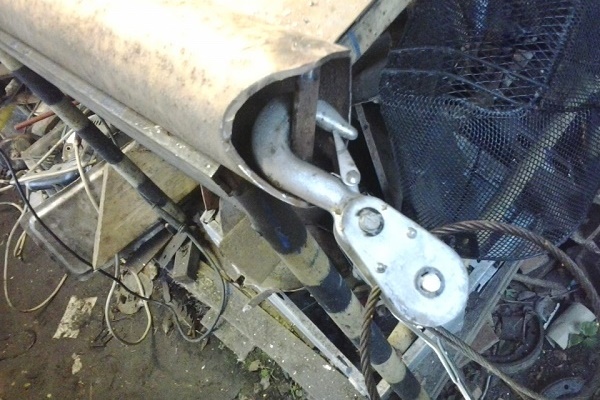
To remove the bollard filled with heavy soil it was easier, the cable is connected to a winch equipped with an electric motor. Rinsing with water during shock-rope drilling of a well is usually not used.
She recommends only in individual cases, for example, to expedite the passage of quicksand. This provides a sufficiently high strength of the walls of the well, i.e. better drilling.

The lack of water in the bottom also allows you to accurately diagnose getting into the aquifer. During wet drilling, inexperienced craftsmen sometimes passed it and continued to deepen the well without any need.
Shock-rope drilling allows you to create the so-called filterless wells.To do this, under the casing in the sand, a cavity is washed, which serves as a sump for water. Then the casing is raised slightly.
With this method of drilling, not only the bailer is used, but also the so-called driven glass. This is the same narrow pipe with a sharp lower edge, designed for loosening and excavating.
Unlike the chipper, the hammer glass is not provided with a valve, since this tool is effective in the passage of viscous plastic rocks, mainly loams.
A glass falling into the bottom is clogged with cohesive rock (loam, sandy loam), which is naturally retained inside. Long narrow slots are made in the walls of the glass through which it is cleaned from the ground, for example, using a piece of reinforcement, etc.
At shock drilling You can effectively use both the bailer and the glass, working with them when passing through different layers of soil. Shock-rope drilling is a simple, ancient and quite reliable method. However, it is deservedly considered quite laborious and takes a lot of time.
Independent drilling of a deep well borehole can take several weeks or even a couple of months. But in this way, you can create a well of solid depth - more than 40 meters. Some sources claim that the 100-meter structures of the bounder are quite capable.
If possible, you can combine different drilling methods to speed up work and increase their efficiency. For example, to pass a layer of loam, you can use a screw auger, and a quicksand is better to pass with the help of a bailer.
Then again, you can return to the use of drill. True, combined drilling requires more tools, which is not always possible.
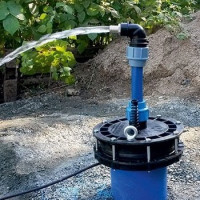
Method # 4 - drilling a needle-well
In an area with an aquifer close to the surface, water can be obtained almost a couple of hours after the start of work.
To drill the Abyssinian well, you must:
- Drill a long hole in the ground with a diameter of 5-8 cm in such a way as to reach a quicksand.
- Insert a narrow casing into the hole, to the lower end of which a sharp tip and a filter are attached.
- Drive the pipe into the ground before reaching the aquifer.
- Grow the pipe as needed.
Primary drilling is carried out by a special long and narrow auger, the length of which is gradually increasing. After water appears in the pipe, drilling can be considered completed. Since the depth of the Abyssinian wells is small, they usually use not submersible, but surface pumps.

The hose is not lowered into such a well, its role is played by the narrow pipe itself. The pump is installed directly on top of the Abyssinian well.
The casing pipe, which at the same time is the working shaft, is extended in segments of 1-3 meters, and threaded joints are carefully sealed with the help of a winder and silicone sealant. The compact size allows you to arrange such a well, even in the basement of a private house, so as not to take up space on the site.

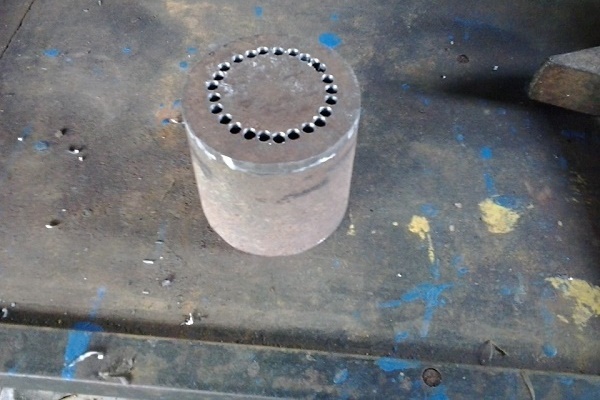
To make a needle well filter, a series of holes with a diameter of about 10 mm are made on the bottom of the pipe. The perforated area outside is covered with a layer of a special metal grid of galunny weaving. Such a filter reliably prevents fine sand from entering the well.
Figuring out how to drill yourself abyssinian well or a well-needle, close attention should be paid to the method of driving a string of narrow casing pipes. This operation can be performed using a bar or headstock.As a rod, a long metal rod is used, which is gradually increased as it lowers along with the casing.
The impact of the rod during operation falls on the tip. At the same time, pipe connections also experience additional load and can be deformed. Sometimes, with strong impacts, the coupling joint can simply break in the process of clogging, and this is unacceptable. The headstock is a load with a hole.
A special head is put on the upper end of the casing, on which they strike, in order to hammer the pipe to the desired depth. With this method of clogging, the load is distributed more evenly, but the integrity of the connections is still at risk. Therefore, only high-quality materials should be used for drilling the Abyssinian well.
In this case, only a threaded joint that is aligned with the center of the pipe is appropriate. Correctly performing such a thread is possible only on a lathe. A broken pipe will cause the master a lot of trouble, because it is almost impossible to pull out a piece of the column stuck in the ground.
Work will have to start anew, and costs will increase markedly. But if for some reason it was not possible to drill the Abyssinian well, almost all materials can be reused.
Drilling tool manufacturing
As mentioned earlier, drilling equipment can be made independently, borrowed from friends, or purchased industrial products.
Sometimes a rig can be rented. However, the goal of self-drilling is usually to minimize costs. The easiest way to drill cheap is to do tools from improvised materials.

Option # 1 - spiral and spoon drill
Manual drilling can be performed with a spiral or spoon drill. To make a spiral model, they take a thick pointed rod to which the knives are welded. They can be made from a steel disk, cut in half. The edge of the disk is sharpened, and then the knives are welded to the base at a distance of about 200 mm from its edge.

Knives should be located at an angle to the horizontal. The optimal angle is about 20 degrees. Both knives are opposite each other. Of course, the diameter of the drill should not exceed the diameter of the casing. A disc with a diameter of about 100 mm is usually suitable. The knives of the finished drill should be sharpened sharply, this will facilitate and accelerate drilling.
Another version of the spiral drill can be made from a rod and a strip of tool steel. The width of the strip can vary between 100-150 mm.
Steel should be heated and rolled into a spiral, hardened, and then welded to the base. The distance between the turns of the spiral should be equal to the width of the strip from which it is made. The edge of the spiral is carefully honed. It is worth noting that at home it is not easy to make such a drill.

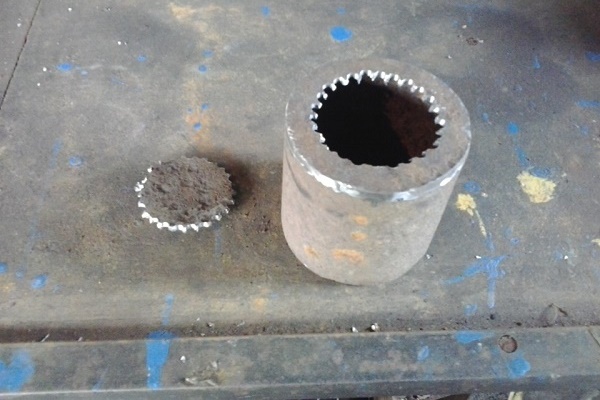
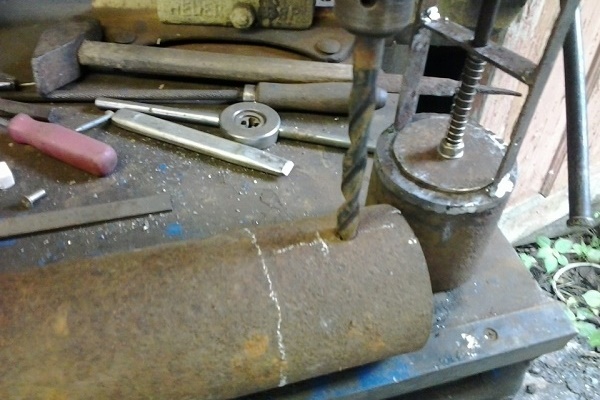
To make a spoon drill, you will need a metal cylinder. In the conditions of self-production, it is easiest to use a pipe of a suitable diameter, for example, a 108 mm steel pipe.
The length of the product should be about 70 cm, with a longer device it will work hard. A long and narrow slot, vertical or spiral, should be made on this case.

Two spoon-shaped knives are mounted in the lower part of the body, the cutting edge of which is sharpened. As a result, the soil is destroyed by both horizontal and vertical edges of the drill.
Loosened rock enters the drill cavity. Then it is removed and cleaned through the slot. In addition to the knives in the lower part of the drill, a drill is welded along the device axis. The diameter of the hole made by such a drill will be slightly larger than the device itself.
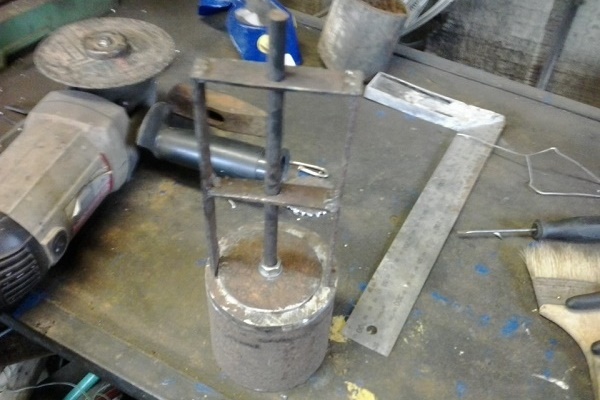
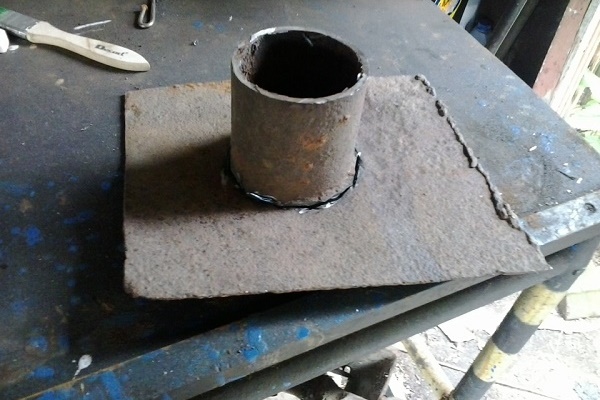
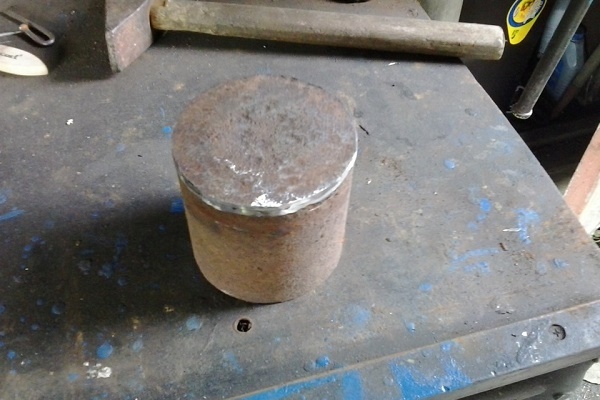
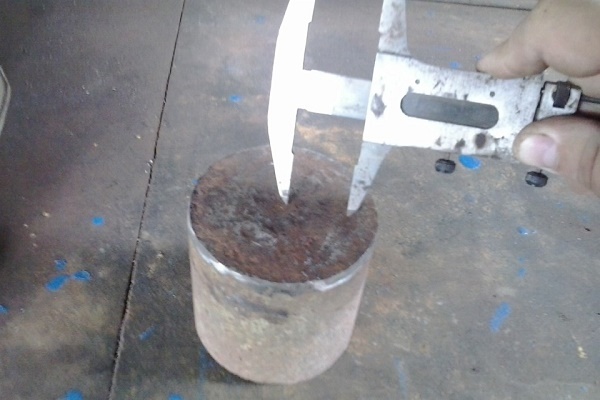
Option # 2 - bailer and glass
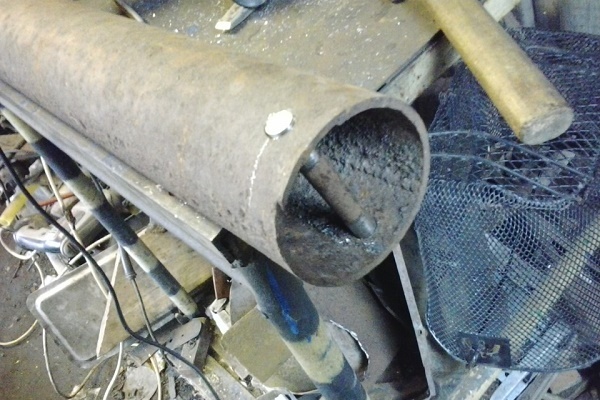
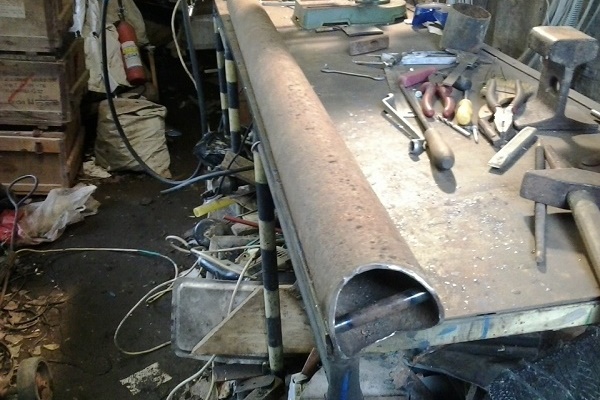
To make the bailer, it is easiest to also take a metal pipe of suitable diameter. The wall thickness of the pipe can reach 10 mm, and the length is usually 2-3 meters. This makes the tool heavy enough so that when it hits the ground, it is effectively loosened.
A shoe with a flap valve is attached to the bottom of the flap. The valve looks like a round plate that tightly closes the lower section of the pipe and is pressed by a sufficiently powerful spring.
However, a spring that is too tight is not needed here, otherwise the soil simply will not fall into the bellow. When pulling the flap, the valve will be pressed not only by the spring, but also by the soil collected inside.
The lower edge of the flap is sharpened inward. Sometimes sharp pieces of reinforcement or sharpened pieces of metal of a triangular shape are welded to the edge.
A protective mesh is made of thick wire from above and a handle is welded to which a metal cable is attached. A glass is made in a similar way, only the valve is not needed here, and a slot should be made in the body to clean the device.
Some useful tips
After the well is ready, you should pay attention to a number of important nuances.For example, in order for the water in the well to remain fresh, it is necessary to ensure an influx of fresh air into the casing.
To do this, make several ventilation holes. The upper part of the well should not be bricked up, it is closed with a hinged lid so that if necessary it was possible to get a pump, inspect the string, etc.
Upon completion of work, be sure to return to well water analysisto check for various impurities. Any problems with the condition of the water are usually resolved by selecting suitable filters.
Water is not taken for analysis immediately after drilling, but after some time, so that pollution caused by drilling leaves it.
Conclusions and useful video on the topic
Video # 1. Overview of various home-made tools for drilling - drills, baits and other shells:
Video # 2. Demonstration of shock-rope method of drilling:
Video # 3. The process of creating the Abyssinian well:
Drilling a well cannot be called a simple task, which anyone can do. Nevertheless, many masters coped with this matter and provided their home with autonomous water supply. Purposefulness and correct actions usually lead to the desired result.
Unclear moments were revealed during the review of the article? Have a desire to ask questions on the topic? Please write comments in the block under the text of the article.
 How to swing a well: methods for pumping after drilling and during operation
 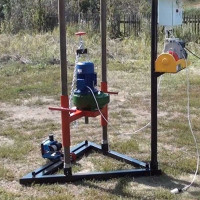 DIY drilling rig: making a homemade drill for drilling wells
 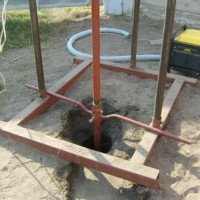 DIY water well: arrangement rules + analysis of 4 popular drilling methods
 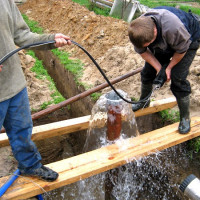 Do-it-yourself flushing of the well after drilling: step-by-step briefing on the work
  DIY Abyssinian well construction: how to make an igloo-well on a site
 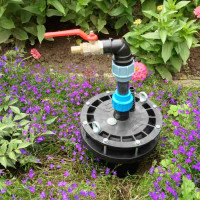 Do-it-yourself well in the country: a review of technology and tools for manual drilling
  How much does it cost to connect gas to a private house: the price of organizing gas supply
  The best washing machines with dryer: model rating and customer tips
  What is the color temperature of light and the nuances of choosing the temperature of the lamps to suit your needs
  Replacement of a geyser in an apartment: replacement paperwork + basic norms and requirements
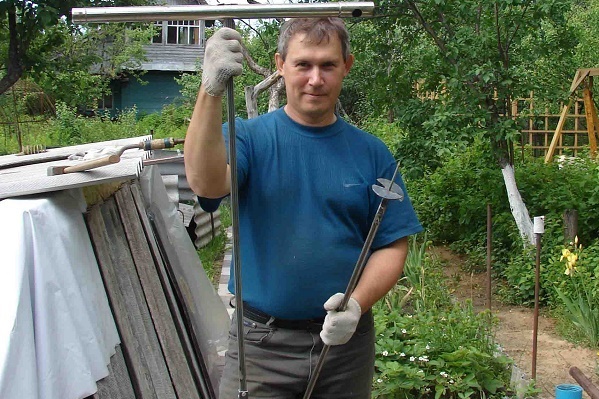
This information will be useful for those who have a desire to try their hand as a driller, who are not afraid of hard work. Here, several methods of drilling are considered, where everyone will choose for himself what he needs according to his capabilities, on the ground. I myself need to drill a well in the yard, so I will use your material. So everything is written in detail. I hope I succeed.
Everything is simple if there is a tool and an experienced person nearby. You read, and it seems that everything is simple, but actually the process is complicated, and drilling is not all, you need to use water further. Here it is important to do everything correctly: install the pump according to science, so that it works properly, use it and enjoy it. I can’t make up my mind myself, I trust the professionals, I don’t think that it will be cheaper myself. To prevent this, he spent time, effort, money, but did not receive drinking water.
I agree. I also thought of trying to drill on my own, but read the guides and changed my mind. There is a decent risk of slipping through the aquifer or what mistake to make. Then it will be even more expensive to remake, and I will spend time.
I'm trying to drill a hole under a casing with a diameter of 160 mm. A storm of water. When passing a quicksand that starts from 3, 5 meters and up to 7 it tightens the bar heavily and it is very difficult to lift it back. How can I go more than meters if it is already hard to pull the bar back at 7 meters ?!
A fairly common phenomenon when a drill hits a quicksand and problems arise in order to pull it back. In this case, as they say, the main thing is not to make sudden movements. I can share a few tips from my practice that have helped out more than once. So:
Method number 1: lower the flexible pipe and supply water for washing the tool precisely in the right places.
Method number 2 (if the first did not help). An HDPE pipe is taken that goes all the way (do not use any connections or couplings); a steel pipe is inserted inside (somewhere 25-20 cm, no more), we fix it with self-tapping screws, then the transition from the pump to this wonderful construction is brewed, washed out.
Method number 3 - a jack to help.