DIY drilling rig: making a homemade drill for drilling wells

Drilling wells in the area is a large-scale task. The services of a professional team are not affordable for every home owner, and hiring “handicraftsmen” is, in most cases, just throwing away money.
It’s easier to do all the work yourself: you work harder for yourself, and there are less costs. In addition, if a do-it-yourself drilling rig is made, the costs will seem literally ridiculous compared to the actual drilling costs.
We will tell you how to make a machine for manually driving water intake in the area. The information presented by us is based on the practical experience of independent drillers. To complete the perception of a difficult topic, the proposed information is supplemented by useful schemes, photo collections, videos.
The content of the article:
What and how is it better to drill a well?
A novice driller needs to be patient and get ready to do the most difficult job.
Still need improvised tools and inexpensive materials for the manufacture of the rig and the drill, as well as common sense and a couple of friends to help.
Drilling wells is akin to art, because the result is unpredictable, and each structure is unique. The task is to make a long and narrow shaft in the soil to the aquifer and lower the casing into it to strengthen the walls of the mine.
In the process, you will have to extract a lot of soil, and this soil can be very different: from pieces of granite to sand mixed with water.
Much depends on the depth of the aquifer. Sometimes you need to walk less than 10 meters to it, and sometimes aquifer reaches several tens or even hundreds of meters. All this affects the drilling methods and its timing. To build a well, there are two main methods: shock-rope and rotational, in the modern interpretation of auger.

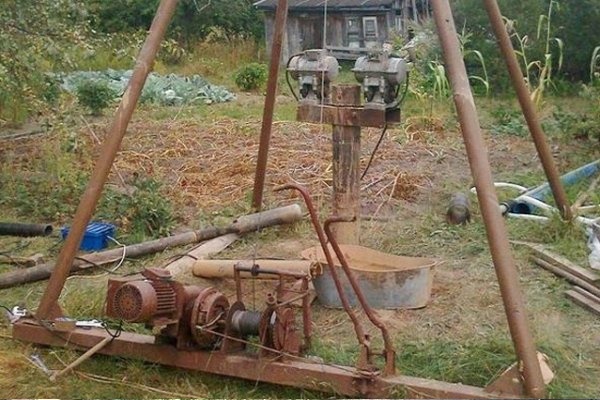
In the first case drilling is in progress with a narrow and heavy projectile called a chipper. It is suspended on a rope or cable, which is thrown over a block mounted on a tripod. A winch with a motor is used to pull a drill from the mine, although this can also be done manually if desired.
The shell is dropped several times to the bottom of the mine from a height of several meters. He loosens the soil, part of which enters the cavity of the bailer. After deepening into the ground by about 0.5 m, the drill is removed from the trunk. The shell is cleaned and thrown back into the mine. The process is repeated until they reach the water.
The shock-rope method is very old; it has been used for centuries, if not millennia. It is relatively easy to make the bobbin, you will need sheet steel with a thickness of 4-5 mm or a thick-walled pipe Ø 110-120 mm, as well as skills in working with the welding machine. And you can work with a bouncer even alone, although with an assistant, things will go much faster.
The advantages of impact drilling are not only its availability. The bailer is reliable, it passes almost any soil except rock. If you need to overcome a layer of sandy loam or loam, replace the baiter with an appropriate size glass - a narrow cylinder without a valve at the bottom.

A glass effectively destroys clay rocks, which, due to their own ability to condense and stick to the walls, are retained in its cavity. In manual shock-rope drilling, the bellow and the glass are alternated as necessary.
As soon as the penetration of the essential borehole is reduced, it means that she met the roof of a loam or sandy loam, which is why it is exchanged for a glass. As soon as the soil destroyed in the well ceases to linger in the glass cavity, it is changed to a bailer.
In one “session” you can deepen the shaft by a meter, although more often this indicator is more modest, about 20-40 cm. This is the drawback of the shock-rope method - a long working time. On clay plastic soils, it is more efficient to use a screw or otherwise a coil drill.

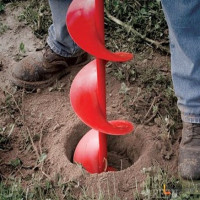
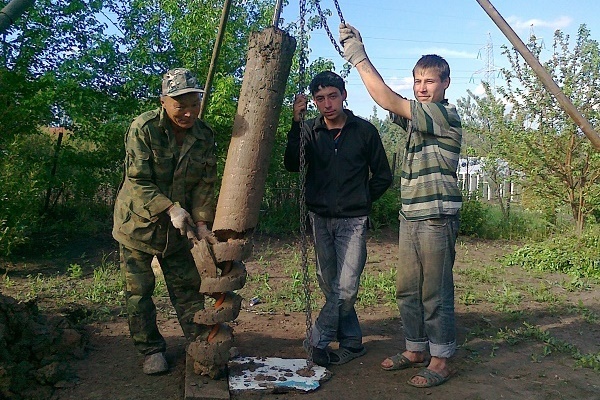
The working tool of the screw installation is a column of rods with a drill at the lower end.The tool is literally screwed into the soil, which is partially held on its blades.
Periodically, the auger, together with the loosened soil, is removed to the day surface, and the face with a collapsed blade is cleared by a bailer. Then again drilled with a screw, penetrating deeper into the earth with each revolution.
The rods gradually increase as the shaft deepens. First, the length of the drill string is increased by fastening one rod. When its upper part is almost aligned with the wellhead, a second, then a third, etc. is attached.
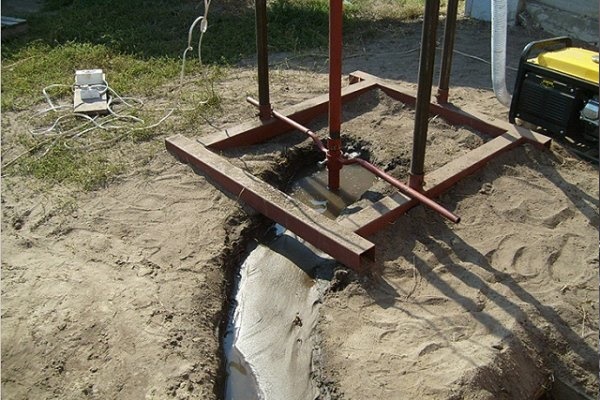
You can rotate the drill manually or using the rotor of an electric motor. To keep the rod in the correct vertical position, a vertical frame mounted on the bed is used in industrial mobile drilling rigs. According to this principle, you can make your own machine.

Simultaneously with the deepening, the wellbore is cased, i.e. a pipe is installed in the drilled hole, the diameter of which is 1-2 cm larger than a similar projectile size. The casing links are connected into a single structure by screwing or welding.
If a large amount of water is pumped into a cased well under pressure, the face can be cleaned without the use of a baffle. This method has been successfully applied by professional teams. Water erodes loosened soil and leaches it to the surface.
Drilling fluid speeds up the work several times, but everything around will be flooded with water mixed with mud. Yes, and rocky soils in this way will not pass. All this must be taken into account before proceeding with the manufacture of our own drilling rig. In addition, you need to determine your goals and objectives.
If you need an assembly for the construction of just one or two wells, you can especially not pore over the thoroughness of execution. But a solid and durable drilling rig can be a good reason to start your own business for drilling wells.
You will find detailed information on drilling methods for water wells in one of popular articles our site.
Production of shock-rope drilling rig
Tripod with a bailer - the design is simple, like all ingenious. Its dimensions can be estimated "by eye", especially precise engineering calculations are not needed here. For example, the height of the tripod on which the bobbin will be fixed should be about a meter greater than this drill.
If drilling work held in the basement of the house, the dimensions of the structure will be limited by the height of the ceiling.

In open space, the bellow can be hung up to increase the force of impact. But do not make it too high, it is not effective. The flap itself must be heavy enough. To effectively loosen the soil, it is better to make notches or sharpen a sharp edge on its sole.
Optimum for drilling is considered to be a projectile length in the range of 1.8 - 2.2 meters, so that the driller can freely reach the top of the drill for attaching or disconnecting the cable. However, in manual drilling, 1.0–1.2 m is considered the best length of the choke. This size allows you to reach the bottom of the projectile with your hand if it is not emptied when loam is sticking, for example.

Most often they make a bailer from a piece of metal pipe; the desired metal thickness is 4-6 mm.
To make such a drilling device, the following operations should be performed:
- Prepare a piece of pipe of a suitable size.
- Make a valve at the bottom of the projectile.
- Weld the safety net on top.
- Boil the handle or “ears” to secure the rope.
- Sharpen the bottom of the projectile or weld a few “teeth” from pieces of metal or from pieces of thick wire.
- Make a tripod from metal pipes.
- Install the block, winch and engine to lift the projectile from the shaft.
- Tie a rope to the bobbin and assemble the structure.
The flap valve deserves special attention. Small diameter shells use a ball valve. A metal ball with a diameter of slightly more than half the diameter of the flap is suitable for its role.
If a suitable ball was not found, it can be made from improvised materials. For example, a mixture of lead shot and epoxy is often used for these purposes, some child’s ball made of plastic or rubber plays the role of the casting mold.

From below, a washer is welded with a hole whose diameter is smaller than the size of the ball so that it does not fly out. For the same purpose, at the top, at some distance from the protective grill, a stop is placed - a piece of metal that restricts the ball moving up. The wire grate does not allow large pieces of soil to fall out of the chute.
The ball of the valve should not fall below the level of a pointed edge or metal teeth, otherwise it will dampen the force of impact. On the other hand, “teeth” should not be made too long, otherwise they will not allow part of the soil to get inside the bailer.
A window is cut out in the upper third of the body. It will be needed when the full bailer will need to be cleaned of the soil that has accumulated inside.

Another variant of the valve is flap. It is made from a piece of metal. The petal valve looks like a round door mounted on a spring at the bottom of the choke. When the projectile moves down, the valve opens under soil pressure, and then the spring closes it and holds the soil inside. Sometimes such a valve is sealed with a piece of rubber, but this is not necessary.
If while drilling homemade bailer it turns out that it captures too little soil, maybe you just need to fix the structure a little. Sometimes you need to slightly squander the gap at the bottom of the device. If the projectile is too light, it should be heavier.
To do this, the upper part of the flap is sometimes poured with concrete. But you can simply attach on top an additional load on the movable joint.

On viscous soils, a flapless version of the flap can be effective. Dense soil is stuffed into the shell and held there naturally. Clean such a device through a narrow vertical hole on its side.
If possible and necessary, two different baits should be made to use them on different soils. The bailer is also used to clean the finished well from sand and dirt. But in this situation there is no need to make such a large projectile, a device with a length of about 0.8 -1.0 meters is also suitable.
Construction of auger drilling machine
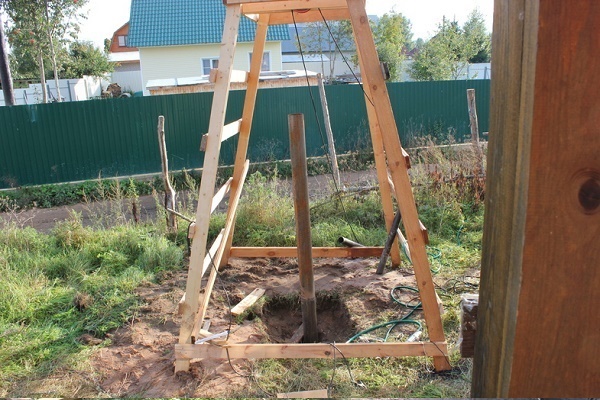
The frame of such an installation can be made in the form of a tripod, but more often it is made of vertical guides mounted on a stand and connected from above by a horizontal structure. The machine frame must securely hold the working column from drill and stackable rods when retrieving them from their well.

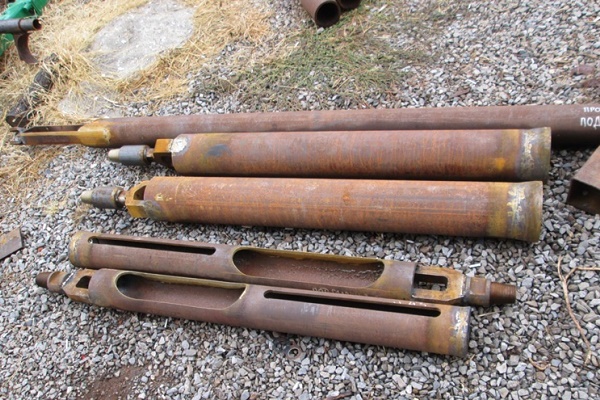
The drill is made as follows:
- A pair of turns of a metal strip are welded to a piece of a narrow metal pipe about 1.5 meters long to make a thread like a thread.
- Knives are attached to the edges of the screw, the cutting edges of which should be at an angle to the horizontal.
- Knives are sharpened.
- A tee with an internal thread is screwed or welded to the upper edge of the drill.
- Pieces of metal pipe of the same diameter are prepared. as the screw pipe, in order to further increase the length of the drill string. These are rods.
- On these pieces of pipe, a thread is cut to connect them or a hole is drilled for fixation with a locking finger.
However, to increase the length of the drill rod, a sleeve or lock connection is also quite successfully used. Drilling rig can be made of metal pipes, channel or from wood. The main thing is that it reliably holds the drill string.
In the upper part of the frame, a block is installed, which is connected to a winch for lifting a pipe string with a drill. It is believed that the tower is only necessary when well drilling more than eight meters deep. A small structure can be drilled without it, but work will still be difficult.
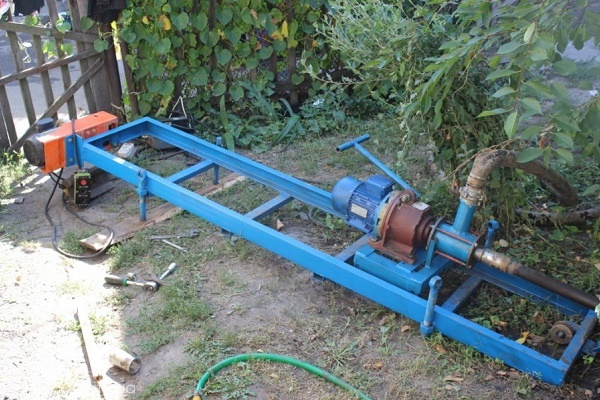
The extension of the length of the drill rod significantly significantly complicates the string, so an electric motor with a winch is used to lift it. If it is supposed to perform “wet” drilling, the rotation of the drill is also carried out using an electric motor.
Experts consider the best option for these purposes a typical device with a capacity of 2.2 kW at 60-70 revolutions, which can be powered from a conventional 220 V outlet. Models of the type 3MP 31.5, 3MP 40 or 3MP 50 may be suitable.
A swivel is an element with the help of which a torque is transmitted from an electric motor to a drill rod. Through it, drilling fluid is also supplied to the shaft. Drill rods are fixed on the movable part of this device. A special sealed pipe is designed for drilling fluid.

Since the swivel is constantly moving during drilling, with poor performance it can break very quickly. To avoid this, two rules must be observed: to use only high-strength steel for its manufacture and to ensure a minimum gap between the static and moving elements of the device.
As already mentioned, there are no super-strict rules for the construction of self-made drilling rigs for wells. Most often, a hybrid structure is constructed, which allows both the shock-rope method and rotary drilling to be used simultaneously.
In this design, the same frame is arranged, which allows you to switch from one method to another without making any design changes.

If you want to be professionally engaged well drilling, then it is better to purchase all the details on the side, rather than doing it yourself, or renting it. You can order all of these items from an experienced turner. You will need to buy a reliable electric motor with a gearbox, and a motor pump, sleeve and hose if you plan to perform work using a hydraulic head.
It is better to make a frame and a drill after a swivel, an electric motor and a winch are purchased. This will allow you to correctly and quickly fit all parts of the installation to each other. To be able to build longer rods on the drill, it is recommended to make a frame with a margin of about 3.3 m.
For the manufacture of swivels and locks, high-quality steel should be used, since these parts of the structure carry the highest loads during drilling.

Hardened steel is not well suited for the manufacture of home-made drilling rigs, since after processing it needs additional grinding, it is better to take ordinary steel. On rods, it is best to use trapezoidal rather than tapered threads.
It has sufficient strength characteristics, and any turner will cope with the performance of such a thread. But for the manufacture of conical threaded rods, you will have to look for a specialist.
For drilling to a depth of more than 30 meters, it is recommended to make rods from pipes with a wall of 5-6 mm thick. Conventional pipes with a wall of 3.5 mm may not withstand such loads. For the manufacture of a drill, it is better to take not alloy steel, but ordinary, so that there are no problems in the welding process.
For drilling hard soils, it makes sense to use a high-strength industrial drill bit. The use of a projectile with three blades gives a good effect. When it is used, cyclic rotation is used, which allows loosening the soil as efficiently as possible.
Drilling tools for manual work are different in design. Distinguish between spoon and coil models, as well as a drill bit. Spoon drills are effective on plastic soils: sandy loam, loam, clay. The cutter of such a drill is usually made in the form of a bucket. Such a drill can be made independently from a pipe of suitable diameter.
On dense loams, you can also use a coil drill. This device resembles a corkscrew in design, and the cutting element is a bifurcated so-called swallow tail. As an alternative to the serpentine drill, an analogue of the ice drill can be used, but it may not be as effective.
On solid rocks, a drill bit with a sharpening angle of 110-130 degrees is best shown. The bit can have a very different shape, since they are calculated on the destruction of rocks of varying degrees of hardness.

For drilling complex geological sections, it is sometimes better to use drilling in two stages with two different drills. First, a narrow drill is drilled with a diameter of about 80 mm. After such exploratory drilling, the work is carried out with a larger diameter drill to obtain a well of the required size.
Hoist capacity must be at least one ton. In addition to the electric winch, some masters immediately put another, mechanical one. It copes more effectively in some cases, for example, if the casing is stuck. For the electric motor and winch it is recommended to use two different control panels.
Conclusions and useful video on the topic
Video # 1. Visual overview of a do-it-yourself rig:
Video # 2. Combined-type drilling rig option for shock-rope and screw drilling:
Video # 3. The use of bobbins for hammer drilling:
A home-made installation for drilling wells is not a very complicated unit, leaving room for engineering work. But it should be remembered that the nodes and mechanisms of such a device during drilling experience significant loads. Therefore, the materials must be durable, and the work must be done as best as possible.
Want to share your personal experience in assembling and putting into practice a rig? Have questions about the topic of the article, do you want to sort out obscure points? Please write comments in the block below.
 How to drill a well with your own hands: ways to budget independent drilling
 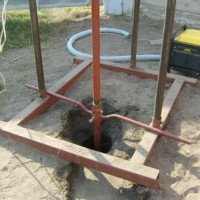 DIY water well: arrangement rules + analysis of 4 popular drilling methods
 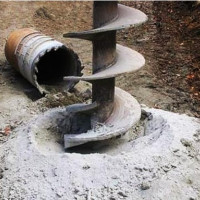 Methods of drilling wells: technological principles and features of the main methods
 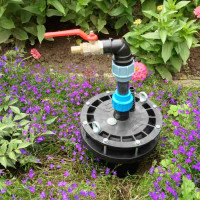 Do-it-yourself well in the country: a review of technology and tools for manual drilling
 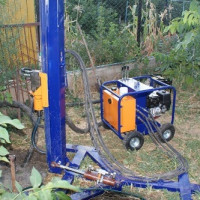 Do-it-yourself water-boring for water wells: a review of technology
  Auger drilling of wells: features of technology and shell for manual drilling and installation
  How much does it cost to connect gas to a private house: the price of organizing gas supply
  The best washing machines with dryer: model rating and customer tips
  What is the color temperature of light and the nuances of choosing the temperature of the lamps to suit your needs
  Replacement of a geyser in an apartment: replacement paperwork + basic norms and requirements
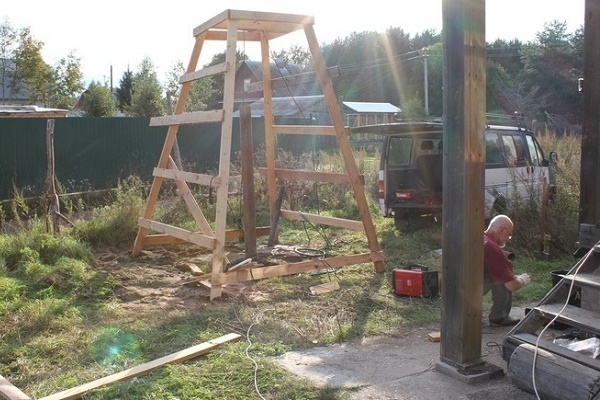
Interesting reading, it is nice to know that in Russia new Kulibins are still being born. It seems to me, if you use home-made installations, it will be problematic to go down a hundred meters. My brother and I once tried to make a drill, but things didn’t move beyond the drawings. It turned out to be painfully expensive, although it is still cheaper than paying someone. And more detailed drawings where can I get it?
Not so long ago I had to drill a well myself. I took from a friend a homemade screw type rig. In my opinion, the most simple to manufacture and operate is not a whimsical machine. As a result, I made a well 12 meters deep with such an installation, spent the time on all the preparatory work and drilling for about half a day. As a result, I saved a decent amount.