How to make a fan yourself: the best options for homemade
Throughout the long winter, we look forward to pleasant summer days, and with the onset of a hot pore, for some reason we begin to dream of coolness. How deliciously it will help to restore strength and relieve fatigue from the light breeze created by a small home-made fan. Moreover, its manufacture is an incredibly interesting occupation, right?
We suggest that you familiarize yourself with step-by-step instructions for assembling the simplest effective devices from literally junk raw materials. The article presented to your attention describes in detail how to make a fan with your own hands and what a home master will need for this.
At your disposal is a detailed description of the manufacture of options whose action has been tested in practice. You can make such devices yourself without having any experience whatsoever. For a full perception of information, step-by-step photos and video instructions are attached.
The content of the article:
Simple homemade CD
The simplest fan can be made from CD drives. It can be used, for example, for local exposure to a user who spends a long time at the computer.
Prepare the source materials for the work:
- CD discs - 2 pcs.;
- low power motor;
- cork from a bottle of wine;
- a wire with a USB plug;
- thick cardboard box or rectangle;
- soldering iron;
- candle or lighter, hot melt;
- pencil, ruler, checkered paper.
For our purposes, you can use the motor from an old toy, for example, from a typewriter. As a cardboard tube fit a sleeve slightly ennobled with decorative finishing paper from the roll of toilet paper.
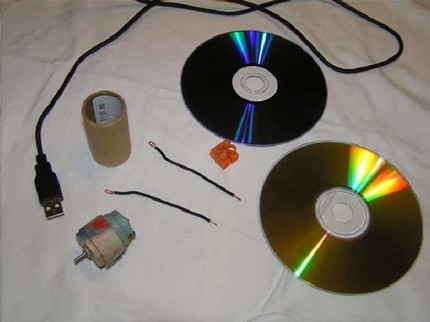
The assembly process of the mini fan is quite simple.
Take one of the CDs and use a marker to divide its surface into eight identical sections.The easiest way to do this is by using a piece of paper in the box.
Draw a cross on it from the horizontal and vertical lines. Each of the four resulting right angles is divided in half. Using the cells to do this is not difficult.
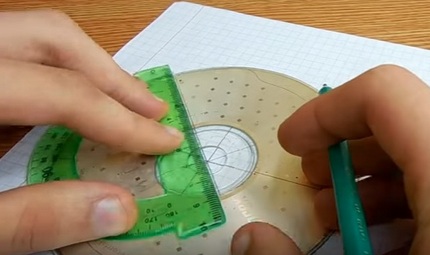
We put a disk on our drawing so that the intersecting lines appear in the very center of its hole. Alternately applying the ruler to the lines diverging from the center, make the markup on the disk. So the sections will be the same.
To divide the disk into blades, it is necessary to draw a soldering iron along the marking lines from the transparent part to the edge.
Scissors can also be used for cutting, but there is a danger that the workpiece will crack during operation. If there is no soldering iron, you need to use a knife previously heated on the stove. When working with a soldering iron along the edges of the cut, a deposited plastic is formed, which is easily removed with a knife.
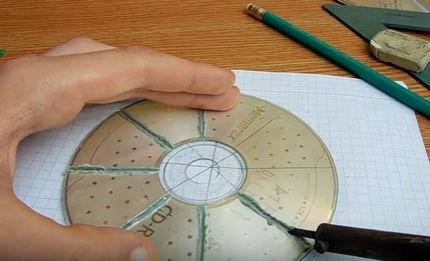
Above the flame of a burning candle, we heat the surface of the disk so that the blades can be slightly expanded. If there is no candle, a lighter or blowtorch will do.
The central part of the disk should be heated, and all the blades should be turned in one direction. A wine cork is placed in the hole of the disc. To fix it better, you need to pre-heat the edges of the hole with hot melt adhesive.
The USB cable must be connected to the motor. If we do not guess with the direction of rotation of the propeller, it will be possible to swap the motions, that is, change the polarity.
The motor needs to be glued to the cardboard tube, and the tube itself to the second CD, which will play the role of the base of the stand.
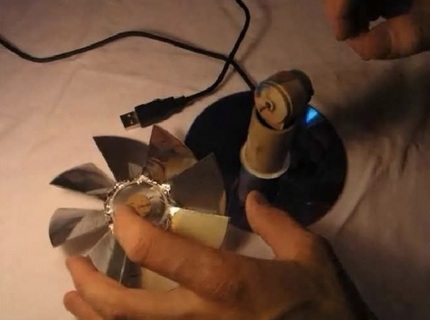
Now the propeller must be "planted" on the stem of the future fan. We will try to make sure that it is installed strictly in the center. Fix it in this position using hot melt adhesive.
After completing all work, the fan is ready for use.
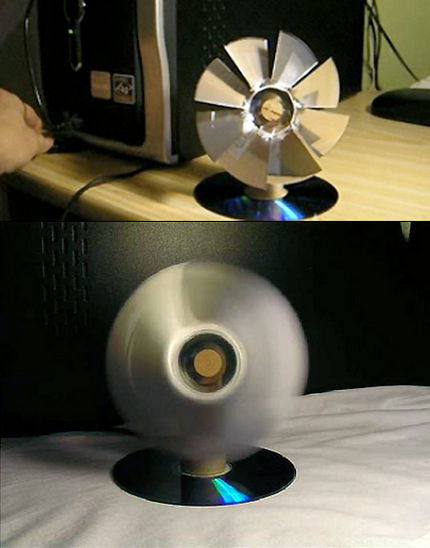
How to make a similar, but slightly more complex design, by including a regulator in the circuit, look at the video posted at the end of this article.
Does this homemade making instruction seem complicated to you? Then you may be interested in information about types of fans and the rules of their choice to purchase a ready-made appliance offered by manufacturers of household appliances.
Plastic Bottle Blower
What our craftsmen from plastic bottles don’t do! It is time to say that the fan from them is also very good. He may not ventilate your entire room, but someone who is forced to work at a computer will help for sure.
We offer two options for creating such a fan model.
Option # 1 - model of hard plastic
To complete the work we need:
- plastic bottle with a capacity of 1.5 liters;
- a motor from an old toy;
- small switch;
- Duracell battery
- marker;
- scissors;
- candle;
- hammer and nail;
- Styrofoam;
- hot glue gun.
So, we take an ordinary plastic bottle of 1.5 liters with a cork. At the level of the label line, cut off its upper part. That is what we will need for the manufacture of the propeller. Divide the surface of the plastic blank into six parts.
We try to mark it so that we get equal sectors: the quality of the work of the future device depends on it.
We cut the workpiece by marking almost to the neck. We bend the blades of the future propeller and cut off every second of them. We still have a blank with three vanes equally spaced from each other. The edges of each of the blades must be rounded. We do it carefully.
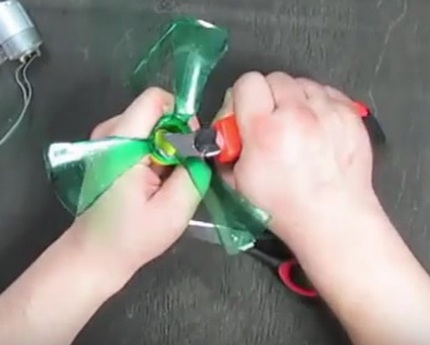
Now we will need a small candle. Ignite her. We heat on it each blade at the base in order to turn it in the direction we need. All blades should be turned in one direction. We remove the lid from the workpiece and in its very center we punch a hole with a nail and a hammer.
We put a stopper on a rod of a small motor. Such motors can remain from old children's toys. As a rule, getting them is not difficult. We fix the cork with glue.
Now you need to make a foundation on which the motor will rest. For this purpose, take, for example, a piece of foam. We fix a rectangle on it, which can also be cut from foam packaging.
On the upper surface of this rectangle our motor will be fixed, to which the propeller is attached. To do this, in the foam, you need to make a recess corresponding to the parameters of the motor.
To fix the elements of the product using hot melt. In the absence thereof, other adhesives may be used. It is important that the mount itself is as reliable as possible.
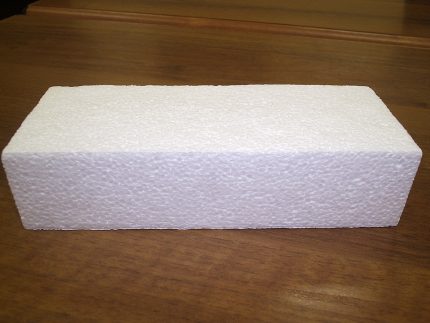
A small switch and a power supply are attached to the foam base, the role of which is played by the rectangular Duracell battery. We assemble the simplest chain, trying to do everything as accurately as possible.
We only need to screw the propeller onto the plug fixed on the motor. Our fan is fully operational.
The foam stand, perhaps, weighs too little to give the device the necessary stability. After all, with a sufficient swing of the blades, it can turn out to be quite powerful. Therefore, the base of the model is desirable to weight.
Option # 2 - soft polymer product
We will prepare in advance everything that we will need during the work:
- two bottles of SevenUp lemonade;
- electric motor 12 V DC;
- seven thick tubules for drinks;
- power supply connector;
- power supply itself;
- switch;
- scissors and utility knife;
- marker;
- hot glue gun;
- Super glue;
- plastic ties;
- nippers;
- soldering iron;
- insulating tape;
- CD disk.
So, there is another option for building a homemade fan from a plastic bottle. Take a bottle of smaller capacity, for example, from the SevenUp lemonade.
The algorithm for cutting the blades of the future propeller is the same as in the previous version. The plastic of this bottle is much softer, so you can give the desired inclination to future blades without resorting to heating them.
The hole in the center of the cork should be made using an awl or a nail heated on fire for this purpose. The electric motor 12 V DC, on the shaft of which the propeller will be fixed, can be taken from old toys or a hair dryer unnecessary in the household.
The cover is fixed to the shaft using hot melt adhesive. We fasten the lightweight propeller to the lid immediately.
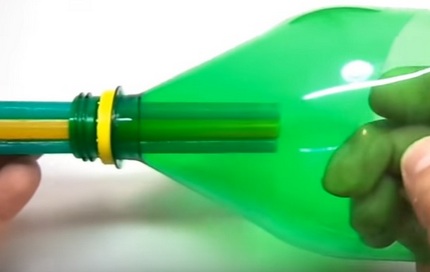
The most interesting thing is the construction of the stand. It turns out not only sustainable, but also attractive. To create it, you need seven thick tubes for drinks. It is necessary to glue them together with superglue. It turns out pretty strong and pretty stand.
For the base, take the top of the larger plastic bottle than the one we made the propeller from. Push the stand from the tubes into the neck of the workpiece, approximately to the middle of its length. We fix the rack in this position with the help of superglue applied to the neck of the workpiece.
Now you can install the engine on a rack, fixing it with hot glue. The fact that the rack itself consists of hollow tubes helps to hide the wires beautifully. We just pass them through the center tube. So the wires are inside the base of the device.
To further strengthen the structure, plastic ties should be used, which are glued with hot-melt adhesive to the stand on the sides of the motor so that the tie lock is tightened above the motor itself, ensuring its immobility. The excess tip of the mount is removed with wire cutters.
In the plastic surface of the bottle, which serves as the basis of the design, holes are cut for the connector of the power supply and the switch. It is better to do this with a household knife.
We connect the connector for the power supply and the switch. Wires should be soldered and insulated. The switch and connector are fixed to the plastic with hot melt adhesive.
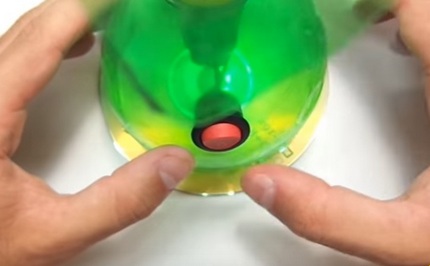
To make the bases heavier and more stable, we will build a bottom for it from the CD.
To do this, grease the edges of the plastic billet with hot glue and press the disk to it.
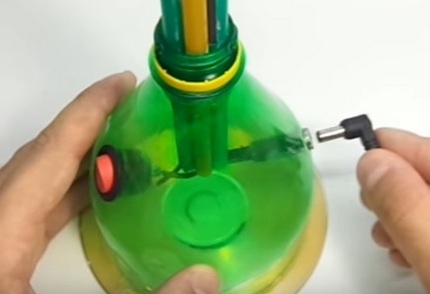
Now through the connector we connect the power. As such, you can use the power supply for LED strips, which is sold in electrical appliance stores. Well, and this homemade product is already ready for work.
To make sure that you correctly understood the sequence of work performed, watch the video at the end of this article.
Modernization of the existing fan
Plastic bottles come in handy in upgrading the fan purchased at the store. Almost free tools at hand will help to significantly increase the productivity of the device.
Let's look at how and by what method you can arrange a pleasant sea breeze in your apartment:
We made parts designed to enhance airflow. They will provide accelerated cooling of the space around.
Now you need to make a basis for fixing them:
After preparing the device, designed to enhance the performance of the fan, we proceed to the assembly and commissioning:
Stylish product without blades
We are used to the fact that the main part of the fan is the propeller. This part of the structure rotates, creating the necessary air flow.
But there are also bladeless models. They are firmly in fashion, primarily because of their safety for younger family members and for pets. In addition, these products look stylish: they are able to fit into any interior and decorate it.
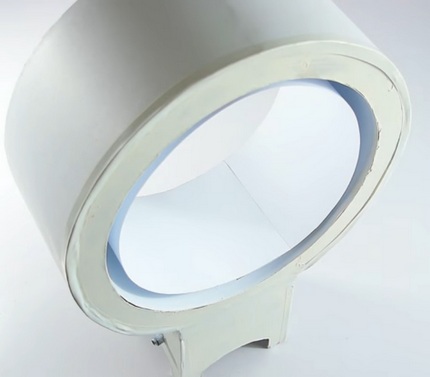
Like most other things in the service of a person, a bladeless fan can also be done with your own hands.
The principle of its operation is simple: a small turbine is located at the base of the device, which allows creating air flows passing through the side openings.
For work, we need:
- computer cooler;
- power supply unit and connector;
- small switch;
- hot glue gun;
- cardboard or heavy paper;
- scissors, pencil, ruler, compass and vernier caliper.
In principle, we need a caliper solely so as not to err in the size of the product. If it is not available, then it is quite possible to do with an ordinary ruler, tape measure or tape measure.
Getting to work.
To begin with, we will make the case - the base of the product. To do this, cut out four rectangular pieces of cardboard.To determine the parameters of the base, we measure the width of the cooler. The resulting size will match the width of the rectangles.
For convenience, we will operate with specific dimensions. The width of our cooler is 120 mm. And this means that the width of the rectangle is also 120 mm.
A small switch and power connector will be built into the body of our product. To keep them tight enough in the future, you need to remove the dimensions from them.
The holes in the housing must match the values obtained. You need to make holes until the rectangles become part of the body: it is always easier to cut them in flat objects.
We need a twelve-volt power supply and an appropriate cooler, consuming only 0.25A. Given the fact that we have a 2A unit, we can assume that we are quite well prepared for the future operation of the future device.
Now we take the sheets of cardboard from which we have to cut out the elements of the main part of the fan. First, draw two circles. The radius of each of them is 15 cm. Cut both circles.
In one of them, let's call it A, we will draw an inner circle with a radius of 11 cm. In the second, which we will call B, the radius of the inner circle will be 12 cm. Carefully cut out the inner circles. Got rings A and B.
The resulting rings will be attached to the body of the product. In order for them to better adjoin the surface of the body, we apply one of the rectangular blanks to each of the rings and cut off a segment whose flat side corresponds to the width of the rectangle.
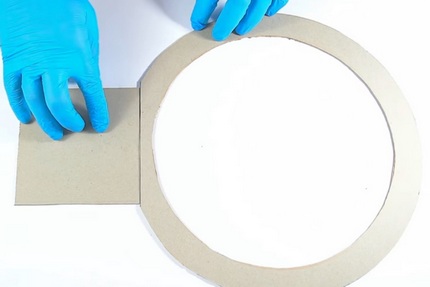
The main part of the fanless fan has a cylindrical shape. To make it, we need strips of cardboard with the following parameters: the first - 12x74cm, the second - 12x82cm, the third - 15x86cm. During the assembly process, it will become clear what to do with each of these three strips.
Before you assemble the case, cut a recess in the bottom of each of the rectangles. So we not only make legs for the future fan, but also create channels for the incoming air.
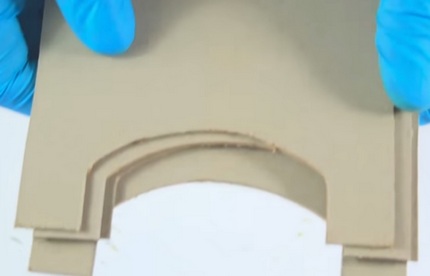
We will assemble the case using hot-melt adhesive. The cooler should be located approximately in the central part of the case, surrounded by four rectangles forming the walls of the structure. Lubricate the cooler with glue around the perimeter and surround it with walls.
Do not forget that the recesses in the walls that we just cut should be at the bottom of the case.
The wires from the cooler can be removed in the corner of the structure, fixing them in this position with glue.
At this stage, it is best to mount and connect. Since we use a switch, we need to separate one of the wires and form a circuit.
Wires should be connected to the power connector (red - plus, black - minus). If we make a mistake in polarity, you just need to swap the wires. Using hot-melt adhesive, we fix the connector and the switch in the places intended for them.
We turn on the power and check if the turbine is working. If everything is in order, we continue to assemble our bezlopastnaya model.
Take the ring A, which will be located in front of the device, and the first strip (12x74cm). We close the strip into a circle and paste it into the inner circumference of the ring A. The result is a cylinder hat without a top, but with brim. The same thing needs to be done with the ring B and the second strip (12x82cm).
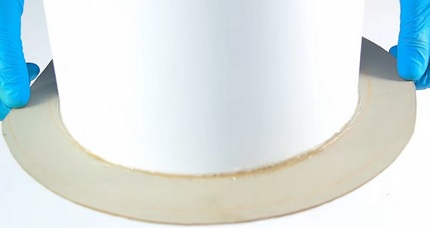
We glue the first “cylinder” to the front of the case with the place where we cut the segment.The second “cylinder” is also glued to the rear side of the body with a cut surface. In this case, the smaller "cylinder" is inside the larger.
The stability of the structure can be imparted with the help of five strength partitions fixed between the rings with the help of the same glue. They need to be cut out of cardboard. The length of the partitions should be slightly less than 12cm.
Now the side surface of the main structure should be covered with the remaining third strip of cardboard (15x86cm).
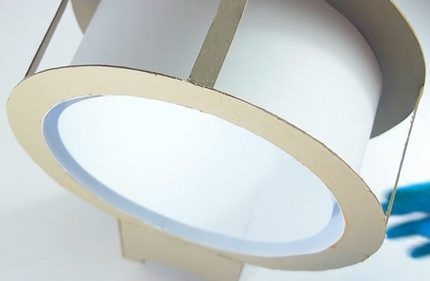
Basically, the fan is ready. It remains to give it an external gloss. To do this, remove excess glue and cover it with paint or glue decorative surfaces on its outer surfaces.
You may also find useful information about fan speed controllersset forth in our other article.
So that you can see how correctly you understood and did everything, watch the video on the independent creation of a fanless fan, which we posted at the end of this article.
If you are fond of assembling interesting and useful appliances, then you may be interested in the information about making an air conditioner at home, discussed in our other article.
And in the cold season assemble heater or homemade fan heaterusing a minimum of materials.
Conclusions and useful video on the topic
The fan from the CDs, which you will see in this video, is different from the one that can be done by following the instructions we have proposed. It has a different basis and there is a regulator:
The green plastic fan, which the video is dedicated to, not only works well, but also looks great.
It will become a real desktop decoration of your workplace:
A feature of the fanless fan that you easily assemble by following the instructions and video is that the airflow appears as if from nowhere. The model attracts with its originality.
Spend some time decorating it, and you will see how flawlessly it fits into your interior:
We presented you the best of home-made fan models. And they are the best because their construction does not need special mechanisms, sophisticated tools, expensive materials and special skills. Absolutely any home master can create them, even a beginner.
We hope that the success that you will definitely achieve by making a fan will awaken your taste for independent creativity.
Do you use a homemade fan made from improvised materials? Or did you use one of the instructions given in our article when assembling the device? Perhaps you have improved the equipment available in the house? Tell us about your experience - leave your comments.

 DIY air humidifier: instrument options and manufacturing instructions
  How to make a non-return valve for ventilation with your own hands: instruction on the construction of a homemade product
  How to get rid of the smell in ventilation: the best options to block the unpleasant smell from the neighbors
  The best channel fans: TOP-15 popular devices + recommendations to potential buyers
  DIY air heat exchanger for a chimney: manufacturing examples and tips from masters
  Do-it-yourself air humidity meter: assembly instructions for the hygrometer
  How much does it cost to connect gas to a private house: the price of organizing gas supply
  The best washing machines with dryer: model rating and customer tips
  What is the color temperature of light and the nuances of choosing the temperature of the lamps to suit your needs
  Replacement of a geyser in an apartment: replacement paperwork + basic norms and requirements
Colorfully, step by step, affordable. Materials, if you look at home, everyone has a budget. But the question of security arises.If something is done wrong, let's say a fan from a CD is connected to a computer unit, will we harm the system unit? The second option is not so attractive, but due to the batteries it is more acceptable for me, there are less chances to spoil something.
How can such a fan damage a computer? He only teaches power through a USB cable. If you’re so afraid, you can connect it via USB-charging from the phone.
Wow, what a luxury idea with a mini fan from cd drives. What a simple way, no special costs for money and effort were required, everything was found at my place. I did everything according to the description, I used a heated knife instead of a soldering iron and it worked fine. The fan works with a bang, does not make noise, does not overheat. Now in the summer I will always put it next to me while I am sitting at the computer.