Ventilation pipes on the roof of the house: arrangement of the exhaust outlet through the roof

When planning ventilation installation work, you probably thought over and decided how best to install ventilation pipes on the roof of the house. This must be done correctly: first, so as not to damage the roof and prevent leaks; secondly, so that the output provides maximum traction.
We will tell you how to properly ventilate to ensure regular air exchange. We will introduce modern and easy-to-install solutions offered by manufacturers to domestic consumers. We will show you how best to do this work yourself.
The content of the article:
Roof exit options
The most common are two options for the exit of ventilation pipes to the roof:
- The use of ready-made ventilation outlets (factory-made);
- Conclusion directly to the roof of ventilation pipes with sealing them with a factory-made feed-through element.
The choice of method depends on the design features of the house and the roof, the requirements for appearance and the budget available.
It is strongly recommended that you do not make a walk-through assembly yourself if you do not have sufficient experience and tools. Due to the mistakes typical for beginners, he will not be able to ensure the tightness of the pipe passage. The result leads to wetting and subsequent destruction of the roof, rafter frame and insulation.
Ready ventilation outlets
Roof manufacturers are interested in the fact that roofs built from materials released by them look beautiful and serve their owners for a long time. Therefore, along with roofing materials, they make parts for arranging the passage of ventilation pipes through the building structure.

Such outputs are available for a wide variety of types of flexible, metal and ceramic tiles, slate and ondulin, rolled polymer and bitumen coatings for flat roofing systems.
The advantages of such outputs are:
- Great appearance;
- Color matching roof color;
- The presence of gaskets and built-in thermal insulation;
- Fine vertical adjustment;
- Deflector and bushing compatible with the output;
- Easy installation.
Mounting such exits is very simple, so this can be done by an amateur in roofing. The only thing that needs to be taken into account: the work will be performed at height, so the necessary safety measures must be observed.

If the installation is done in the roof of a metal tile, then the first thing according to the template, which is usually included, it is necessary to mark and make a hole in the roofing material. Please note that in the place where the hole will be made, there should not be battens and rafters under the roof sheets, otherwise the pipe cannot be placed.
Cut hole for ventilation passage unit the easiest way is a small grinder 115-125 mm, although manufacturers of metal tiles recommend using scissors for metal.
When the hole is ready, if there is a waterproofing membrane in the roof, then you also need to cut a hole in it, into which the sealant should be fixed to the sealant. Then apply sealant to the passage element and screw it with screws.

Next, in the passage element, you need to insert the ventilation outlet, designed to equip the ventilation pipes on the roof. It is necessary to set it in a vertical position by level and fix it with self-tapping screws.

In the attic space, the ventilation outlet must be connected to the ventilation pipe, the fastening of which to the wall in the attic must be done using clamps or a metal frame.
Similarly, factory-made ventilation exits are installed on roofs made of ceramic tiles, corrugated board, ondulin or slate.
If the ventilation outlet is planned to be installed in the roof from soft tiles, then along with the above installation method on top of the roofing material, the ventilation outlet can also be installed during the installation of the roof under the tiles.
To do this, a through flange and a protection cut from a waterproofing carpet are fixed to the bitumen mastic and nails to the base of the roof. A soft tile is subsequently mounted on top of it. This method provides excellent sealing.

As you can see, there is nothing complicated in installing a factory ventilation outlet for any type of roof, and the final result exceeds all expectations in terms of beauty and reliability.
The only limitation in this case is the height of the standard output, which ranges from 300 mm to 700 mm. This makes the factory outlet applicable only if it is located close to the ridge. Only in this case it will not fall into the zone of wind backwater.
It is impossible not to mention the ventilation outlets equipped with an exhaust fan.

Such an exit to the roof ventilation pipes allows for confident traction, independent of wind and temperature. It can be installed even in the area of wind backwater, where natural ventilation will not work. Due to the fact that the fan with an electric motor is located outside the house, it will not create extraneous noise indoors.
Pipe outlet through passage element
If there is a need to remove a long ventilation pipe through the roof, a sleeve for the passage of the antenna, or simply to perform installation at minimal cost, then a universal pass-through element, called the flash master, is used.

Such penetration is fixed on the roofing material using silicone and self-tapping screws, and at the junction of the sealant to the pipe, it is pressed with a clamp for additional reliability.
If the hood is laid indoors indoors, and not in the ventilation shaft, then you must somehow still fix the ventilation pipe to the wall. This is best done with clamps made of elastomer gaskets to reduce noise interference.
Suitable for pipes with diameters from 6 mm to 467 mm and can be installed on any type of roof. In addition, such a passage unit can be made of both rubber and silicone, withstanding temperatures up to 240aboutWITH.
Advantages of using a universal passage element:
- Low price;
- Simple installation;
- Suitable for any roof;
- Suitable for any pipes with a diameter up to 467 mm;
- It is made in color of a roof;
- Provides tightness and reliability.
Like the factory outlet, you can install a ventilation pipe with a through element with your own hands, observing safety rules when working at height.
When using a passage element, one should not forget about the need to warm the ventilation pipe and install a deflector or umbrella on it.
Where to place the ventilation outlet?
When arranging the exhaust outlet through the roof, it is important not only to ensure the tightness of the passage through the roofing pie, but also to choose the right location. You also need to correctly determine the output height, because the draft in the ventilation duct directly depends on it.
Firstly, it is better to make the exit point of ventilation through the roof as close to the ridge as possible.

This arrangement has several advantages:
- Most of the ventilation duct will pass through the attic, where there is no wind, and the temperature is always slightly higher than on the street. Thanks to this, the insulation layer on the pipe can be made thinner;
- The ventilation outlet located near the ridge has a minimum height above the roof surface, therefore it is resistant to gusts of wind and does not require additional fastenings;
- A factory-made ventilation outlet can be used, which will add additional aesthetics to the roof.
Do not worry. It is better to carefully consider how to make a sealed outlet of the ventilation pipe on the roof, if it cannot be installed close to the ridge. In this case, the passage simply needs to be additionally insulated and secured.
Secondly, in order not to get into the zone of wind backwater with a pipe, which every house with a pitched roof has, the height of the vent pipe deflector should be:
- 0.5 m higher than the roof ridge if the exit is located no further than 1.5 m from the ridge;
- not lower than the roof ridge, if the exit is at a distance of 1.5 m to 3 m from the ridge;
- not lower than the line drawn at an angle of 10about from the ridge to the horizon, if the ventilation outlet is located further 3 m from the ridge;
- if the ventilation pipe is removed from the annex to the house, then its deflector should be located 0.5 m above the line drawn from the eaves of the roof of the main building at an angle of 45about to the horizon.
To ensure the indicated height above the roof is extremely important for any ventilation, but for natural ventilation it is vital.

If this rule is neglected, then the exhaust deflector will fall into the area of wind backwater and in windy weather there will be no draft at best, and in the worst case there will be reverse draft and air from the street will go into the house.
How to fasten a tall pipe?
If for some reason it is not possible to bring the ventilation outlet closer to the ridge, and the fulfillment of the requirement for wind support forces to make a very high pipe above the roof surface (more than 1.5-2 m), then the ventilation pipe must be additionally fixed.
This must be done because the higher the pipe, the greater wind loads it is subjected to due to the larger area of airflow. With strong gusts, the pipe can simply be broken in a place close to the passage through the roof.
There are several ways to securely fix the ventilation pipe to the roof:
- Stretch marks;
- Cuts;
- Metal racks.
Depending on the design and height of the ventilation duct and the roof, these reinforcement methods can be used together, for example, amplification of the ventilation outlet with a metal stand, followed by fixing it with braces.
Stretching Stability
Stretch marks are most often made of galvanized cables, less often of thin chains.

To securely fasten the ventilation outlet, at least three extensions are required. The angles between stretch marks need to be made as equal as possible, that is 120about, and to the axis of the pipe extension is best set at an angle of 45about.
To fix the extensions on the pipe, a clamp with three eyes is installed, and three anchors with rings in the roof or other places. For tensioning the cables, threaded tensioners are used, and for the manufacture of loops screw clamps.

Cable extensions are very easy to manufacture and install, and all the necessary materials are sold in any hardware store and are not expensive. To reinforce the ventilation pipe with stretch marks with your own hands is not difficult.
Fixing the position of the pipe with slopes
The cuts (rigid stretch marks) are similar in appearance to cable stretch marks, however, they differ from them in the principle of operation. Unlike cable extensions, which work exclusively in tension and must be fastened in at least three places, the cuts can also work in compression, therefore, to strengthen the pipe, only two points of attachment to the roof are enough.
Depending on the direction of the wind, the slopes will equally well withstand the wind load, which either compresses or stretches them. Due to this advantage, mowing can be used in confined spaces, for example, if the ventilation duct goes close to the roof eaves and the installation of three extensions is not possible.

Mowings are made, as a rule, from light metal profiles painted to protect against corrosion. For fastening to the pipe, as with stretch marks, a clamp is used, and the cuts are attached to the base on an anchor or other fasteners.
Unlike stretch marks, the cuts do not need to be stretched. They are immediately made to the desired length and are rigidly fixed to the chimney and roof to prevent any vibrations. When choosing the angles between the cuts, as well as between the cuts and the pipe, it is better to follow the same rules as with extensions.
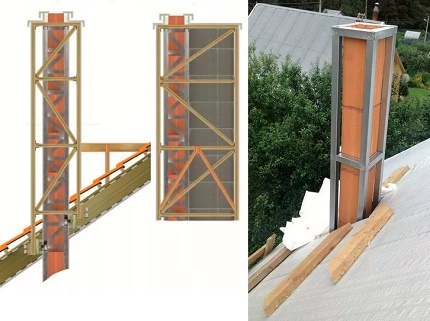
Metal construction
Metal racks are used in cases where it is not possible to fix the rooftops with slopes or the pipe is so high that it needs to not only be fixed, but also strengthened.
The most common are welded volumetric racks. Outwardly, they look like mobile communication towers and are a welded structure that acts as a power frame for the pipe.
The use of such racks strengthens the pipe and allows you to reliably hold it under wind loads in all directions. It is problematic to make racks on your own, as this will require metal, tools and experience with welded geometric structures. It is better to order their manufacture in a locksmith workshop.
If nevertheless there is a need or desire for independent manufacture, then you will need:
- Smooth surface for welding, so that the stand turns straight;
- Tool: welding machine, mask, electrodes, angle grinders with cutting and cleaning discs;
- Materials For small constructions, a corner of 40 and a strip of 40 × 4 are suitable. You can also use profile pipes of various sections: 40 × 40, 40 × 20, 20 × 20;
- High-quality paint for corrosion protection.
Structurally, the rack is made of two, three or four vertical corners of 40 or profiles 40x40, which are interconnected by short segments of a strip or profile of a smaller section at right angles or diagonally.
The greatest strength is given by the diagonal installation of the crossbars. However, for domestic use, the strength of the crossbars installed perpendicular to the racks is quite enough. In the place of fastening of the vertical element to the base, platforms with holes for fasteners are welded to it.

Depending on the design of the rack, it is securely attached to the roof or wall, and a ventilation pipe is attached to it on the clamps. The design is strong enough and able to withstand strong gusts of wind.
However, it should be remembered that the stability of a metal stand primarily depends on the reliability of its fastening to the base: the smaller the support area and the number of attachment points, the less wind the stand can withstand.
Is it necessary to insulate the ventilation outlet?
The question of the need for insulation of ventilation, and in particular its access to the roof, is often asked by independent developers. The answer to it is unequivocal: insulation must be mandatory!

The ventilation outlet is on the street and is exposed to negative temperatures, and the wind only accelerates the cooling process. Having frozen, the walls of the ventilation duct begin to cool the warm air passing through it from the room. As a result, traction is significantly reduced.
In this case, two negative phenomena are created:
- If the warm air from the room goes up, trying to go outside, then having cooled off the walls, it starts to go down again, creating a traction and swirls, interfering with the normal operation of the ventilation;
- The warm air removed from the premises contains fumes from human activities.In contact with the cold walls of the ventilation duct, this moisture turns into dew and begins to flow back into the ventilation duct with drops, creating excellent conditions for the development of mold fungi.
In severe colds, condensed moisture does not have time to drain inside and freezes at the very exit. The vent hole is reduced and may freeze completely.
To eliminate these problems, the ventilation outlet should be sufficiently insulated. The easiest way is to use factory-made ventilation outlets. The manufacturer makes the structure double-walled and lays a heater in it.
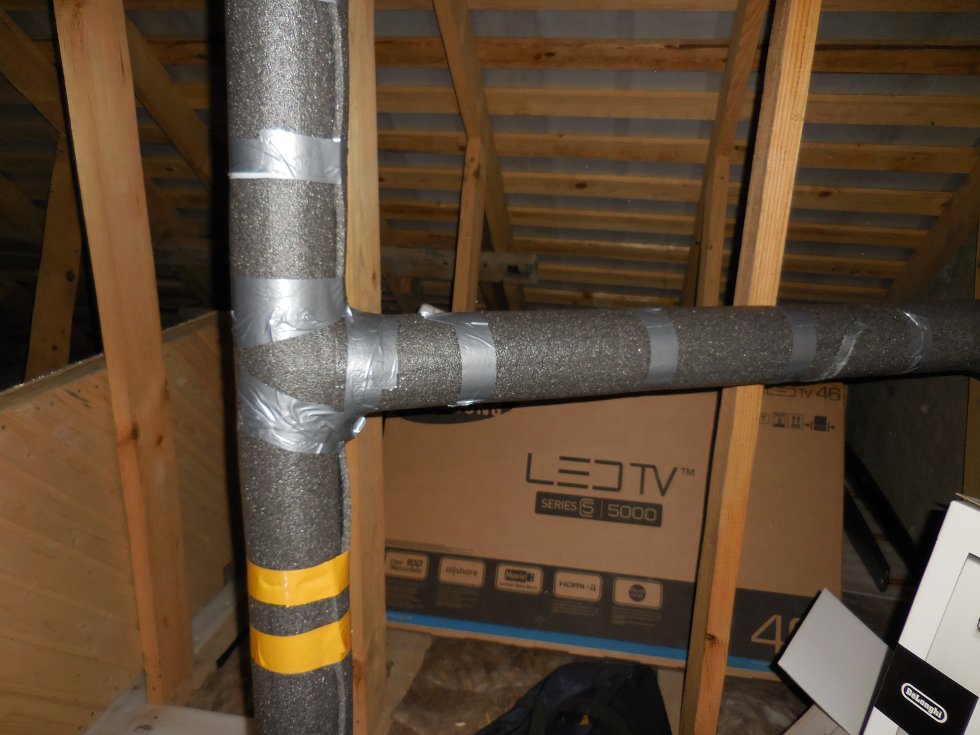
If the outlet is arranged with ordinary ventilation plastic or metal pipes, then they can be insulated independently. It is best suited for this purpose tubular insulation made of foamed polyethylene (used for insulation of sewer pipes, water and heating), roll insulator or similar material.
It is conveniently applied by simply wrapping in several layers and fixed with reinforced tape. Polyethylene and Isolon are not afraid of water and sunlight, and birds and insects do not show interest in them.
It is not necessary to use foil insulation: it is much more expensive, and the effect of the metal layer is unlikely to be noticeable. The main thing is to make a sufficient thickness of the insulation, which is recommended to be done at least 30 mm.
Also, mineral wool is suitable for warming the ventilation outlet. However, over it you will have to make a protective cover made of durable material (fiberglass, galvanized or plastic sheet, etc.) to protect it from wind, rainfall and birds. The most convenient for such purposes is mineral wool in rolls: it simply wraps around a pipe.
In addition, if you are considering how best to fix the ventilation pipe on the roof and at the same time insulate it at once, the elements are perfect chimney sandwich. They are easy to install and equipped with a factory-installed insulation.
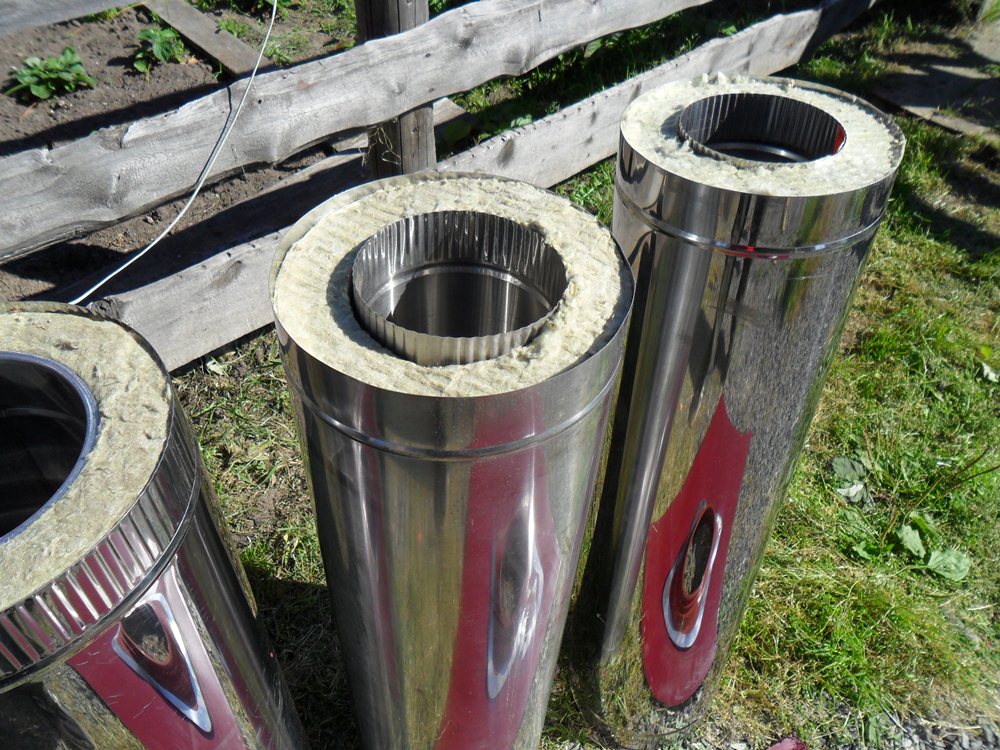
In addition, the chimneys have standard bushing assemblies for tight connections, as well as standard baffles and umbrellas to protect against rain and wind.
Another advantage of using chimneys for the manufacture of ventilation outlets is the ability to connect them with clamps for extensions for subsequent reliable fastening. And the service life of stainless steel chimney pipes as a ventilation duct is practically unlimited.
Typical installation errors
Despite the apparent simplicity of the selection and installation of the ventilation outlet, errors are often made in this procedure, leading to unpleasant consequences:
- Poor sealing of the passage element at the junction with the roof or insufficient self-tapping screws, as well as the absence of a clamp at the junction of the passage element with the pipe. The consequences are leakage of the roof, wetting of the rafter system and insulation, with subsequent destruction. Remedy: restore tightness, install a clamp;
- The absence or insufficient insulation of the output. Consequences: decrease in draft in the ventilation duct, and in cold weather it freezes with complete cessation of draft. Remedy: perform additional thermal insulation;
- Installation vent deflector without observing the distance between the pipe edge and the device umbrella. Consequences: reduction of traction, its termination or the occurrence of reverse traction. Remedy: make a ventilation outlet above the zone of wind backwater or install a deflector with an electric fan;
- Lack of reinforcement of a high ventilation pipe.Consequences: pipe fall due to strong gusts of wind with damage to the roof or personal injury. Remedy: Reinforce the pipe with braces, slopes or a stand.
Do not make the indicated errors when installing ventilation outlets in your home. And if the work has already been completed, then make sure that they are done correctly and, if necessary, make corrections in time.
Introduces the specifics of the organization of the ventilation system in the chicken coop next article, the information of which will be extremely useful to farmers and owners of a small private economy.
Conclusions and useful video on the topic
This video shows how to install a ventilation outlet on the roof of a metal tile:
Video of installing a ventilation outlet on a soft roof:
This video shows the option to install the cuts:
There is nothing complicated in installing a ventilation outlet. Thanks to a wide selection of materials, it is possible to make and install such an output both independently and using factory products that have undoubted attractiveness.
The main thing during installation is to ensure the tightness of the passage through the roof, the correct height, reliable fastening and good thermal insulation.
Tell us about how to equip the passage through the roof with your own hands. It is possible that you have information on the topic that may be useful to site visitors. Write comments, please, in the block form below, ask questions, post photos.
 Ventilation on the roof of a private house: the construction of the passage of the duct through the roof
 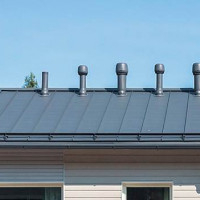 Installation of ventilation on the roof: installation of the ventilation outlet and air supply units
 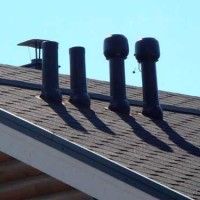 Adjoining the roof to the ventilation shaft: arrangement of the passage of the ventilation unit through the roof
 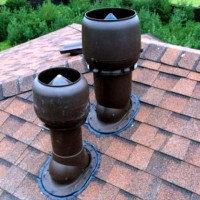 Ventilation pipes for the roof: tips for choosing a pipeline + installation instruction
 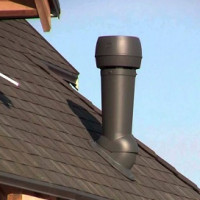 How to make a node of the passage of ventilation through the roof: arrangement of roofing penetration
 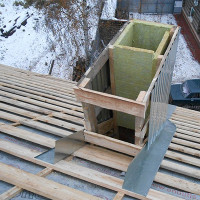 How to make a roof ventilation duct: a detailed construction guide
  How much does it cost to connect gas to a private house: the price of organizing gas supply
  The best washing machines with dryer: model rating and customer tips
  What is the color temperature of light and the nuances of choosing the temperature of the lamps to suit your needs
  Replacement of a geyser in an apartment: replacement paperwork + basic norms and requirements