The device of the indoor unit split system: how to disassemble equipment for cleaning and repair

Cleaning the air conditioner should not be limited to caring for external elements. Dust penetrates everywhere, accumulates and interferes with the normal operation of mechanisms. You can invite a wizard from a service center for maintenance, but many craftsmen cope with this task on their own.
In order to perform all maintenance work independently, you need to know the device of the indoor unit split system. We will tell you all about the design of HVAC equipment. We will give recommendations according to which it was possible to dismantle the unit without fear, clean and assemble again.
The content of the article:
The main elements of the indoor unit
Although the arrangement of specific models from different manufacturers varies, the circuit diagram by which such climate equipment is assembled has common basic elements.
The internal unit of a modern split system consists of:
- front panel;
- filter elements;
- fan and evaporator;
- engine;
- jalousie;
- drainage systems;
- display panel, etc.
To properly disassemble the device, you need to carefully disconnect the individual elements in the correct sequence. First, you should carefully study all the accompanying documents received when purchasing the device.

In them you can find a lot of useful information on how to disassemble the internal unit of this split system to perform maintenance activities. If for some reason the documentation is missing, it makes sense to look for the necessary information on the Internet.

General work procedure
First you need to prepare for disassembling the indoor unit: disconnect the device from the network, prepare the necessary tools and materials.You will need different screwdrivers, hexagons, a rag, a container to drain condensate, a ladder, etc., will come in handy.

Different manufacturers split systems use various types of fasteners: bolts, latches, clips, etc. Particular care should be taken when working with plastic fasteners. Excessive force will break the element. Instead of cleaning the device, you will need to repair it.
First, remove the front panel of the indoor unit. You have to unscrew the bolts or disconnect the clips, they can be carefully pry off with a straight screwdriver.
After that, a strainer and shutters are removed from the housing. Usually these items that need to be cleaned often enough are simply inserted into the case. Manufacturers provide for the possibility of their easy dismantling.

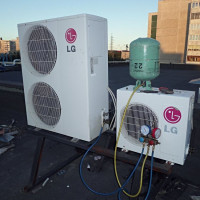
Now you need to find and disconnect the drainage tray, if possible. Sometimes it is built into the case. At this stage, you will need a container for accumulated liquid, as well as rags, in case the water spills. In LG air conditioners, such an element is usually mounted on one bolt, clips are located below, they must be snapped off.
Then remove the impeller shaft. In its grooves, a lot of dust usually accumulates. This element is usually taken out from below or from the side. If the design allows, it is preferable to use the first option, it is simpler.
Do it like this:
- Disconnect the mounting of the radiator located on the left side of the case.
- Loosen the impeller fixing screw on the right.
- Gently lower the shaft down, holding the loosened bolt with a screwdriver so as not to touch the blades.
All operations must be performed slowly and carefully. The screw that holds the impeller is very tight. It must be unscrewed so as not to damage the thread. You should not twist it to the end, because putting it back in exactly the same position can be difficult.
If there is no way to remove the shaft from below, you need to use a more complex option:
- Disconnect wiring from control unit.
- Remove the fasteners and disconnect the unit from the split system.
- Remove motor mounts, remove cover from shaft.
- Separate shaft and engine by bending radiator tubes.
- Remove the impeller and clean all components.
When reassembling the device after cleaning equipment It is very important to correctly connect all the elements. The blades of rotating parts must not touch the walls of the housing or other components of the device.
Attention will also be required during wiring. Inexperienced masters are better to pre-draw a diagram or photograph the wires so as not to confuse anything during their connection.
Dismantling the example of a Panasonic air conditioner
Even such a high-quality device with good filters is not protected from dust inside the case. The space between the lamellas of the turbine here was very small. In these narrow gaps, dust accumulates that cannot be taken with a standard vacuum cleaner.

The Panasonic has the ability to remove the turbine for cleaning without any problems. Although this is not such a simple procedure as when processing filters. You won’t have to remove the case from the wall, all operations can be performed standing on a stepladder.
An electronic control unit with indication and other elements of this type are located on the right from the point of view of the master, who stands directly in front of the device. You need to start by disconnecting the case. Bottom on the sides it has screws, and on top it is held by latches.
First you need to unscrew the screws. They are located on the sides and hidden by neat decorative caps. To find them, the moving part of the body will have to be lifted. The plugs are pry off with a straight screwdriver, then with the help of a cross screw the fasteners.

Now the housing must be lifted with a gentle movement from the bottom up to disconnect it. A click is possible because it is held by three plastic hook-shaped latches. Now you can remove another part of the housing, which consists of a cover, an engine and a condensate collector.
This unit is mounted in grooves located deep enough in the body, but can be removed easily. Gently pull it down with moderate effort. If the entire unit does not separate immediately, you can first release the mount on the left, and then on the right.
At this stage, you need to pay attention to the position of the hose along which condensate is discharged. If it interferes (this happens when connecting on the left side), then it must first be disconnected from the condensate collector.
The moisture container does not completely separate from the case, since it is additionally connected to it by a pair of thin wires. You need to take care of the stand in advance for this part of the air conditioner or hang it on a cord, rope, etc.
Wiring may break due to the weight of the condensate trap. As already mentioned, accumulated condensate may spill out at this stage. It is better to pour the moisture immediately into a suitable container. It is very likely that some of the water will spill, so it’s best to keep a rag on hand.
About what should be done if the climate equipment constantly flows into the room they are processing, you will learn from next article, which we strongly recommend to read.
The removed condensate collector will provide access to the technical equipment of the unit: the head of the screw fixing the heat exchanger and the rubber turbine bearing will be visible on the left. The screw must be unscrewed, but the bearing should not be touched, it should remain in the grooves that hold it.

Now you need to rotate the turbine with your hands to find on its right side the place where it is fixed with a screw on the motor shaft. One lamella is missing here. The screw is recessed deep. It needs to be unscrewed, but it is not necessary to remove it in order to facilitate the reassembly. After this, the heat exchanger should be lifted with moderate effort.
It is fixed on latches, a click should sound. Here you need to act carefully so as not to cut yourself, the edges of some parts are quite sharp. When the heat exchanger comes out of the latches and is raised, a vertical clearance will appear, through which it will be possible to carefully remove the turbine, after removing the bearing.
A few words about cleaning
After disassembling the indoor unit, it is recommended to carry out dry cleaning. To do this, you need a household vacuum cleaner and a brush.
They act simultaneously: they brush the available space with a brush, and the edge of the hose of the included vacuum cleaner is kept nearby to immediately remove debris. Some process the inside of the unit with dry steam if there is access to a steam generator.

Then you can use a cleaning agent, for example, in the form of an aerosol. They hold him for a while, you need to act according to the instructions. Then the surface is treated with clean water using a brush or spray gun to remove the cleaning agent that has dissolved the dirt. You will need a container to collect draining water.
Now you need to wash the turbine, filters and other elements, dry them. This can be done using conventional home remedies, but there are commercially available kits designed for this purpose. Then reassemble the device. All fasteners must be in place and carefully tightened or snapped into place.

The parts removed from the device can be washed with hot water and brushed. There is household chemicals specifically designed for such a technique. But ordinary household soap will give a good result. Of course, you need to protect the parts from damage.
For example, stiff bristles can seriously damage the strainer. A lot of dust accumulates on the impeller, you need to process each groove. All filter elements are thoroughly washed. They must be dried before installation.
Especially carefully treat the surface of the evaporator and rotor, as well as the condensate tank. It does not hurt to check the condition of the tube, through which moisture goes out. If you clean it with a piece of hard cable, you can detect serious contamination there. They are simply pushed out, and the tube is washed.

Some craftsmen decided not to disassemble the indoor unit. They remove only the front cover, the filter, and then cover the wall with polyethylene and wash the indoor unit with a thin stream of water under high pressure. This is not the best solution, since you can break the air conditioner like that and damage the decorative finish.
If the cleaning measures did not give the expected result, the full functionality of the split system is not restored, you will have to repair the air conditioner. You can find repair instructions in our recommended article.
Conclusions and useful video on the topic
How to disassemble the indoor unit:
To perform such a disassembly, you need attention, time and patience. The procedure does not require a complex tool or special skills. But an inattentive attitude during operation is unacceptable, since this can completely ruin the split system.
Want to talk about how you cleaned the internal component of the climate unit with your own hands? Do you have useful information that is useful to site visitors? Please leave comments in the block below, ask questions, publish photos on the topic of the article.
 Refueling split systems: how to fill freon climate equipment with your own hands
  Standard sizes of air conditioners: typical sizes of outdoor and indoor units
  Split system for 2 rooms: how the equipment is arranged and works + the nuances of choosing such a technique
  Air conditioner with fresh air supply: design and selection of a supply air split system
  What is a split system: device and principle of operation of typical air conditioning systems
  Proper use of split systems: operation of equipment + tips for care
  How much does it cost to connect gas to a private house: the price of organizing gas supply
  The best washing machines with dryer: model rating and customer tips
  What is the color temperature of light and the nuances of choosing the temperature of the lamps to suit your needs
  Replacement of a geyser in an apartment: replacement paperwork + basic norms and requirements
Of course, an ordinary person is unlikely to cope with the repair of the split system, it’s better to call a professional, but everyone can clean it. There is nothing super complicated to disassemble the indoor unit. But you need to clean it at least once a year, and more often, otherwise an unpleasant odor will begin to appear, crackling and other extraneous noise may appear when you turn it on and work.
Unfortunately, cleaning does not always save the situation.Last year, I had a split system that was carefully used, was cleaned annually, in particular, filters were regularly washed, and a sharp unpleasant odor suddenly started. One that immediately began to pull to clear his throat, while running away from the room. Dismantled the indoor unit. While disassembling, he was still surprised: did he really manage to get so dirty? No, that's fine. But still I went through all the components, washed, dried, assembled turned on - the same thing.
And on the nose summer, without air conditioning can not survive. My wife even tried to spray perfume on the details, she’ll suddenly help))) As a result, he called the master. He said that the smell comes from the pipes connecting the indoor and outdoor units, this can not be solved by cleaning the indoor unit. I had to change the tube. Now, if there was a way to wash them or clean them at home without damaging the air conditioner, it would be great. But I haven’t heard of this yet.
In fact, such craftsmen are now carrying a small cart. Unfortunately. The thing is that the cost of cleaning the split is so low that many rushed there to cut down quickly on the dough. I even met the only ones who cleaned only the indoor unit of the split. And these are supposedly professionals. So if you don’t clean it yourself, then at least know what exactly should be cleaned.