Installing a split system: step-by-step instructions for self-installation

By controlling the microclimate of personal space, we create optimal conditions for recreation, work, and activities. Installing a split system will allow you to set a favorable level of temperature and moisture in the simplest way. You must admit that in summer there are many days that need to be regulated by climatic parameters.
After reading our article, you will find out all the details and subtleties of the installation of air conditioning equipment. Carefully selected and systematized information will be useful both for independent home masters and for installers' customers to verify proper execution.
We have described the installation process in detail, listed the nuances of the location and mounting of the blocks. The materials required for installation and connection of the units are listed. A valuable addition to the text, facilitating the perception of information, are photos and video applications.
The content of the article:
Choosing a place to install the system
Studying information about how to correctly install split systems in a private house or apartment, you first need to choose the location of its parts.
For this, it is necessary to take into account the direction of distribution of the cold / hot air flow in the room, taking into account the main technical requirements specified by the equipment manufacturer in the instructions.

There are certain rules that must be taken into account when choosing a block placement point:
- the distance between the unit and the ceiling should be at least 15-20 cm, although some manufacturers indicate 20-30 cm in the instructions;
- from the side to the wall - at least 30 cm;
- to an obstacle that will impede the flow of outgoing air or scatter it - not less than 150 cm.
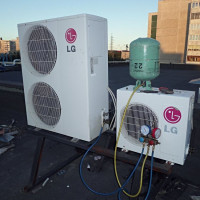
For the outer part of the split system, the location is selected based on the bearing capacity of the walls. Installation is possible near the window, on the slabs enclosing the loggia, or on the wall next to the balcony.
For those living on the lower floors, the installation of the block is carried out above the window - as far as possible from passers-by.

For a multi-storey building, especially if the apartment is on the top floor, it will be necessary to involve high-altitude specialists or to determine the installation point in the closest proximity to the window, which will provide easy access during installation.
Determining the distance between blocks
Often the choice of equipment location is regulated by the minimum and maximum distance between its parts. These indicators are mainly indicated by the manufacturer and depend on the model range and characteristics. split systems.
Sometimes companies do not indicate the minimum length of the circuit between two units, so installation can be performed arbitrarily.

It’s a little easier to figure out the maximum possible distance between the two units. The standard indicator is 5 m. An increase in the length of the route is also possible, but in this case it is necessary to count on additional costs due to the need to refuel with freon.
Preparation for work
The decision to install a split system on your own comes, as a rule, after asking prices from specialists. Incredibly high amounts for the implementation of the work, which takes 3 hours, are justified by the presence of expensive tools and its wear during operation. This is what makes up the bulk of the wizard's service fee.

If you look at the recommendations of equipment manufacturers, often the instructions indicate that the preparatory work can be done on their own, but for the installation of pipelines, connection to the electric network, and the process of evacuation, it is advisable to invite specialists with the appropriate tools.
Hardware Installation Tools
It is possible to carry out independent installation of the cooling unit, as most of the tools are in the suitcase of the home master. An exception may be a vacuum pump, but it is not necessary to buy it - it will be possible to make such a unit from old parts.
Some brigades of craftsmen do not even use this equipment when laying tracks up to 6 m long.

During the installation process, an important aspect is to observe the horizontal arrangement of block systems. In connection with these requirements, each stage of work should be accompanied by a check by the building level.
If any tool is not available, it can be rented at a hardware store.
The following equipment will need to be prepared in advance:
- Hammer drill. It is used for making holes in the facade, through which the track will be laid, generalizing the external and internal blocks.
- Drill with a set of drills.Used for mounting fasteners.
- Pipe cutter for cutting pipes made of copper.
- Deburring device after pipe cutting. You can use a rimer, file and sandpaper.
- Roller for copper pipes.
Some people think that using a reamer does not make sense, especially if pipe cutter new and leaves no burrs or dents, but in vain.
Only after manipulations with the chamfer, the edge of the flared tube can be pressed as tightly as possible with the nut, and accordingly, the leak of freon is unlikely.

According to the technical rules of installation, a vacuum pump is necessary - the air conditioning system is sealed with this equipment. After filling the route with refrigerant, the evacuation process is carried out.
Purchase of necessary materials
Components will be required quite a lot, but all of them are easily available in any specialized store. Do not forget that the materials should be of the highest quality and selected exclusively for the device functionally aimed at cold.
You must purchase a wire to supply power and connect the units. In the passport or in the installation instructions for the equipment always indicate the necessary parameters.
Standard is a four-core power cable with a cross-sectional area of 2 mm2 or 2.5 mm2. The length is selected based on the distance of the route, taking into account a small margin.
You will also need to prepare seamless thick-walled tubes of type soft copper designed for cooling devices. Pipes are selected of smaller and larger diameters. More specific specifications are indicated in the user manual.
The length is equal to the length of the route plus an additional margin of up to 30 cm. During the transportation of the tubes, their edges must be plugged to shelter from dust settling inside the product.

For insulation of pipes a foam rubber insulation is used. Sell it in segments of 2 m. For the implementation of measures for thermal insulation, a length equal to the length of the route will be required. Synthetic insulation is used on two pipe diameters.
As a drainage tube, experts recommend installing a corrugated hose equipped with a plastic spiral inside. You can also use an alternative part - a polypropylene tube. Its length is equal to the length of the track with a surcharge of 80 cm.
And you will need two L-shaped brackets to fix the block from the outside. The appropriate size of the parts is determined by its dimensions, and the safety margin on the bearing load should exceed its weight by 5 times. Such an increase in the maximum allowable stress of the part is required to compensate for wind and snow loads.
It is better to buy these components from a company selling spare parts for household split systems.

As fastening parts are used: anchors, dowels and bolts. Their number, type and parameters are selected based on the type of brackets and mounting plate intended for the indoor unit.
The type of walls where the external part of the system is to be installed is also important. To camouflage the laid communication line, a plastic box of standard dimensions 60 * 80 cm will be required.
Split system installation procedure
It is quite a real task to independently install an air conditioning system, however, there are many nuances in the work and they relate to certain models, so the installation process may have some differences. To study all the requirements, it is initially necessary to read the instructions for the equipment model purchased.
Stage # 1 - installation of outdoor and indoor units
The first to be installed indoor unit. Having decided on its location, the area is marked on the wall for the mounting card. After drilling backlashes, plastic plugs for dowels are inserted, a card is hung and fixed with dowels.

After installing the cassette, using the building level, the exposure of the strict horizontal placement of the future block is measured. In case of any discrepancy, it will be necessary to redo all the work performed.
At this stage, preparatory work for laying the tracks is ahead. First, the lines of its location are calculated. Then a hole is drilled into the facade wall, taking into account the necessary slope of more than 1/100.
A hole with a diameter of 5 cm is also drilled with a slope, while the angle of inclination can be increased, in comparison with the track. So, the condensate formed will be better off leaving the system.

When choosing a back-to-back mounting scheme, you need to check the hole designed to accommodate the power cable. To do this, verify the location of the power ports on the units.
And now it’s the turn of installing the outdoor unit. If we are talking about a multi-storey building, then special equipment for high-altitude work will be required.
As in the first case, the strict horizontality of the block must be maintained, therefore, at the marking stage, a level is also used.

At the time of mounting the fasteners, each available hole should be filled with anchor bolts (standard diameter 10 * 100 mm), regardless of their number. After, the outdoor unit is exposed and also fixed by fasteners.
Stage # 2 - laying the communication line
By means of an electric wire and two copper tubes, the connection of the outdoor and indoor units is carried out. Additionally, a drainage system responsible for the removal of condensate will be laid through the wall. These elements must be correctly selected, connected, laid and secured.
First, you should prepare copper tubes by cutting off the desired length with a pipe cutter and treating the edges with an example from burrs and dents after the cutting procedure.
Using other tools, such as a file, is not recommended. After its application, metal shavings get into the tube, which will circulate through the system and eventually lead to compressor failure.

Thermal insulation of the tubes is carried out by putting polyurethane foams on them
Now it was the turn to lay the drainage and cable. On each wire you need to wear a special tip. They are installed on conductors cleaned from insulating material and crimped with forceps.
The finished cable is connected to the air conditioner according to the diagram given in the device manual.

The drain pipe is connected to a special terminal on the indoor unit and discharged through a hole in the wall. The tube should be long enough and end at least 60 cm from the wall.
According to the rules, its installation is carried out at an angle to the outside. Clamps are required through each meter of length to eliminate sagging to prevent condensation from accumulating.
Stage # 3 - connecting the system units
The communications passed through the wall are connected to the corresponding ports. It is important to remember that the total length of the drainage pipeline cannot be more than 20 m. The copper pipes are laid in a loop method to catch oil, which is contained in a small amount in freon.
Drainage can be diverted in two ways: take it to the sewer or to the street. The first method is technically correct, however, due to the complexity of the reproduction, it is not widely used.

At the bottom of the internal block of the system is a tube with a plastic tip. A corrugation hose is put on it and tightened at the junction with a hose clamp.
A similar procedure is performed for the outside of the device, but many ignore it. If a polymer pipe is used instead of a hose, an appropriate adapter is selected. With it, connect the output of the unit and the tube.
To connect copper pipes, you need to initially lay them on the wall, using a pipe bender. If such a tool is not available, we suggest that you familiarize yourself with the article, which describes in detail how to bend a pipe without special equipment. Read more - read Further.
The tubes must be given the necessary slope without excesses and sharp creasing. First of all, they are connected to the unit indoors. To do this, nuts are loosened at the appropriate ports.
When untwisted, a characteristic hissing sound of escaping nitrogen will be heard. It is pumped at the time of production, to eliminate the oxidation of parts. After its descent, it is necessary to remove the plugs and completely unscrew the nut. The following is a rolling procedure.

The edges of the pipes in the area of 5 cm are aligned. Then, flaring is carried out to ensure the connection of the input and output of the blocks. This will create a closed circulation system. The correctness of the installation plays an important role in acquiring the properties of maximum tightness during the movement of freon.
The flared edge of the pipe is connected to the desired output and fixed with a nut. It is forbidden to use any additional devices - sealants, gaskets, etc. Used copper tubes provide the necessary sealing.

Do the same with all four ports. After connecting, the last stage of installation of the air conditioning system follows - the elimination of air and moisture, as well as possible argon residues that could accumulate during the installation process.
Stage # 4 - evacuation of the system
During installation work, air enters the tubes of the air conditioner and if it is not removed, it will end up in the air conditioning system. The result is an increased load on the compressor, respectively, its rapid heating.
Also, water particles adversely affect all the details. Freon contains a fraction of lubricating oil; its hygroscopic consistency upon contact with water becomes less effective. As a result, component wear will accelerate.
Two methods can be used to remove air: a vacuum pump or a small amount of freon fluid, which descends from a unit located outside. In the manufacture of an outdoor unit, manufacturers season it with freon with a little surplus.

An alternative to an expensive vacuum pump is the release of excess freon from the outdoor unit system. To do this, plugs are unscrewed on its valves. It is necessary to work with the lower port of a larger diameter. Under its cover is a hex socket. Based on its parameters, the corresponding key is selected.
Using a suitable key, turn the valve 90 ° and return it to its original position after a second. Thus, a small amount of freon enters the system and increased pressure is created. A second press of the finger on the spool located at the same port releases excess freon and gases from the system.
After complete removal of air, the spool outlet is twisted with a plug, and the valves are fully open and freon enters the split system. To check the tightness of the joints, they are coated with soap foam.
This completes the installation of the air conditioning system, you can proceed to direct operation.
Conclusions and useful video on the topic
How to lay the air conditioning track:
Rolling pipe for split system:
Installation and installation of air conditioners, subtleties and secrets:
It is worth remembering that with self air conditioner installation, minor factors do not exist. And everything that was done incorrectly, for example, rolling of pipes without trimming the rim, or insufficiently fixed connection - as a result leads to rapid wear of the components of the cooling system. Therefore, during installation, you need to be extremely careful with all the details.
If you have the necessary experience or knowledge in the installation of split systems, please share it with our readers. Perhaps you know some subtleties that we did not mention in this material? Leave your comments, ask questions in the block below.
 Refueling split systems: how to fill freon climate equipment with your own hands
 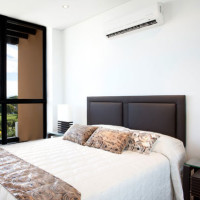 Where to get the air conditioning water drain: norms and options for the drainage system for a split system
  Proper use of split systems: operation of equipment + tips for care
 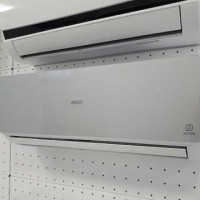 Errors of Aux conditioners: how to identify a malfunction and restore the operation of the split system
 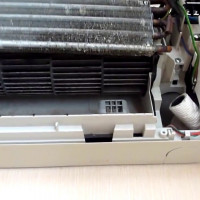 The device of the indoor unit split system: how to disassemble equipment for cleaning and repair
  Air conditioner with fresh air supply: design and selection of a supply air split system
  How much does it cost to connect gas to a private house: the price of organizing gas supply
  The best washing machines with dryer: model rating and customer tips
  What is the color temperature of light and the nuances of choosing the temperature of the lamps to suit your needs
  Replacement of a geyser in an apartment: replacement paperwork + basic norms and requirements
It is a fact that shops selling split systems parasitize on the installation, and in any case, you need to invite specialists for a banal, but regular connection to the electric network. And often, these unfortunate installers from online stores can only screw and hang a block on them to the wall, and that’s all. And they ask for fabulous sums, although you can handle this kind of work for one or two.
If ordered in a normal company, then the installers will be normal. In the end, they have much more experience in installation, compared with the average person, give a guarantee and are responsible.Personally, I thought about installing it myself, but figured it out and changed my mind.