How to install and connect an air conditioner: detailed instruction + analysis of errors
The installation quality is 90% determines the efficiency, continuity and service life of the split system. In an effort to save money, many refuse the services of a qualified installation team, relying on their own skills.
In order not to spoil expensive equipment and realize the full potential of the device, before installing the air conditioner, you should understand its design, study the installation technology and outline the main stages of work.
We will try to help you solve these issues. The article provides a diagram of the device of a household split, describes the principle of its operation, and also sets out detailed instructions with a description of each technological stage of installation of an air conditioner.
The experience of professionals allowed us to highlight the typical mistakes of novice installers - these points should definitely be taken into account when attaching and connecting blocks.
The content of the article:
Typical device and principle of operation
Air conditioning is technically sophisticated equipment. Individual models vary in the method of air supply, performance features, power and other technical parameters. Read more about the types and selection of air conditioners in this article.
A typical home air conditioning system is represented by a “bundle” of two elements - a street and an indoor module.
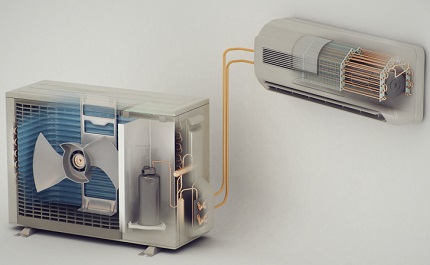
To understand by what principle air cooling occurs, it is necessary to understand the main components split systems.
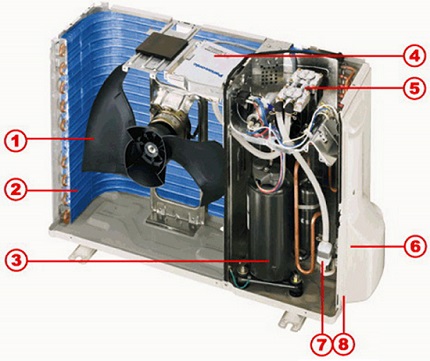
Remote unit components:
- Fan - provides blowing of internal elements, in particular, a capacitor.
- Capacitor. In the radiator, the refrigerant is cooled, transferring heat to the external air stream.
- Compressor - the heart of the refrigerator. The device is designed to compress and transfer freon along the circuit.
- Control system. On inverter models, the board is located in the outer casing; in other air conditioners, the electronics are part of the indoor unit.
In reversible split systems, a four-way valve is provided (position 5 in the figure below), which changes the freon supply vector depending on the operating mode: “heating” or “cooling”.
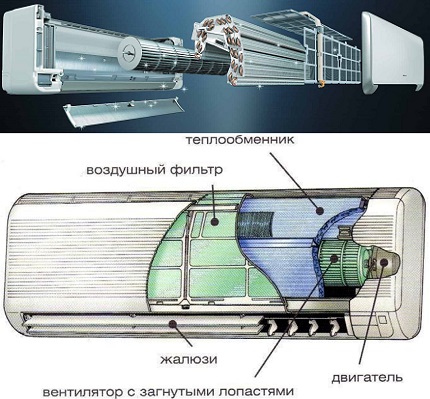
The device of the indoor unit is somewhat simpler.
The main working units and parts:
- Front cover with shutters. Plastic perforated panel for air supply inside the room. Lattices regulate the direction of air masses.
- Air filter. Polymer mesh and filter elements retain dirt particles. The degree of purification depends on the type of filter: carbon - the removal of extraneous odors, electrostatic - dust retention.
- Heat exchanger. Performs the role of an evaporator - heating and evaporation of freon are carried out here.
- Fan. It pumps air jets, redirecting them through the evaporator to the room. Several speeds are possible.
An indicator panel is located on the front side of the device to display the operating mode and current microclimate parameters.
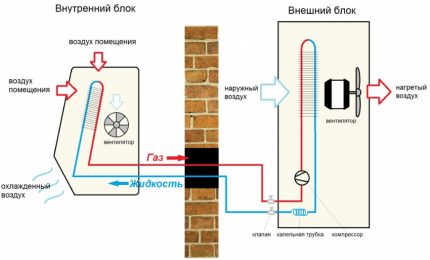
The principle of operation of the air conditioner is based on the transfer of heat from the room to the street. The system uses a unique property of the refrigerant - boiling at low temperature.
Operation in cooling mode:
- After the split system is turned on, gaseous substance is supplied to the compressor - here Freon is compressed, and its temperature rises.
- Heated gas enters the heat exchanger of the outdoor unit, where condensation occurs - conversion to a liquid state. The process is accompanied by cooling of freon and heat transfer to the outside.
- The refrigerant goes to the internal heat exchanger. Following the capillary tube, the liquid is throttled - the pressure of the material decreases.
The reverse process is observed in the evaporator - the incoming freon is blown with heat from the room and, when changing from a liquid state to a gas form, it releases cold. Cooled air flows into the room.
Requirements for the placement of a split system
Of particular note is the choice of the location of the air conditioning elements. A separate set of requirements and standards is devoted to the installation of an external unit, an internal case and the length of the pipe line of the system.
Outdoor unit. When choosing an external unit, you should consider the strength of the walls of the house. High-power models of air conditioners weigh up to 50-60 kg, standard household - 10-15 kg. In this case, the wall and the used fasteners must have a double safety margin of at least.
Nuances of installation:
- installation of heavy equipment on walls made of aerated concrete is highly undesirable;
- the unit is mounted on a ventilated facade through a damping seal - the material reduces the noise vibration of the device;
- support brackets should be attached directly to the wall, and not decorative cladding or insulation.
The location of the outer casing is selected taking into account the following recommendations:
- The unit must be in the free air circulation zone.
- An important condition is access to equipment for maintenance and repair.
- In the operating mode of the split system, hot air leaves the compressor unit, so the unit is placed so that warm fumes do not fall into the windows of neighbors on the lower floors.
The outdoor element must not be placed in an enclosed space, inside a glazed loggia or balcony. The minimum distance from each wall of the device to another dense surface is 30 cm.
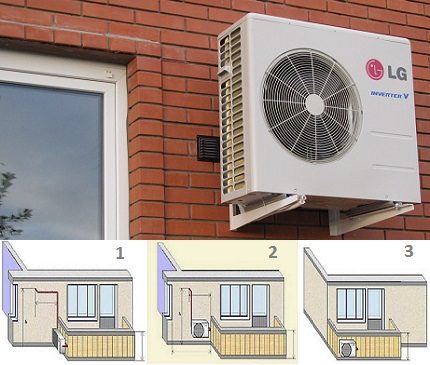
When arranging an air conditioning system for an apartment on the ground floor, the height of the outdoor unit is at least 2 m from the ground.
Indoor unit. The mounting place must comply with technological standards, ensure comfortable use of air conditioning and not particularly stand out from the interior.
General requirements:
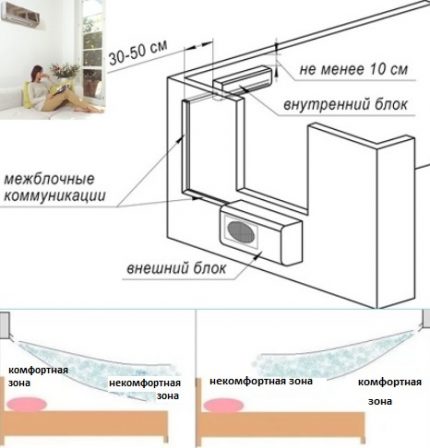
- The cooled air flow should not go directly to the person. It is better to avoid focusing in the area of frequent stay - on a sofa, bed or workplace. Models with versatile air distribution send jets along the walls.
- There should be no obstacles or objects in the path of the exit stream. Installation of the evaporative block in a niche is not allowed - cooling efficiency decreases.
- A hair dryer must not be placed over outlets and electrical appliances - if the drainage system malfunctions, moisture can cause a short circuit, damage to the devices.
During installation, it must be ensured that the air intake openings do not overlap - installation close to a wall or ceiling is not permissible.
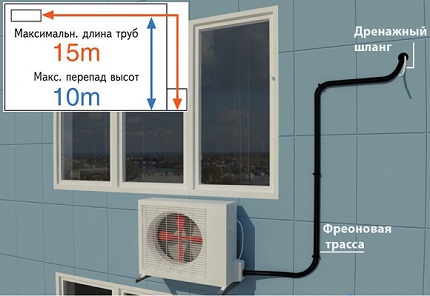
Track length. An important aspect of the system’s performance is the freon line footage - the distance between two blocks. The length of the track is indicated in the equipment manual. The optimal parameter is 6 m, permissible distances: vertical - 7 m, horizontal - 15 m.
Removing blocks to the maximum distance is not recommended for several reasons:
- the high cost of the copper pipeline;
- with the extension of the freon line, the load on the compressor increases - its capacity "weakens", and wear increases;
- the greater the length of the route, the more labor costs for its construction.
Very often, installers, in an effort to reduce the time to complete the work, persistently offer to "cut" the freon line. However, excessive track reduction affects the operation of the device.
Phased installation technology
Before installing a two-unit air conditioner, you should prepare the necessary tools and draw up a work plan. The general scheme of actions is as follows: drilling the shtrob and holes, mounting the panel of the hair dryer unit and fixing the street module, supplying communications, evacuating and starting the split system.
Selection of components and tools
Different manufacturers supply fully equipped air conditioners with mounting kit. Providing the missing fasteners is the lot of the installer.
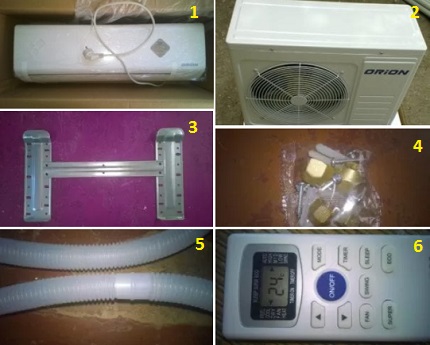
For self-installation you will need:
- copper tubes with a diameter of ¼ inch (liquid phase of freon), 3/8 inch (gaseous refrigerant) - the meter is selected in accordance with the length of the freon route plus 1 m of reserve;
- nuts for joining pipes;
- insulated sleeves made of foamed polymer;
- reinforced adhesive tape;
- anchor screws (diameter 10-12 mm, length 150-300 mm) and brackets.
A power outlet is required to power the units. Optimally, if it is connected to a separate VVGng cable 3 * 2.5 mm from a separate electrical panel. It is desirable that the cable is protected circuit breaker.
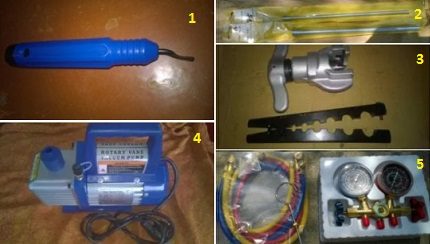
In addition to these tools, you will need: a hammer drill and drills of various sizes, screwdrivers, spanners, wire cutters, crimper and wire strippers.
Preparation of communication channels
The first thing to note is the location for the installation of the hair dryer unit, the path of the Freon circuit and the location of the through hole.
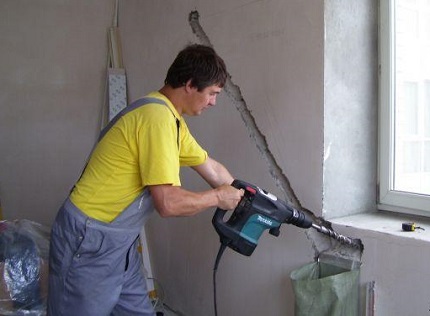
To output pipes and cables, a hole with a diameter of 50 mm is drilled with a slight slope towards the street - this will provide free condensate drain. Under the wires you need ditch the wall or use camouflage pads.
Insert a sleeve (plastic pipe) into the through-window, reducing the risk of damage to communications.
Mounting plate mount
The base for installing the hair dryer unit is mounted strictly horizontally so that the liquid from the drainage tank does not pour into the room, but is discharged through the drainage channel to the street.
In addition, the skewed air conditioner looks ugly.
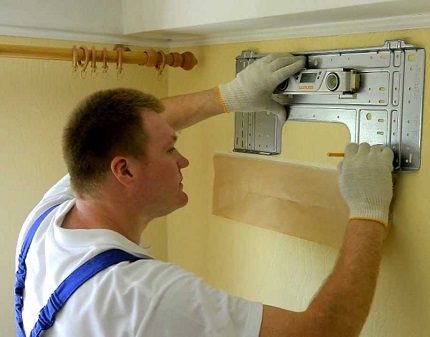
Mounting Plate Mount:
- On the back of the inner case, remove the steel panel by bending the latches.
- Attach to the wall, align horizontally.
- Mark the places for fasteners, drill holes, install dowels.
- Fasten the panel.
The mounting plate has many pre-drilled holes. To fix the base for the block, it is enough to use six of them - more convenient in the particular case.
Installing an external split block
Installing a street block on a facade wall involves risky high-altitude work. Hand-made installation is permissible only on the lower floors of high-rise buildings or in private one-story houses.
Even in these situations, it is necessary to enlist the support of an assistant and observe safety precautions - work with insurance. To mount the external module at a height, you need to invite an industrial climber.
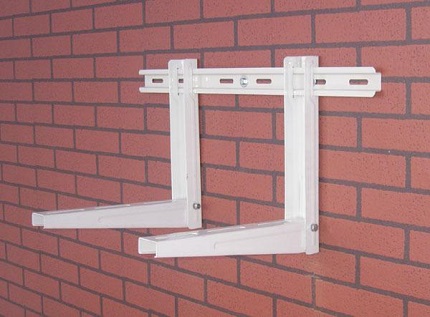
Bracket Requirements:
- The integrity of the paint layer. Coating material - powder paint without scratches, chips. The enamel will not withstand mechanical influences, and the places of damage lend themselves to corrosion - over time, the fasteners lose their strength.
- Oval Anchor Holes. Drilling additional openings is unacceptable, as the calculated margin of safety is reduced and the paint is peeled off.
The bearing capacity is indicated on the bracket housing. The distance between the two "beams" is calculated so that the openings in the supports coincide with the holes for fixing on the external module.
Progress:
- Fasten the brackets using long anchors, screws with a diameter of 10-12 mm. For each support - at least three fasteners.
- Under the paws of the split block lay rubber pads - vibration isolators.
- Lower the module onto the brackets.
Pass the anchor through the seal, the holes in the supports, block legs and tighten them tightly. The diameter of the mounting bolts is 8-10 mm.
Supply of copper tubes and cable
Next, measure the length of the communications from the indoor unit to the terminals and valves on the outdoor unit. Cut the desired length of wire and strip it.
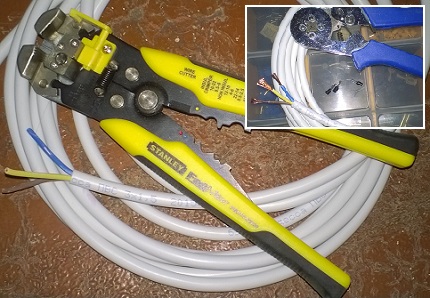
Preparation and installation of freon highway:
- Cut and strip two identical pipe sections. Remove chips and wipe the ends.
- Throw a flare nut onto the tube and flare.
- Bend the tubes coming from the indoor unit and screw them with nuts onto the nipples. Tighten the nuts.
- To put on a heat-insulating cover.
- If necessary, extend the drainage.
- Collect cables and tubes, tape them. Put plugs on the copper tubes, place the drainage channel at the bottom of the ligament.
- Pull the communication “node” through the hole in the wall.
- Attach the hairdryer to the mounting plate.
- Using a pipe bender, give the track the desired shape, avoiding sharp corners.
- Bring the pipes to the valves - with a larger diameter to the gas, smaller - liquid. Trim the excess if necessary.
- Put on insulation and flare tubes.
Before connecting and testing the air conditioner, it is necessary to check the tightness of the line. Test the pipes and check the pressure stability in the system with a pressure gauge.
Vacuum refrigeration circuit
A mandatory step is to create a vacuum in the system. The procedure eliminates air and moisture from the line. For work, a pump and a manometric manifold are used.
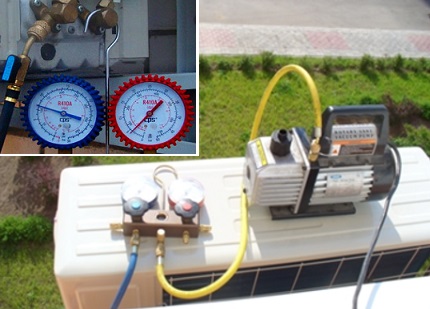
System evacuation order:
- Close the valves on the pressure gauge.
- Start the vacuum pump, open the pressure gauge valve - after a minute, the device will show a zero value.
- Continue evacuation to remove moisture from the system. Operating time - 15-30 minutes.
- Close the valve and turn off the pump.
An increase in pressure after turning off the pump indicates leaks and a leak in the circuit.
Filling Freeway
Finishing stage - refrigerant start and checking the performance of the air conditioner. A certain volume of freon must circulate in the circuit to maintain the pressure set by the manufacturer.
When lengthening the line, refueling with this substance is required.
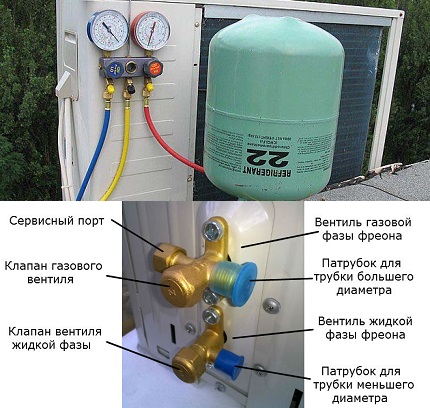
After refueling, disconnect the hose from the "gas" valve. Precautions should be observed - wear glasses, gloves and do not tilt your face to the unscrewed fitting. To minimize the loss of freon, you need to act quickly.
It is necessary to be prepared for the fact that the unscrewing of the fitting is accompanied by hissing, the release of oil and freon. An uninformed person can abruptly pull his hand and release refrigerant. In addition, there is a risk of thermal burns.
Before the first launch of the split system, it is necessary to check the joints of the route for leaks (soaping), tighten the plugs on the service port and valves. Now you can connect the air conditioner to the outlet and test its performance.
Common errors in installing an air conditioner
Non-compliance with installation requirements is a frequent cause of failures in the operation of split systems and an unreasonable increase in electricity bills. Here is a list of popular shortcomings.
№1. Installation in the wrong place. Requirements for the placement of split blocks were discussed above. Inexperienced masters make standard mistakes: installation over a heating device or in a zone of direct exposure to sunlight.
№2. Poor rolling.
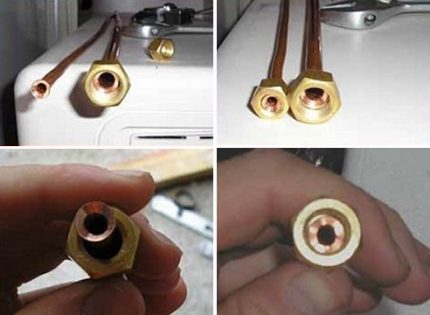
№3. Refrigerant volume mismatch. The amount of freon is directly proportional to the footage of the circuit. If the trunk was increased / decreased, and its volume was not adjusted, then the air conditioner does not work correctly, and eventually fails.
№4. Lack of thermal insulation. The hole in the wall for laying the trunk must be filled with foam. If this is not done, then the temperature differences will provoke the appearance of condensate - the deposition of moisture on concrete will lead to the formation of fungus.
№5. Halls of copper tubes.
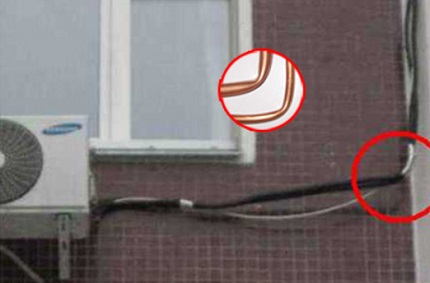
№6. Poor cable connection. Errors in the arrangement of electrical wiring are fraught not only with the breakdown of climatic equipment, but also with a fire or electric shock.
№7. The use of substandard materials. Weak brackets can not cope with the assigned load, especially in winter when snow accumulates on the split block. Preventive measures: choosing a reliable support and installing a protective visor above the street block.
Conclusions and useful video on the topic
A detailed video will help you understand the technological nuances of installing an air conditioner in an apartment.
The briefing contains a list of necessary tools, displays the process of installing split blocks, organizing cable channels, connecting communications and commissioning the air conditioner:
The main difficulty in installing an air conditioner is installing a heavy block on the facade of a tall building. It is better to use the services of an industrial climber. The rest of the actions do not require special skills, the main thing is to comply with the installation technology and the recommendations of the split manufacturer.
Do you have personal experience installing an air conditioner? Do you want to share your accumulated knowledge or warn readers against possible installation and connection errors? Please leave comments and participate in discussions - the feedback form is located below.

 How to install the air conditioner on the load-bearing wall: rules + technological sequence
  How to install air conditioning on the loggia and glazed balcony: instructions and valuable recommendations
  How to install air conditioning in a plastic window: technology secrets and installation instructions
 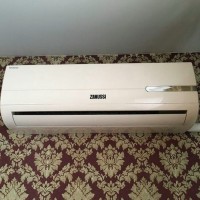 Errors of air conditioners Zanussi: codes of malfunctions and instruction on their elimination
 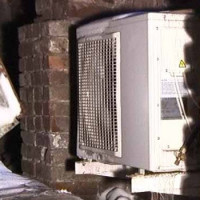 Installation of an external air conditioning unit in the attic: the possibility of solving and analysis of technical specifics
 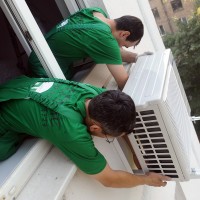 When to install the air conditioner during repair: the best period for installing the air conditioner
  How much does it cost to connect gas to a private house: the price of organizing gas supply
  The best washing machines with dryer: model rating and customer tips
  What is the color temperature of light and the nuances of choosing the temperature of the lamps to suit your needs
  Replacement of a geyser in an apartment: replacement paperwork + basic norms and requirements
Yes, a lot depends on how tightly the air conditioner is attached to the wall on the street. My “masters” were installed, so two weeks later the bracket fell off on the left side - surprisingly, the right one coped with the load imposed on it. It’s good that it all ended so. And if he fell down and, for example, fell on someone's car? So watch out for this.
Guided by the information you provided, you can open your own installation service! It is good that they brought an image of the design and principle of operation of the air conditioner. Interestingly, does it install industrial air conditioners by this technique? It would be nice to add a couple of paragraphs about troubleshooting. Perhaps I’ll follow the advice of the previous commentator and I will monitor the installation of the climate unit so that the work is carried out according to the rules.
Industrial air conditioners, Sergey, are installed, guided by a developed project.
One section is devoted to the number of outdoor units providing the necessary cooling capacity, the other to the placement of indoor units, the third to communications, the fourth to automation, linking the work of the components. To represent the system, I attached a screenshot of the outdoor units located on the roof of the building.
In case of malfunctions, Sergey, a modern air conditioner signals the owner. On an electronic board displays "error codes". For example, attached a screenshot of Daikin. Having looked, you will understand that it is useless to write a separate article for amateurs, and the masters are provided with training manuals.