How to install the air conditioner on the load-bearing wall: rules + technological sequence

If you decide to independently mount and connect a brand new air conditioner, you need to know all the technological features and subtleties. After reading this article, you will learn how to properly install the air conditioner on the load-bearing wall so that there are no problems in operation or maintenance.
Knowing all the features of the work, you can not only control the hired craftsmen, but also do everything yourself. Given that the installation usually costs half the air conditioner, this is a chance to save a lot.
Here you will find tips on choosing a place for each block. We described all the nuances of installation, gave a list of everything you need with options for replacing improvised means. They offered detailed instructions for installing the air conditioner, an analysis of possible errors and a video of the whole process that will help even a novice cope.
The content of the article:
How to choose a place for the air conditioner?
Not only a comfortable microclimate in the house depends on the correctness of this decision, but also the health of residents, durability split systems, the size of electricity bills and unit maintenance. In addition, in the case of load-bearing walls, errors can turn into problems with the BTI and other offices, and sometimes even the collapse of the building.
To avoid all the described negative consequences, choosing a place and method of installing the air conditioner, one should take into account many factors - we will talk about them later.
Restricted Walls
Bearing walls are the thickest in the house, the main load is distributed on them, damage to their structure threatens the safety of all residents.

The outer walls are always load-bearing, and therefore there is no choice for an outdoor air conditioning unit. Many owners try to hide the communications of the internal block in the wall for aesthetic reasons. To do this, you need a groove with a depth of 4 - 7 cm.
Reinforcement in load-bearing walls laid only 3-4 cm from the surface of the wall. This means that the reinforcement will have to be cut out - and this is dangerous, besides it is forbidden by SNiP 3.05.06 - 85. The prohibition of deep chilling applies to brick bearing walls: although there are no reinforcement in them, but a significant reduction in thickness, especially on the horizontal segment, negatively affects the resistance to stress.
Does this mean that it is impossible to install air conditioning and communications in the load-bearing wall safely and legally? Of course not.
There are several solutions at once:
- Laying the trunk in the duct is the most common and universal option, it is also used in the case of installing an air conditioner after finishing the walls;
- Installation of blocks back to back is only possible when the air conditioner is hung on a wall facing the street.
- Stacking air conditioning tracks into a false wall, column, other decorative structure on the wall or ceiling of drywall. Sheathing the entire wall with drywall, you can at the same time organize sound insulation from neighbors or insulation.
If you are not going to sell, inherit or make other transactions with the apartment, it is likely that illegal wall chipping for installing an air conditioner will go unnoticed and unpunished.

However, we strongly recommend that you do not do this for your own safety - you should live in this house, not the installers.
Where to hang the outer part?
The efficiency and economy of the split system depends largely on the operating conditions of the outdoor unit and the length of the track. The better it cools and the closer it is, the easier it is for him to provide housing with coolness.
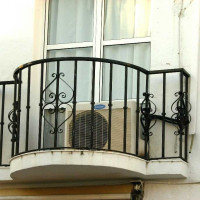
Firstly, the external part of the split system must be installed securely. External walls - load-bearing, thick, almost always suitable. Difficulties can arise due to insulation or a ventilated facade, also mounting on a wall from aerated concrete requires special attention. It is permissible to place only low-power models weighing 10-15 kg on the balcony railing.
Secondly, the condensation unit will be much easier to work in the shade, on the north or east side. In addition, the compressor and the radiator must be well blown in from all sides, therefore it is important to observe all the indentations indicated in the instructions. Usually it is 10 - 30 cm from the wall and sides, 60 cm in front and on top, at least 2 m from the ground.
Thirdly, outdoor air conditioning unit should be located within reach, but at the same time not to interfere with you or your neighbors.

Good places to install the outdoor unit:
- under the roof overhang;
- on an unglazed balcony;
- near the glazed balcony;
- under the window, if the drainage tube can be brought to the side;
- on the roof, if the track is no more than 10 - 20m, depending on the model.
The last thing to consider is condensate drainage from the indoor unit. According to the standards, it should be taken to the sewer, but in practice this is extremely rare. The tube is most often taken out simply to the street, under the outdoor unit.
In this case, it is necessary to provide, firstly, that it is lower than the indoor unit. And secondly, so that water does not fall on passers-by, windows and the wall. You can bring out the drainage tube separately from the highway between the blocks, simply by the shortest path to the street, with a slight slope.
Where to place the indoor unit?
The indoor unit can also not be hung in the corner, it is necessary to retreat at least 12 cm to the side and 10 - 30 cm from the ceiling, the exact numbers are indicated in the instructions. When mounting on a load-bearing wall, it is especially important to choose a place closer to the street wall in order to minimize the length of the track in the duct.

Do not hang the air conditioner over a battery, in a kitchen or other room with electromagnetic interference, behind a curtain, over a cabinet, over a bed or a workplace. In the latter case, you are provided with regular colds, in the rest the unit will not be able to work effectively, it may soon fail.
What do you need for self-installation?
The high prices of professional installation, as a rule, are explained by the use of expensive professional tools, as well as the danger of work. But this is only partly true, so if you are not ready to give a tidy sum for a couple of hours of professional work, you can handle it yourself.
Specialized tools can be rented at a hardware store, and consumables can be purchased at the same place where filters and spare parts for air conditioners are sold.
Tools: professional or improvised
To fix both blocks, you need a hammer drill and a level, it is also desirable to have a drill or a screwdriver. A puncher needs to punch holes not only for fasteners, but also for the output of communications. That is, you need a drill or a mill with a diameter of 50 - 80mm, depending on the model of the air conditioner. If there is no construction level, it can be replaced by a piece of a transparent hose with water.

If you plan to connect to the mains directly, without an outlet, you will need an indicator and a tester so as not to mix up the wires and check the operability without burning the air conditioning control board.
It is also advisable to have a pressure gauge to check the pressure of freon after installation.
The most necessary professional tool is a set for processing copper tubes. It includes a pipe cutter, a rimmer or a chamfer, a mill. Theoretically, the first 2 can be replaced with a hacksaw, a file and sandpaper, and in the lease you can only look for a roll to create a bell.
However, in practice, this leads to metal chips getting into the tube, and then into the compressor, which causes it to break. In addition, if you do not remove bends, dents and burrs from the cut, after flaring, the pipe edge will not be smooth, and the smallest cracks will diverge over time and lead to freon leakage.
Another specialized device - a vacuum pump, is necessary to remove air, moisture and dust from the system before the first start. If you can’t find it, or rent is too expensive, you can replace it with a compressor from an old refrigerator or a supercharger from an aquarium paired with a pressure gauge.
In the absence of such equipment and a short track length, you can simply lower a little freon before starting, so that it displaces all unnecessary.

If you decide to independently install the outdoor unit at a height of more than 2m, be sure to get insurance. When working with a ladder, call at least 1 - 2 assistants: the capacitor is quite heavy, lifting and putting it on the brackets is not an easy task.
Consumables and their selection
Before starting installation work, it is necessary to check the configuration of the air conditioner and buy supplies. As a rule, only the unit with instructions is included, even batteries for the remote control need to be purchased.
However, in some models, the kit includes copper tubes for freon conduit, there may also be a wire with a plug for plugging into a power outlet. If this is your case - check the length of the tubes, if they are not enough - buy new ones for the entire length, and not just the missing segment.
Of electricians, you definitely need a wire with a cross section of 2 - 2.5 square meters. mm For 2 - 4 wires, depending on the model, for connecting the external unit to the internal. Take the length with a margin of at least 0.5 m, so that after stripping and laying it is not taut.
You also need to take care of connecting the indoor unit. You will need a wire to the nearest junction box and to the air conditioner, an automatic machine, possibly a socket, plug, box for external wiring.

To fix the outdoor unit, L-shaped brackets are usually used. They should be designed for a load 5 times greater than the weight of the device. Do not forget to stock up on dowels with self-tapping screws and anchors to fix not only these brackets and the block itself on them, but also the mounting plate of the indoor unit.
For the track you will need two seamless thick-walled tubes of different diameters made of soft copper, for freon. Their edges should be closed from the factory so that no dust gets inside. The exact diameter can be found in the instructions, and the length is equal to the length of the route plus 1 m in reserve, because you can’t connect them to lengthen.
Copper tubes need insulation - sleeves made of foam rubber of appropriate diameter and length.
Do not forget about the condensate drain pipe - corrugated hose or polypropylene pipe. If it should be long or at some point it will turn up, you need a drainage pump.
In order to disguise the pipeline, without thinking how to ditch the load-bearing wall under the air conditioner, buy a plastic box. It is much easier to mount on the walls to mask communications.

If not the entire route will be laid in a box, it is advisable to wind it with metallic tape.
Optional available protective visor, an anti-vandal casing and a winter kit for the outdoor unit, but these are not mandatory accessories.
Installation procedure and technology
Statistics say that the vast majority of split-system failures, as well as their incorrect operation, are fully or partially caused by installation errors. If you are ready to approach the issue meticulously and responsibly, you can get the necessary tools and equipment, then self-assembly will not only help save money, but also save from the mistakes of irresponsible masters.
So, if the air conditioner is next to it in the box, the instructions for it have been studied, all the necessary tools and materials are ready, you can proceed with the installation.
Preparatory work and indoor unit
After choosing a place for the indoor unit, bring an electrician to it. It is advisable to extend the new cable from the shield, or at least from the nearest junction box. In order not to get on the armature or wiring, making a hole under the machine or socket, it is advisable to pre-ring the wall with a wiring detector or at least a metal detector.
If possible, it is better to place the machine on an adjacent wall, which is not a carrier. Do not get carried away with the desire to hide everything as much as possible: a socket and circuit breaker must be within reach without a stool or stepladder.

While the air conditioner is packed, you must do the dirtiest job:
- Mark the wall: where will the indoor unit be, from it is the route to the outdoor with a slope of 1 - 3%, where is the exit to the street.
- If you nevertheless decided to ditch the load-bearing wall - now is the time.
- Punch a hole into the street of the right size, based on the thickness of two copper pipes in the insulation, cable and drain pipe combined. It is also advisable to do it with a slight bias towards the street, or with a margin in diameter.
- Remove the mounting plate from the indoor unit, attach it to the wall and level it horizontally. If necessary, transfer the attachment points and the contour to the wall with a pencil.
- Prepare the holes and securely fix the mounting plate.
Already at this stage, you can hang the indoor unit and once again check the level. The slightest distortion threatens stagnation of condensate and overload of the compressor, so do not be lazy to redo everything if necessary.
Fix the base of the box on the wall, not forgetting the slope. When everything is ready - it's time to sit down to relax and enjoy the installed unit, because the most difficult and responsible work is ahead.
How to install the outdoor unit yourself?
The easiest way is to independently hang the condenser unit of the split system on an unglazed balcony.

Having taken care of safety, make a marking on the wall for the brackets. Check the width of the fasteners on the unit itself and mark the mounting points of the brackets. Make sure that they are strictly on the same level horizontally: the skew of the outdoor unit is just as dangerous as the indoor unit.
After installing the brackets, carefully attach the outdoor unit to them, observing the indentation from the wall recommended by the manufacturer. Remember that you cannot drill additional holes in the brackets: this greatly reduces their bearing capacity.
Check the horizontal position of the installed block both along the wall and perpendicular to it.
Routing and connection
When both units are installed, it is time to connect them with a route. This is the most important part of the job, because errors in the preparation and installation of copper tubes can lead to reduced efficiency, leakage of freon or damage to the compressor.
Before breaking the tightness of the copper tubes, remove dirt in the room after working with a rotary hammer. Unwind coils of tubes, level them. Measure the length necessary for the highway, and cut 1m more - with a margin for bending and rolling not at the first attempt.
Work the inside of the slices with a rimmer, holding the tube end-down. So you remove the skirt - bending the edges inward, and the chips will not fall into the tube. Then put the nut, thread to the end, and fix the tube in the corresponding groove of the roll.

If there is the slightest crack or other defect on the finished bell, it is necessary to cut off the stretched section of the pipe and repeat everything from the beginning. If the outdoor unit is installed in a convenient location, it is advisable to open and flare the second end of the tube already on the street, after laying the track.
When both tubes are expanded, put on a heater. Then lay in parallel both copper tubes in the insulation, a condensate drain pipe and a cable for connecting the blocks. The drainage pipe should stick out at 60 - 80cm from the wall. If necessary, be sure to install the pump. Wrap everything tightly with metallic tape, combining it into a single trunk.
If everything is stacked in a special box with clamps, it may be more convenient to pack everything separately, in parallel, so that the track turns out to be flat. In this case, only the part that will be laid along the street without a box is wrapped with tape.
Having brought one end of the highway through an opening to the street, lay the rest in the box and fix with clamps. Connect all the tubes to the indoor unit. Do not overtighten the nuts on the copper pipe. A heat shrink sleeve may be required to connect the drain pipe.

Then remove the front panel and connect the electrician according to the instructions.
On the side of the outdoor unit there is a cover under which there are terminals for connecting wires, and sometimes a connector for copper pipes. Connect everything according to the marking, as on the indoor unit. Attach the drain pipe under the bracket.
Preparation for launch and verification
When all the connections are complete, check for leaks using soap suds and a bicycle pump connected to the freon filling fitting.
Then connect the vacuum pump and run it for about 1 hour, until a vacuum is formed. Then the pump is turned off and the valve is closed with a plug, and both valves are fully opened so that the freon from the condenser can enter the evaporator. If the line is long, freon refueling is required - you can check the pressure with a manometer.
The air conditioner is included in the network, and he himself must enter the test mode. Some models have a separate button or combination on the remote for this - see the instructions. Only at the end of the test mode, you can putty a hole in the wall and collect the decorative parts of the box - and be proud of the work done.
Conclusions and useful video on the topic
To better imagine the whole process, we offer to observe how professionals install the split system:
And on this video the most crucial stage is described in detail - flaring of copper tubes:
Summing up, we note that it is quite possible to install a split system on a bearing wall yourself, and you won’t have to ditch it. If you could not find part of the equipment, or you are not confident in your abilities, try to arrange partial installation with the masters. For example, you can install the blocks yourself, and entrust the laying of the route to specialists, or connect everything yourself, and leave the master only evacuation, refueling and the first start.
How do you plan to install air conditioning? Do you consider it permissible to shatter the load-bearing walls? Perhaps you have experience installing a split system? We look forward to your additions, questions and impressions in the discussion block below.
 How to install air conditioning on the loggia and glazed balcony: instructions and valuable recommendations
  How to install and connect an air conditioner: detailed instruction + analysis of errors
 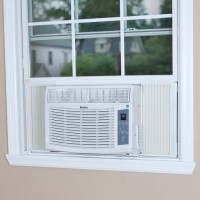 How to install air conditioning in a plastic window: technology secrets and installation instructions
 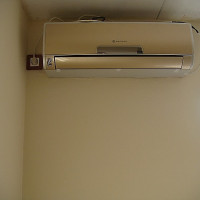 Rules for the location of the outlet for air conditioning: choosing the best place to install
  How to install a floor air conditioner: recommendations for installing a portable model
 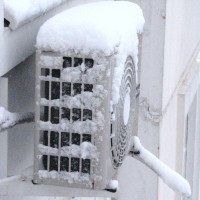 Is it possible to use air conditioning for heating in cold weather and how to prepare it for this job?
  How much does it cost to connect gas to a private house: the price of organizing gas supply
  The best washing machines with dryer: model rating and customer tips
  What is the color temperature of light and the nuances of choosing the temperature of the lamps to suit your needs
  Replacement of a geyser in an apartment: replacement paperwork + basic norms and requirements