DIY split-system cleaning: routine inspection and maintenance

Regularly and correctly performed cleaning of split systems will provide an increase in the period of their reliable operation and maintain functionality in all operating modes. But not only that. A clean air conditioner successfully fights the harmful pollution that is present in the air of residential premises.
We will talk about how to clean the climate equipment, available for independent execution. The article we presented describes in detail the process of disassembling a system for removing contaminants and processing options for functional components. Based on our advice, you can clean the unit without difficulty.
The content of the article:
Inspection of equipment before cleaning
The procedure for cleaning climate devices, step-by-step instructions for their implementation and useful tips will be considered on the example of the most popular type of home and office wall split systems.
Before you start cleaning the split system on your own, you must carefully examine it externally, focusing on the following points:
- the absence of damage to the conductive wires of the electrical circuit, their insulation and grounding;
- reliability of fastening of all screws in threaded connections;
- Freon circuit integrity
- lack of mechanical damage.
Such inspections of HVAC equipment do not take much time, and it is recommended to conduct them not only before servicing the air conditioner, but also on a regular basis, at least twice a month.

In addition to periodic cleaning and split system maintenance, for certain symptoms according to the results of the inspection, it may be necessary to unscheduled maintenance of the unit.
Signs of excessive contamination of the split systems include:
- characteristic unpleasant odor immediately after turning on the device;
- leakage from the case of the internal module;
- the appearance of an unusual sound during operation, extraneous crackling or increased noise;
- change in temperature blowing.
When scheduled maintenance of the system or for the treatment of these symptoms is necessary in a certain step-by-step sequence, all cleaning procedures must be performed, the result of which will be a device cleared of all contaminants.
According to the number of main units of a split system, the procedure for cleaning it can also be divided into two stages: maintenance of the indoor unit and cleaning of the outdoor module.
Dismantling and cleaning the indoor unit
The process of washing parts of split system blocks does not need a very detailed description. We will dwell on certain nuances of this procedure below.

In order to have a general idea of which particular parts and assemblies internal wall module split systems are serviceable; you need to know its device.
The main nodes of the indoor unit include:
- The evaporator is a radiator or heat exchanger.
- Shaft or impeller.
- A motor that rotates a shaft.
- Drainage tray / bath.
- Horizontal and vertical blinds.
- Control unit with temperature sensors, indicators.
- Strainers
- The housing of the internal module, in which all parts are compactly integrated.
Careful familiarization with the device of the indoor unit makes it possible with understanding to approach the cleaning procedures, and also after completing them, to install in the necessary sequence all the details in their place, carefully and correctly making the connection.
Step # 1 - cleaning the air conditioner filters
The first step when servicing a split system is to clean the filter elements.
The main section with the upper filters, in the principle of which the static effect is laid down, is located under the cover of the device. Their cleaning is the simplest procedure that does not require special knowledge and skills, and also is not too time consuming.

You must understand that even a slight accumulation of dust and grease on the filters can create problems in the functioning of the entire device.
The primary filter maintenance procedure is as follows:
- Switch off the device and wait at least 10 minutes.
- Having unfastened latches (usually on the side of the device), open the external cover.
- Remove the filter sections secured to the frame.
The sides of the filter sections, mounted under the housing and mounted on the runners, are easy to remove.

In order to remove the additional filter, usually a sponge, it is necessary to remove the air ionizer, if the split system is equipped with it. Typically, the ionizer is mounted on the radiator from the control panel of the device.
You need to gently pull the handle, and it easily, in the grooves, comes out of the socket. The filter is mounted on the back of the ionizer on a plastic frame, and is effortlessly removed from its grooves.
If it is very dirty, you can use a vacuum cleaner for preliminary cleaning.Then it is recommended to wash the filters and the ionizer in a container with detergent, and then - under running water. For washing, use a sponge and a non-rigid brush.
After completing the water procedures, it remains to shake off the moisture from the washed elements and decompose them for drying.
Step number 2 - care of the internal module
For further thorough cleaning of the entire air conditioner, it will be necessary to disassemble it, with the individual parts turned off and removed. This process is the most complex and time-consuming, especially if it is performed for the first time.

First of all, the front of the case is disconnected. The screws are located below the caps. By pulling the lid toward you and up at the same time, it can easily detach from the housing.
Next, the condensate collection tray is removed. To do this, unscrew the screw on the side mount on the left of the housing and all the screws holding the damper and control unit drive to the right. When disconnecting the sensor, care must be taken not to pull on the wires, but only on the retaining bracket.
After that, the drain pipe is disconnected. Despite the fact that the main work on creating a dust barrier is performed by filters, a rather large amount of dirt settles on the fan blades. Therefore, the need for cleaning the fan shaft is beyond doubt.
In order to remove the impeller, you first need to unscrew, but not to the end, the screw of its fastening from the side of the control panel. Since the shaft is removed together with the motor, it is necessary to remove the motor wires from the connectors. As a rule, there are two such connectors.
After that, you can remove the control unit from the electronic board. To prevent moisture from entering the electronic part of the module, when washing, a plastic bag is put on the unit, which is tightly tied and fastened with tape.
The continuation of the process of removing the impeller is the disconnection of the heat exchanger, for which the motor mounts are unscrewed from the body and the evaporator, as well as the screw holding the evaporator on the left side of the block.

Complete disconnection of the indoor unit from the system connecting it to the external compressor is a difficult procedure and is not performed at home. In addition, in this case, a freon refill of the entire system will be required.
Therefore, it is enough to free the module from the wall mount and carry out further cleaning procedures. For convenience, a rope is tied to the block body. With its help, it is hung out on the brackets from which it was removed.
Having freed the evaporator, it will be easy to disconnect the block with the impeller and motor from the module itself and then send it to the sink.

From this moment, further maintenance of the split system can be continued in two versions:
- Dry removal of dust and dirt from the evaporator.
- Spray heat exchanger washing.
The first method involves cleaning the front of the heat exchanger with a vacuum cleaner and a brush. To clean the rear part, the heat exchanger is removed to a distance that is acceptable from the wall and is gently vacuumed using a slotted nozzle.
Given the constraint, it is not recommended to use a brush or brush to clean the rear of the evaporator, so as not to damage the radiator.
Along the way, do not forget to clean all accessible plastic places on the case, as well as the back of the condensate drain tray, using cleaning cloths or rags moistened with detergent.But even the highest quality dry cleaning of the heat exchanger will not give the effect achieved when washing it with water.
Step # 3 - Evaporator Cleaning
In order to wash all deposits accumulated there from the radiator and the air conditioner case, it is necessary to first equip the walls, furniture and floor coverings from splashing and flooding with water and cleaning products.

But such a device is quite affordable to make with your own hands. To do this, stock up on film, tape and a container for collecting water.
The installation procedure for a home-made service protection is as follows:
- Prepare a plastic film of the required size: with a margin of at least 1 meter across the width of the air conditioner on both sides and taking into account the distance from the unit to the container into which the waste water will be collected, you can use a regular bucket.
- Fasten the upper part of the film to the wall behind the air conditioner with tape.
- Collect the bottom of the film and put it in a bucket, cutting off the excess part and securing it with tape on the edge of the container.
All dirt and water will merge into a bucket through an equipped funnel without causing damage to the room. The conditioner is washed with a jet of water under pressure.
To do this, you can use the following devices:
- hose from a water tap with a nozzle to create a jet of high pressure;
- manual pump sprayer;
- car device Körcher.
Use Korcher, creating high pressure, should be with some caution.

Assembling the indoor unit of the air conditioner is carried out in the reverse order. At the first disassembly, it is recommended to fix the entire process, leaving notes on the main actions on paper, or using video / photo shooting.
Carefulness and accuracy in this matter will not lead to a situation in which after assembly of the product there will be extra parts.
Maintenance of the external module of the split system
The main enemy of outdoor units of air conditioners is street dust and poplar fluff. In the absence of timely care, the condenser and compressor of this module, depending on the location height, will work effectively for no more than two to three seasons.

For proper maintenance of this module, it is also necessary to present its device.
The outdoor unit in its composition has:
- A fan that feeds air to a heat exchanger.
- A condenser, which is a system of copper tubes through which freon circulates.
- A compressor that compresses and circulates the refrigerant throughout the system.
- Four-way valve, providing reversible operation of the split system, changing the roles of the condenser and evaporator.
- Filter.
As with the indoor unit, before starting the cleaning procedure of the outdoor unit, make sure that the system is de-energized. At the first stage, all impurities are cleaned on the block body, after which the front panel is dismantled and you can start cleaning from the inside.
Step by step, it looks like this:
- Remove the grill and fan.
- Protect the engine from moisture by hiding it as tight as possible in a plastic bag.
- Dry-clean accessible areas of the internal system with a paintbrush.
- Use detergent to treat all the internal parts of the module that are accessible with the front part open, as well as wherever possible — outside, on the sides, and behind.
- After waiting 5-10 minutes, wash all the nodes in the ways similar to those described for the indoor unit.
- Install all removed parts in reverse order.
It should be remembered that it is also necessary to clean the radiator of the indoor module with care so as not to bend and damage its ribs.
During cleaning condensing unit It is advisable to examine its components. It is important to identify timely compressor malfunctionsto troubleshoot immediately. The rules of the diagnosis will be introduced by our recommended article.

It is important not only to imagine in what order and how to clean the components of the split systems in ordinary home conditions, but also not to violate basic safety measures.
All contacts with internal components of the system are allowed only on a de-energized device, and when working at height it is necessary to provide insurance and observe maximum caution.
Drain drain cleaning
Aggregate change in the state of the refrigerant inevitably leads to the formation of condensate. Accumulating in the indoor unit, water is discharged through a special drain pipe to the outdoor unit, from where it flows down.
Blockage of the drainage pipeline and, as a consequence, the lack of free removal of water, can cause leaking indoor unit during operation of the device. Often, the causes of blockage in the drainage system can be not only deposits that occurred during the operation of the device, but also, for example, a plug from a nest arranged by wasps.
The procedure for cleaning the drainage of the wall split system is quite feasible to do it yourself, without unnecessary expenses for the services of specialists. Above, in the instructions for disassembling the indoor unit, it was described how to turn off the condensate drain tray from the drain pipe.

Further, for better cleaning of the drainage and its treatment at home, you can do the following procedure:
- Pour a disinfectant into the system, such as the chlorhexidine used in hospitals, about 4 bottles.
- Wait at least 15 minutes, connect the vacuum cleaner hose to the drain pipe and suck out all deposits.
Disinfectant can be pumped in the absence of a pump at hand, using a plastic bottle, which must be connected with a rubber tube to the drain hole. Raising the tank above the level of the inlet to the drainage, the fluid is pumped into the system with simple compressions.

With different diameters of the drain hole and the device for pumping air, you can make an adapter. With a little imagination, it’s easy to do at home from improvised means.
Antibacterial Processing Technology
Mandatory at the final stage of servicing the split system will be the procedure for processing all parts with antifungal agents and antibacterial compounds that are acceptable for spraying in a residential building.
To neutralize the air conditioner from germs and various microorganisms, the following can be used:
- formulations containing antibacterial agents;
- special cleaners for air conditioning systems;
- products containing chlorine-containing substances.
An unmistakable option when choosing a disinfectant is the drugs used to disinfect medical instruments.
Disinfection, it is recommended to carry out after full service and drying the parts of the split system, before its assembly.

Often banal clogging causes a decrease in the cooling capacity of HVAC equipment. A complete list of causes of a malfunction of the unit is presented in next article, which we highly recommend reading.
Conclusions and useful video on the topic
Tips for disassembling, maintaining and assembling the indoor unit of an air conditioner from a specialist:
Dismantling and do-it-yourself cleaning of the external module of the air conditioner:
A mechanical way to remove plugs in the drainage pipe of an air conditioner caused by a hornet’s nest:
It should be understood that the need to invite specialists to repair it depends on how the split system is regularly cleaned. But not only that.
The given tips on self-service of the air conditioner will provide practical assistance in maintaining it in constant cleanliness, and this is a guarantee of protection against undesirable health effects in the comfort zone.
Want to talk about how you yourself cleaned your own or office split system? Do you have useful information that can facilitate the cleaning process for site visitors? Please write comments in the block below, post photos, ask questions about the topic of the article.
 Maintenance of split systems: do-it-yourself cleaning, repair and refueling of HVAC equipment
 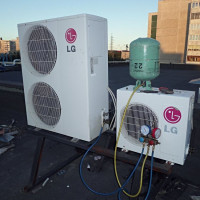 Refueling split systems: how to fill freon climate equipment with your own hands
 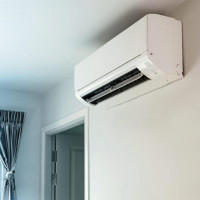 What is a split system: device and principle of operation of typical air conditioning systems
 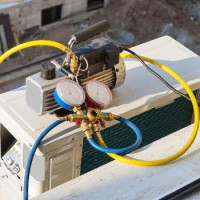 Do-it-yourself evacuation of the air conditioner: technology for work + valuable recommendations
 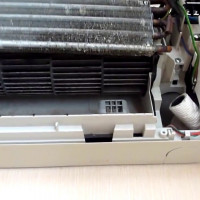 The device of the indoor unit split system: how to disassemble equipment for cleaning and repair
  What is a multi split system: principle of operation + installation and connection rules
  How much does it cost to connect gas to a private house: the price of organizing gas supply
  The best washing machines with dryer: model rating and customer tips
  What is the color temperature of light and the nuances of choosing the temperature of the lamps to suit your needs
  Replacement of a geyser in an apartment: replacement paperwork + basic norms and requirements
Yes, you don’t care to clean it yourself like professionals do. Don’t say that they also have industrial vacuum cleaners and steam generators, and they can refuel in the event of a leak. Of course, anyone can clean and rinse the upper filters; there is nothing complicated there. But it’s better not to go into the indoor unit if you don’t understand this. And the outdoor unit is generally inconvenient to clean, especially if you live above the third floor. In general, I did not trust my husband this.
Cleaning the air conditioner is very important, as it accumulates a large amount of dust and harmful microorganisms. I ask my husband to remove the filter and clean it at least once a month. The very first time we turned to the help of the Internet, on Youtube we found a similar air conditioner and watched the video. After viewing it became clear where in our air conditioner there are plugs and screws. In general, the process is simple, most importantly, take care of the details.