Compressor for the refrigerator: an overview of frequent breakdowns + step-by-step instructions for replacing

Refrigerators differ from other large household appliances in their durability, while functioning daily. However, they are prone to breakdowns.
With frequent voltage drops, the compressor for the refrigerator is the first to fail. It is this mechanism that is considered the most important element of the system driving freon through pipes, due to which cooling is provided.
In this article, we consider the existing types of compressor and analyze the causes of typical breakdowns. We also provide detailed instructions on how to replace it with your own hands.
The content of the article:
Existing types of compressors
Failure of the most important element of the refrigerator most often occurs as a result of power surges. If you regularly experience problems with power supply, we recommend that you take a closer look at voltage regulators.
A broken compressor promises significant expenses not only for the purchase of a new device, but also for the work of a master.
However, you can go the other way and make a replacement on your own. Whichever option you choose, you will first need to choose the right type of compressor.
Manifold air blower
Obtaining information on innovative models of refrigerators from sources, one can come across such a concept as a “normal” compressor. However, not everyone knows its meaning.
This term refers to the collector mechanism, with a vertically mounted motor shaft. It is mounted on a spring mechanism and closed by an airtight duct, thereby ensuring a high degree of soundproofing of the system.
In older models, a horizontal layout was used, which made the unit more noisy - vibration was reflected throughout the body.
It uses the standard principle of operation and technology developed many decades ago - the supercharger works until the set temperature mode is reached in the refrigeration unit, and then it turns off.

Survey models equip mainly budget options for refrigerators, and this is their only advantage over other representatives of the species.
Inverter type compressor
The upgraded units are equipped with an inverter type of supercharger. A conventional compressor reaches its peak when shutting down, and there are a lot of such repetitions on the day, and accordingly, it is subject to rapid wear and tear and a shortened service life.
Whereas inverter devices operate even with sufficient air injection in the chambers, periodically reducing the number of revolutions. The wear resistance of component parts is significantly lower, and, accordingly, the period of uninterrupted use is higher.

The leading position in the development of inverter devices is held by Samsung, which was the first to massively equip refrigerators with non-shutting down mechanisms. Manufacturers give a ten-year guarantee on their work.
To learn more about the features of refrigerators with an inverter compressor, their advantages and disadvantages, please go to this link.
Linear view of the device
Innovative developments in imported equipment involved a new type of supercharger - linear. The principle of operation is similar to previous versions of devices, but this type functions much quieter and more economical.
Unlike conventional mechanisms, they lack a crankshaft. Through the action of electromagnetic forces, the reciprocating motion of the rotor is provided.

Linear superchargers are technically similar to the two previous counterparts, however, they have a number of significant advantages:
- less weight;
- a high degree of reliability during operation;
- lack of friction in the compression plane;
- application at low temperature conditions.
The main ideologist who has been actively introducing linear type superchargers is LG. Most often they are used in refrigerators with a system No frosthaving individual temperature controllers in various units.
Plate rotary supercharger
Rotary (rotary) horizontally or vertically positioned blowers are equipped with one or two rotors and are analogues of a twin-screw juicer, however screw spirals are unequal.
Depending on the principle of operation, they are divided into two main classes: with a rolling and rotating shaft.

In the first case, the unit is represented by an engine shaft with a cylindrical piston mounted, which is eccentric relative to the center, that is, offset.
Rotation cycles are produced inside the cylinder body. The gap between the housing and the rotor changes during rotation.
In place of the minimum hole is located the discharge pipe, the maximum - suction. In turn, a plate is attached to the revolving piston by means of a spring, which blocks the space between the two nozzles.
In the second version, the principle of operation is similar with one difference - the plates are fixed and placed on the rotor. In the process, the piston rotates relative to the cylinder, and the plates rotate with it.
The general algorithm of the refrigerator
The functioning of all refrigerators is based on the effect of freon, which acts as a refrigerant. Moving in a closed circuit, the substance changes its temperature indicators.
Under pressure, the refrigerant is brought to a boil, which is from -30 ° C to -150 ° C. Evaporating, it captures the warm atmosphere located on the walls of the evaporator. As a result, the temperature in the refrigeration unit drops to a predetermined level.

In addition to the main discharge device, which creates pressure in the refrigerator, there are auxiliary elements that perform the specified options:
- evaporatorcollecting heat inside the refrigeration unit;
- capacitoroutward heat carrier;
- throttle deviceregulating the flow of refrigerant through a capillary tube and a thermostatic valve.
All of these processes are dynamic. Separately, it is worth considering the algorithm of the motor and the principle of operation in case of its malfunction.
The compressor is responsible for the systemic regulation of pressure drops. The evaporated refrigerant is drawn into it, which is compressed and pushed back into the heat exchanger.
In this case, the temperature indicators of Freon increase due to which it passes into a liquid state. The compressor operates using an electric motor located in a sealed enclosure.

Additionally, it is worth noting that most refrigeration units have different temperature values inside the main unit. So manufacturers simplify the storage organization of various categories of products.
Depending on the zone, the climate can be adjusted from dry to wet, and the temperature of the main compartment from 0 to 5-6 ° C, freezer - up to -30 ° C.
In more detail, we examined the device and the principle of operation of the refrigerator in this publication.
Having dealt with the device, we proceed to the analysis of the main factors of compressor failure, after which it will be necessary to dismantle it.
The main causes of breakdown of the supercharger
All problems in the compression unit are conditionally divided into two main groups: with a working and a non-working motor. The first option is as follows: when you turn on, you hear the sound from the compressor, the light on the refrigerator is on. Accordingly, in another embodiment, the unit does not turn on at all.
Reason # 1 - refrigerant leak or temperature control defect
Here, the main reason may be the leak of freon.
You can conduct an independent check in this way: touch the condenser - its temperature will correspond to room temperature.

Another reason is possible - failure thermostat. In this case, a signal about the wrong temperature will simply not be received.
Reason # 2 - winding problems
If the unit does not turn on, then a possible cause may be an open circuit in the compressor windings.
This situation can happen both on the working and on the launcher, or on two at once. When the refrigerator is connected to the network, the supercharger does not work, and the temperature of its unit is room temperature.
Reason # 3 - inter-turn closure
The device starts up, however, no more than a minute. And the case is overheating.
In this case, the winding turns are closed, their resistance is lowered, and an increased current flows through the relay block. The relay turns off the supercharger, a click will be heard. After cooling the starter, it again turns on the compressor and so on in a circle.
Reason # 4 - engine jamming
When turned on, the operation of the electric motor is audible, but rotation does not occur, the compressor does not compress, the resistance of the windings is at a maximum.
Reason # 5 - valve breakage
Loss of cooling capacity is due to valve defects.
As a result of such a breakdown, the unit works without shutting down and does not create the proper compression level, respectively, the units of the refrigeration device do not gain the desired temperature.
Often in this case, an uncharacteristic ringing of metal parts during operation can be heard. This can be determined by determining the degree of air supply.

To make sure of the "diagnosis", you will need to cut the filling pipe using a pipe cutter. We do the same with the condenser filter.
Now in their place we connect the manometric manifold, turn on the supercharger and check the formed level of air compression - the norm is 30 atm.
Reason # 6 - thermal sensor or start relay
It is also necessary to check for defects such elements as the thermostatic sensor and starting relay.
In such a failure, the compressor either does not turn on or turns on for 1-2 minutes. When checking the resistance of the windings, the nominal values will be recorded.
Step-by-step process of self-replacement
If the causes of malfunctions are not identified, the supercharger itself must be repaired. And for starters, you will need to remove it from the refrigeration unit and check the operability.
Stage # 1 - disassemble the supercharger
The compressor is located behind the refrigerator in its lower part.
In the process of dismantling, the following tools will be used:
- pliers;
- spanners;
- plus and minus screwdrivers.
A supercharger is placed between two nozzles connected to the cooling system. With the help of pliers they will need to bite off.

The refrigerator is started for 5 minutes, during which the freon enters a condensate state. After that, a valve with a hose connected to the cylinder is connected to the filling line. For 30 seconds, with the valve open, all refrigerant will be vented.
After we remove the relay block. Visually, it can be compared with a conventional black box with wires coming out of it.
First of all, on the launcher they mark the top and bottom - this is useful in the process of reinstalling. Unscrewing the locks and removing from the yoke, we also have a bite of wiring leading to the plug.
We unscrew all the fasteners together with a survey device. We clean all the tubes for soldering a new device.
Stage # 2 - measure the resistance with an ohmmeter
In order to verify the operability of the component, we will conduct an external inspection, as well as testing and checking its individual components. First of all, we inspect the condition of the motor. This can be done using a multimeter or an ohmmeter.
As mentioned earlier, the power cable is initially tested. If he is a worker, we examine the supercharger itself. We will use a tester for this.

First of all, remove the protective block and extract the contents, disconnect from the start relay. Next, using the probes of the multimeter we make pairwise measurement of wires.
We verify the results with a table that indicates the optimal performance for this particular compressor model.
The data of the serviceable device in the standard version will be as follows: between the top and left-hand contact - 20 Ohms, top and right-hand - 15 Ohms, left-and right-hand - 30 Ohms. Any deviations indicate damage.
The resistance between the feed-through contacts and the housing is checked. Cliff readings (infinity sign) indicate the health of the device. If the tester gives any indicators, most often it is zero - there are malfunctions.
Stage # 3 - check the current strength
After checking the resistance, it is necessary to measure the current. To do this, connect the start relay and turn on the electric motor. We clamp the tester with one of the network contacts leading to the device.

The current must be identical to the motor power. For example, a 120 W motor corresponds to a current of 1.1-1.2 A.
Stage # 4 - preparing tools and equipment
To replace the faulty compressor of the refrigerator, you need to prepare the following set of tools and materials:
- portable station for regeneration, refueling and evacuation;
- welding machine or burner with a MARP gas cylinder;
- compact pipe cutter;
- ticks;
- Hansen coupling for tight connection of the compressor with the filling pipe;
- copper pipe 6 mm;
- filter-absorber for installation at the entrance to the capillary tube;
- alloys of copper with phosphorus (4-9%);
- solder drill as a flux;
- cylinder with freon.
You should also pay attention to safety measures when working with repair equipment. First of all, you need to equip the insulating pad and disconnect the refrigeration unit from the power supply.

After each refueling, the room is ventilated for a quarter hour before soldering. It is not allowed to turn on the heating devices in the room where the repair is made.
Stage # 5 - install a new compressor
First of all, it is necessary to attach a new supercharger to the traverse of the refrigeration unit. Remove all plugs from pipes coming from the compressor and check the atmospheric pressure in the device.
Depressurize it no earlier than 5 minutes before the soldering process. Then we make the connection of the compressor pipes with the discharge, suction and filling lines, their length is 60 mm, and the diameter is 6 mm.

Process tube soldering It is carried out according to sequence: filling, discharging excess refrigerant and discharge.
Now we remove the plugs from the filter dryer and install the latter on the heat exchanger by inserting a throttle pipe into it. We weld the seams of two contour elements. At this stage, we put on the Hansen coupling on the filling hose.
Stage # 6 - start the refrigerant in the system
To fill the refrigeration system with freon, we connect a vacuum to the filling line with a coupling. For initial start-up, bring to a pressure of 65 Pa. By installing a protective relay on the compressor, the contacts are switched.

Connect the refrigerator to the power supply and fill with refrigerant 40% of the norm. This value is indicated in the table located at the back of the device.
The unit turns on for 5 minutes and the connection nodes are checked for leaks. Then it must be disconnected from the power again.

Perform a second evacuation to a residual value of 10 Pa. The duration of the procedure is at least 20 minutes.
Turn on the unit and completely fill the circuit with freon. At the finish stage, we preserve the tube by clamping. Remove the sleeve and seal the pipe.
If you have never done such work, we recommend that you study the process of self-study in more detail. freon refrigeration.
Useful Soldering Tips
Soldering of two nozzles made of copper, carried out by an alloy of copper with phosphorus (4-9%). Docked elements are placed between the burner and the screen, heating it to a cherry color.
Heated solder lowered into the flux and melted by pressing the bar to the heated docking area.

For soldering steel tubes or silver alloy is used from its alloy with copper. The soldering element is heated to red.
After the seam has hardened, it is wiped with a damp rag to eliminate flux residues.
Conclusions and useful video on the topic
The tools and materials that will be required to replace the compressor, as well as all the stages of work are available in the video on the example of the Atlant refrigerator:
The basic rules for evacuating and refilling the cooling system:
The manufacturers declared compressor life is 10 years. However, its damage is inevitable.
In the event of a malfunction of the supercharger, you can replace the broken compressor yourself, having previously familiarized yourself with all the safety rules and the stages of the upcoming work. Also for these purposes it is necessary to stock up on the necessary equipment.
Professionally repairing refrigerators and want to supplement the above list of reasons for compressor failure? Or share useful repair tips with newbies? Write your comments and recommendations below this article.
If you still have questions about self-repairing failures, ask our experts in the comments to this publication.
 Why the refrigerator does not turn off: an overview of frequent breakdowns and how to fix them
  Refrigerators "Minsk": a review of the lineup + analysis of frequent breakdowns
 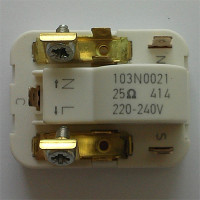 Start relay for the refrigerator: device, how to check and repair it correctly
 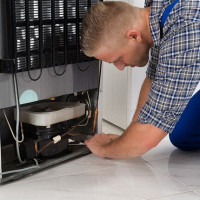 How to repair the refrigerator: finding the cause of the breakdown + repair methods
 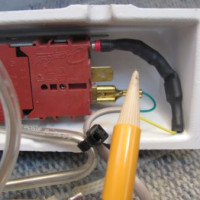 Temperature regulator for the refrigerator: device, check + subtleties of replacement if necessary
 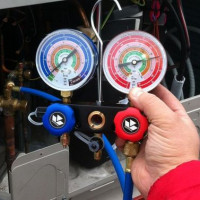 Filling the refrigerator with freon at home: the algorithm of the work
  How much does it cost to connect gas to a private house: the price of organizing gas supply
  The best washing machines with dryer: model rating and customer tips
  What is the color temperature of light and the nuances of choosing the temperature of the lamps to suit your needs
  Replacement of a geyser in an apartment: replacement paperwork + basic norms and requirements
On our old Nord refrigerator, the compressor also flew and it was also necessary to fill it with freon, because it was standing in the garage for a long time without work. I had another refrigerator, and so it became a donor for Norda. The compressor did not begin to touch it myself, because I cannot download freon myself. He called a friend, he is engaged in repairs. Special equipment is needed there, and I did not have refrigerant.
More difficult than installing the compressor yourself, was to find this compressor! I personally used it because It was unrealistic to find a new compressor for an outdated model. Naturally, it turned out cheaper than buying a new refrigerator. But the search and installation took several days, almost a week we (in the summer!) Lived without a refrigerator. There is no confidence in their installation, therefore, anyway, plans now to buy a new refrigerator.
Hello. In our city this is easier, try this option too. We already have an old refrigeration master (ask at local forums, you will probably find one) who knows where to order inexpensive spare parts and install them at an affordable cost. The refrigerator will be like new. This is from personal experience. Still cheaper than buying a new refrigerator.
Filling the refrigerator with refrigerant is not prohibited by specialists by law.
Do not carry nonsense ...
Hello. You confuse the Rules for labor protection during the operation of refrigeration units with the laws for physical. persons: “9.1. The servicing of refrigeration units is allowed to employees who have undergone training and have a certificate confirming their qualifications.”- these rules do not apply to ordinary people.
Why are your repair articles written in such an ugly technical language?
For example, is the same device, say a start relay, also called a “relay block” and a “trigger”?
And so throughout the text and with different devices?