How to fix a vacuum cleaner with your own hands: the most common breakdowns and their repair

The service life of vacuum cleaners is on average 5-10 years, and warranty repairs provided by the manufacturer or distributor,– 1-2 years. During this time, the equipment rarely fails. Exceptions are factory defects, cheap and low-quality products.
Therefore, if the unit breaks down after the warranty period expires, you have to contact expensive service centers. Agree, it would be nice to learn how to fix some problems yourself? Such a skill will help when there is no time to wait for the master, and also will save the family budget.
Doubt your own strength? We will help you deal with your problems. In the article, we identified the most common breakdowns of various types of vacuum cleaners, and also provided detailed instructions for their elimination.
In addition, we have listed the basic rules of operation and maintenance, the observance of which will prevent the occurrence of any malfunctions in your device.
The content of the article:
- Malfunctions in different types of vacuum cleaners
- Instructions for repairing various breakdowns
- Breakage # 1 - the device does not suck up debris
- Breakage # 2 - the vacuum cleaner emits a burning smell
- Breakdown # 3 - the technique does not turn on
- Breakdown # 4 - Battery Charging Issues
- Breakage # 5 - a problem with fixing the power cord
- Breakdown # 6 - reduced absorption
- Breakdown # 7 - malfunction of the dust collector indicator
- Breakage # 8 - breakage of the brush in the washing unit
- Vacuum cleaner breakdown prevention
- Conclusions and useful video on the topic
Malfunctions in different types of vacuum cleaners
Before you figure out what types of breakdowns most often occur in cleaning devices, you should familiarize yourself with the most popular types of units.
According to the specifics of cleaning, devices for dry and wet cleaning are distinguished. The first type is a more budget option, which is released by almost all well-known brands - Samsung, Bosch, LGother
Washing vacuum cleaners belong to the premium segment: their cost is much higher, but the functionality of the devices is also up to par.

Their design is similar to conventional dry cleaning devices, however, it additionally has a water container, special nozzles and filters.
By type of construction The following types are distinguished:
- standard household - floor-mounted appliances that move with the wheels on the bottom of the case;
- vertical - accumulator and wire units providing comfortable cleaning thanks to the compact sizes and light weight;
- portable (manual type) - designed for cleaning car dealerships, small rooms, furniture cleaning;
- robotic - devices with automatic cleaning programs without user intervention, controlled using the remote control.
Depending on the type of unit, the collection of dust particles and debris can be carried out in a special fabric or paper bag, in a plastic container or a special container, passing through an aquafilter.
Features of repairing appliances with a bag
The principle of operation of the unit with a dust bag consists in the passage of air masses through it, then through the ultrapurification filter and the engine compartment. The HEPA filter used in such products not only delays dust microparticles, but also acts as a compressor.
Most often, in these models, filters are the main parts that fail most quickly.

Some models have a function for sensing air intake intensity: when problems are detected, the vacuum cleaner automatically turns off and the filter is cleaned.
If the device does not provide such a technology, then you should independently monitor the quality of garbage suction. Be sure to alert you to the buzz or overheating of the equipment body - this is an occasion to check all the filter elements.
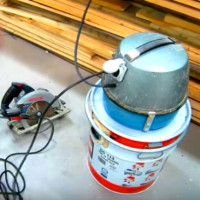
"Diseases" of units with a cyclone filter
The advantage of container models is the absence of the need for frequent replacement of disposable filters, quick cleaning of the garbage container, high quality surface cleaning with additional air cleaning.
AT cyclone filter there is a maximum delay of microparticles. Therefore, the cleaned air masses, passing through the engine compartment, and then through the HEPA filter, do not clog it. Thus, the filter lasts much longer than with bag options.

During operation of the device, the filter element protects the fan motor from metal and sharp objects that could violate the integrity of the part. Therefore, be sure to check whether it is clogged with garbage before cleaning.
Types of breakdowns of models with aquafilter
The dust collection process is carried out in this way: the incoming air whips the water in the container to small particles, removing it under the front visor.
Dust masses along with a foggy whirlwind continuously pass through the hose and settle to the bottom of the dust collector. Residues of dust particles pass through where moisture is trapped. Then purified air without water passes through the engine and cools it.
Having dealt with the principle of the device, then we will consider the most frequent failures in its operation.
For a long service life of the vacuum cleaner, you must follow all the points in the instructions. It is recommended that the container be filled only with purified or distilled water up to the indicated mark.
It is also necessary to clean, rinse and dry all parts used.This will allow you to use the device without replacing the fog HEPA filter for 2 years or more.

Another problem is the failure of the fan motor due to burnout of the winding. This can be seen if the unit began to overheat, buzz, debris suction capacity decreased, knockout of RCD, automata. If a problem is found, you will need to replace the defective part.
Instructions for repairing various breakdowns
In each of the types of vacuum cleaners discussed above, various elements and components can fail. It depends on the design of the unit and the principle of its operation.
For example, most often users encounter such problems:
- no traction;
- an odor has appeared;
- the device does not turn on;
- there is a closure, knocking out traffic jams;
- no fixation of the cord;
- decreased suction power;
- noise and vibration;
- others.
Next, we consider in detail what malfunctions can most often be in various types of products, and how to fix them yourself.
If your device fails and the warranty period has expired, do not rush to take it to a service center. Perhaps the breakdown is simple, and you can repair the vacuum cleaner without the help of specialists with your own hands.
The following examples of malfunctions, methods for diagnosing and repairing them will help you independently solve a particular problem with the unit.
Breakage # 1 - the device does not suck up debris
When such a malfunction is detected, the device makes a characteristic sound in the form of a hum. This indicates that the engine is running, but does not absorb dust.

To do this, perform a series of actions:
- Check for debris in the bag or container.
- Separate all parts from the hose - brush, tube. They may contain debris that interferes with the free passage of air currents. If found, clean accessories under running water or with a long needle.
- If the cause is not in the hose, then a blockage has formed inside the device. Check all filters (exhaust, fine cleaning). If possible, read the instructions and rinse the fine filter and dry it. After that, install the part in the vacuum cleaner body and make sure that it is working.
- Inspect the waste bin carefully. Cloth bags must be washed or cleaned of fine accumulated dust, which clogs the cells and interferes with the free passage of air.
Other reasons for poor dust absorption may be deformed gaskets, gaskets, lack of tight connection between the hose and the body of the product. A worn o-ring, a broken sleeve for the vacuum regulator must be replaced with new parts.
In another case, when air passes well through the tube and brush, but the debris remains on the floor, check the height of the brush roller.

If it was not possible to achieve perfect absorption of debris, then you need to replace the nozzle.
Breakage # 2 - the vacuum cleaner emits a burning smell
If during the cleaning process or after it there is a smell of burned rubber, and the engine stops working at the same time, then the reason lies in the winding. To do this, you will need to completely disassemble the motor, repair or replace the burnt anchor or stator with a new element.
Instructions for disassembling the engine:
- Remove the bolts from the body of the product.
- Flip the housing cover, move the coil, wires, and remove the motor.
- Remove the side bolts and remove the sealing gum.
- Separate the body into two parts using a screwdriver.
- Remove the engine from the protective housing.
- Bend the rolling and separate the part, releasing the turbine.
- Unscrew the bolt using the socket head, tightly fixing the stator and the rest of the structure.
- Unscrew all connecting elements and remove brushes.
- Break anchor using a key and a hammer.
Check the condition of the bearings and, if necessary, treat them with oil.

After disassembling, replace the failed elements and reassemble the part in the reverse order.
Breakdown # 3 - the technique does not turn on
Have you noticed that with a repeated attempt to turn on the device there are no signs of its operability? Then stands check the voltage at the outletwhich the device is connected to, as well as the integrity of the power cord.
As a rule, in places where the cord is attached to the plug, the wire breaks, so there is no contact. If you find this problem, then you will need to completely replace the cord with a new one.
For repair you will need:
- Remove the back cover of the device.
- Remove the screws that secure the diaphragm.
- Carefully remove it without touching the wires.
- Bring the block with gasket to one side.
- To get a spring and check its serviceability.
- Replace wiring and damaged components as necessary.
After the repair is completed, assemble the unit in the reverse order according to the instructions.
Also, the cause of the breakdown may be faulty switches, internal wiring. Another possible reason is the automatic protection from overheating of the device. This technology prevents damage to the engine due to the increased load during operation of the device.
The presence of a thermal switch allows you to prevent overheating of the device in time, and additional options eliminate the cause - for example, clean the HEPA filter from dust particles.
In many models of washing units, a special relay is installed, which turns on when a device overheat is detected.

The reasons for the product overheating are clogged filters, dust collector, air duct.
The most unpleasant reason for not turning on the unit is a motor breakdown. Therefore, the first thing to check is brushes and a collector. Disassembly of the part should be carried out according to the above instructions.
The collector assembly must be checked for moisture that could cause a short circuit in the motor winding. If a humid environment is found inside, it will be necessary to dry everything thoroughly.
The closure of the collector compartment is also possible due to graphite dust from the brushes. To eliminate it, you need to clean the collector with a brush and a cloth.
Breakdown # 4 - Battery Charging Issues
Battery devices also tend to malfunction sooner or later. In addition to mechanical damage, breakdowns of electric brushes and other accessories, most often, users note a quick discharge of the battery, its long charge or loss of dust suction power.
The reason lies in the battery pack. Depending on the frequency of use of the product, the battery must be replaced after 2-3 years. During this time, the element completely consumes its resource, and recharging does not give any results.
The suction power of the air flows decreases with decreasing battery capacity.

Replacement should be carried out carefully: having opened the product case, disconnect the broken battery and install a new one in its place.
If you notice problems with the battery within 1-2 years of use - this is an occasion to hand over the equipment for warranty repairs.
Breakage # 5 - a problem with fixing the power cord
In wired vacuum cleaners, a malfunction of the winding drum often occurs: the cord does not retract when the button is pressed or is constantly reeled up during operation of the device.

If a malfunction is identified, repairs should be carried out in the following order:
- Remove the housing cover.
- Remove drum and barrel spring with sleeve.
- Take out brake roller and lever.
- Replace deformed elements - coil spring, bearings, etc.
- Adjust the degree of cord tension in the drum.
- Assemble the drum and replace it.
- Check the operation of the stop lever.
- Assemble the vacuum cleaner by attaching the housing cover.
After complete assembly, make sure that the auto-winding mechanism is working properly.
Breakdown # 6 - reduced absorption
A clogged dust collector, dirty filters, engine problems, or hose malfunction. Another reason is the corrosion processes in the cleaning mechanism of the connecting cord.
Which, due to prolonged use of the device, can cause periodic malfunctions, as well as reduce the suction power of dust masses.
You can restore the correct operation of the unit in this way:
- Remove the back cover of the product.
- Sand the contacts with fine sandpaper No. 20.
- Treat them with a cloth moistened with alcohol.
- In the same way, clean the contact rings in the drum mechanism.
- Replace the cover.
- Check for electrical contact in the winding mechanism.
After the manipulations, you can use the device safely, and its suction ability will be restored if the problem was hidden precisely in the corrosion of the automatic winding unit.
Breakdown # 7 - malfunction of the dust collector indicator
Jamming of the piston system of the mechanism, deformation of the indicator spring prevent its proper operation.

To repair a failed mechanism, you must:
- Remove the front cover.
- Remove the dust bag, filter, grill, ultrafine filter and device handle.
- Remove the screw holding the indicator.
- Remove indicator tube from housing.
- Remove the rubber sleeve and spring from the tube.
- Completely disassemble the entire mechanism in detail.
- Replace the deformed tube, cork, spring, and if there is a blockage, remove it with a sharp object and a brush.
- Collect elements in the indicator housing one by one and install it on the instrument cover.
Based on the results of the procedure, verify that the indicator is operational.
Breakage # 8 - breakage of the brush in the washing unit
The malfunction of the wet nozzle is the result of improper use by the user. According to the instructions, the washing vacuum cleaner must be filled with water up to the mark on the tank.

Water and detergent spray tubes are located outside. When clogged, visually it is quite easy to determine: they are transparent.
For cleaning, you will need to pull the tube from the nozzle and the spraying mechanism, and then install it back.If the part is damaged, you can use any suitable plastic tube in length and diameter.
Vacuum cleaner breakdown prevention
To increase the life of the equipment, proper care should be taken. Regular preventive maintenance of malfunctions ensures high-quality and uninterrupted operation of the unit, and also prevents the occurrence of sudden breakdowns or malfunctions during use.
Periodic visual inspection of the device will reveal worn parts and assemblies, and replace them in time. Timely replacement of spare parts is necessary in order to avoid more serious damage to other parts.
Preventative engine care
Care of the electric motor and early diagnosis of malfunctions prevents possible malfunctions in the operation of the equipment.

The vacuum cleaner should be disassembled in the following order:
- take out the garbage container or bag, filter element;
- unscrew the housing cover;
- clean all parts and mechanisms from a layer of dust;
- unscrew the bolts and disconnect the engine;
- disassemble it into parts, rinse, lubricate, check the condition of the winding, brush-collector assembly, bearings;
- if necessary, replace worn parts;
- clean the HEPA filter.
Next, you need to assemble the device in the reverse order.
General recommendations for the care of the unit
Since the main function of the vacuum cleaner is to clean the room of dust, it must be regularly freed from accumulated debris.
To prevent overheating and breakdown of the nodes, mechanisms of the device, it is recommended:
- after each cleaning check the cleanliness of the filters and, if necessary, clean them;
- timely empty the dust bag, garbage container;
- keep the equipment in a dry room, preventing water from entering the engine and internal parts;
- prevent sharp objects that could damage important parts of the device;
- observe the operating mode of the unit and do not overheat it.
If you still have problems with the device, follow the above basic recommendations for troubleshooting a vacuum cleaner.
Conclusions and useful video on the topic
Step-by-step repair of the device engine:
Poor air intake - search for causes, their elimination:
In order for your appliance to serve you for years, keep the filter elements clean, lubricate and change bearings in a timely manner, and store the vacuum cleaner correctly.
In the case of minor malfunctions - do not rush to spend money on the workshop. Thanks to the proposed instructions, you can independently repair the assembly, parts of the vacuum cleaner and save your finances.
Share your vacuum cleaner repair experience with your readers. Tell us what the malfunction of the device was, how you managed to repair the equipment. Please leave comments on the article, ask questions and participate in discussions. The contact form is located below.
 How to make a vacuum cleaner with your own hands: detailed instructions for assembling a homemade appliance
 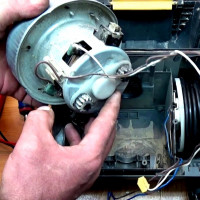 How to disassemble a Samsung vacuum cleaner: typical breakdowns + detailed instructions on how to disassemble a vacuum cleaner
  Do-it-yourself Samsung vacuum cleaner repair: common causes of malfunctions + troubleshooting procedure
  How to make a cyclone for a vacuum cleaner with your own hands: device + detailed assembly instructions
 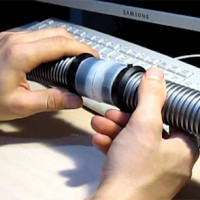 How to fix a hose for a vacuum cleaner: causes of damage + self-repair methods
 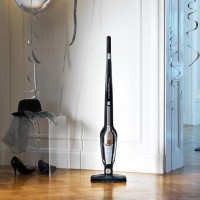 Which wireless vacuum cleaner is best for home: a ranking of the best models on the market
  How much does it cost to connect gas to a private house: the price of organizing gas supply
  The best washing machines with dryer: model rating and customer tips
  What is the color temperature of light and the nuances of choosing the temperature of the lamps to suit your needs
  Replacement of a geyser in an apartment: replacement paperwork + basic norms and requirements