Installing the facade on the dishwasher: tips + installation instructions

The difference between the installation of the built-in dishwasher and the freestanding model is that additional design of the front wall - the door of the machine is required.
It is assumed that the decorative panel is chosen for the surrounding interior, and then the facade is installed on the dishwasher.
If experienced craftsmen cope with this operation quickly, then for beginners the task seems rather complicated. To understand the features of the installation of the facade, you should carefully study the instructions and get acquainted with some of the nuances of installation. And about all this we will tell you in detail in our article.
The content of the article:
Design Features of Embedded PMM
The range of models integrated into kitchen sets is much wider than freestanding counterparts. This is explained by the principles of ergonomics and space saving, embedded in the concept of building an interior kitchen. To get acquainted with the best brands specializing in the manufacture of embedded PMM models, please go to this link.
To install the built-in dishwasher, you will need a separate cabinet, or rather, a niche in the headset. It differs from ordinary kitchen cabinets in that it does not have a back wall and a bottom.

The machine is installed directly on the floor, on 3 or 4 support legs. The absence of a back wall allows you to freely position the hoses - water inlet and drain.
The cabinet must have reliable walls to which the body of the dishwasher is attached, and the “roof” is the countertop. The front panel is fixed not to the walls, as in conventional cabinets, but directly to the door of the machine.
No need to experiment with mounts: manufacturers provided for the installation features and prepared special holes for screws. Detailed instructions on installing the built-in model of the dishwasher we brought here.
What is a facade for PMM? This is a decorative panel, most often from the same material as the front surface of the entire kitchen unit. It is made of MDF, plastic, laminated particleboard, solid wood or combinable materials.

Where do they get the decorative panel?
There are several ways to make it:
- ordered together with a kitchen set, if the dimensions of the machine are known in advance;
- do it yourself from the doors of a disassembled kitchen cabinet;
- if there is no suitable "excess" facade, they are selected in a similar style and color scheme.
The first method is considered the most practical: when ordering, all the dimensions of the machine are taken into account, so the facade "rises" perfectly. But this method is far from always applicable. We recommend that you familiarize yourself with dishwasher options to the finished kitchen.
At what stage should the facade be fixed?
The installation of the dishwasher is carried out in several stages. The main is considered connection to communications: water supply system, sewer system, dedicated power lines.
Decorating the front side is usually done at the very end, when the rest of the work is already completed.

Can I turn on the dishwasher without a decorative trim installed? It is not recommended to launch before the end of installation for several reasons.
Only a dishwasher completely closed on all sides can fully perform its functions, in addition, the panel plays the role of an additional sound and heat insulator.
Sometimes they mask a car first and then make a connection. This option is appropriate if there was a delay in connection for objective reasons, for example, in parallel changing the riser in the toilet or laying a new power line.
In order not to waste time in vain, slowly decorate.
Preparation of tools and materials
To fix the front overlay, no special tools are required.
The same items that are used to install the dishwasher as a whole will come in handy:
- drill;
- screwdriver;
- awl;
- screwdriver;
- roulette or ruler;
- pencil or marker.
If there is no power tool, then only one screwdriver is enough - you can also screw in the screws manually if the holes for them are pre-drilled.

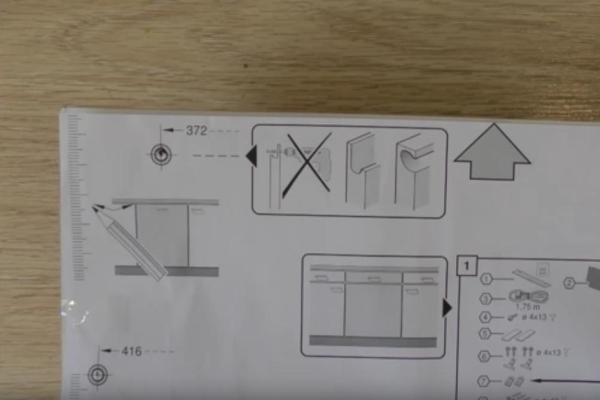
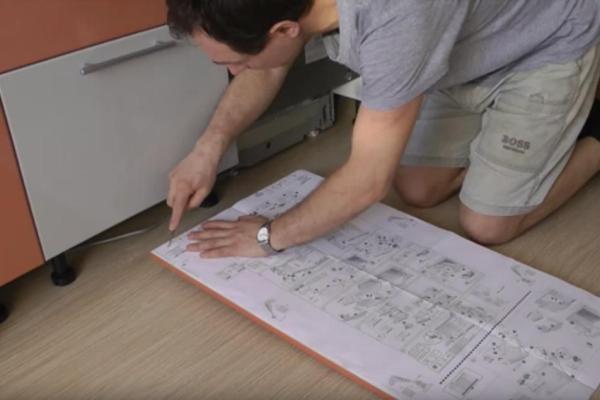
Simplifies the work of the presence of a stencil for facade cladding in the delivery set. It is a large sheet of tissue paper with marked attachment points.
The stencil is placed on the back of the decorative panel and mark the place of screwing screws.
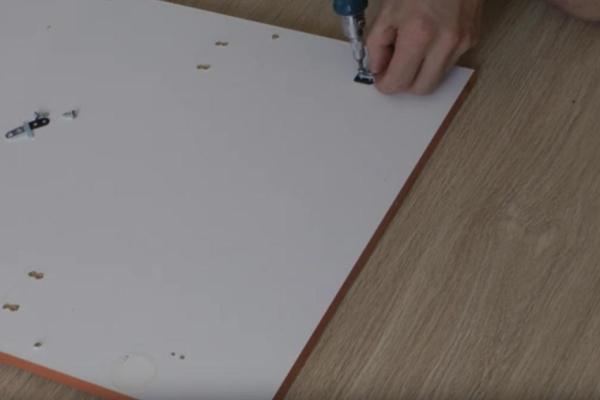
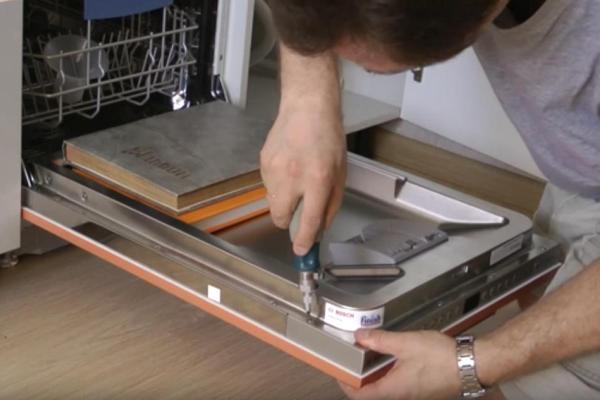
In addition to tools, you will need double tape. A few “stickies” - pieces of adhesive tape - come in handy when you need to try on the facade. They don’t recommend immediately “screwing” on the self-tapping screws, since an error of 2-3 millimeters - and all the work is wasted.

In order for the surfaces of the door and facade to adjoin as tightly as possible, the heads of the screws should be drowned in the canvas.
Fastening the workpiece is easier than a makeshift pad.If the panel is made by yourself, you may need a carpentry tool, sandpaper for grinding, antiseptic impregnation and paint to finish the entire surface or just the ends.
DIY installation instructions for the facade
Choosing the right time and preparing the tools, you can proceed with the installation. However, during the installation process, they often encounter unpleasant nuances that can delay the installation of the facade for an indefinite period.
Consider the features of installation, which are better taken into account before starting work.
Stage # 1 - determine the dimensions of the decorative panel
To find out the exact dimensions of the facade panel, you do not need to perform calculations and draw diagrams - the manufacturer did everything for us. The instructions indicate all indicators of interest - length, width, thickness, allowances.

The width of the panel often coincides with the width of the dishwasher, since the door repeats the parameters of the case from the sides. For example, for standard 60-centimeter models, it is usually 598 mm, for 45-centimeter models - 448 mm (there are exceptions).
However, the height may be different. It depends on how the facade of the adjacent kitchen cabinets is located.

It is allowed to use the panel several mm larger than the recommended length, if the interior requires it. The main thing is that extra millimeters do not interfere with opening the door at a right angle.
If the overlay touches the base, then it is left unchanged, and the edge of the base is cut along the contour of the facade.
Stage # 2 - choose the right fixation method
It is forbidden to ignore the manufacturer's recommendations and experiment with methods of fastening the lining. If you fix the facade in your own way, it can eventually fall off or “move” to the side.

If you use nails instead of self-tapping screws, then you will definitely have problems with dismantling. Expensive equipment has served for more than a decade and can "survive" the kitchen.
To change the cover plate with a panel from new furniture, you will have to tear out nails with the risk of deforming the door surface.
Erroneously fix the facade to glue. Two extremes can occur: either the glue will quickly lose its properties from temperature extremes, or “tightly” will fix the patch on the machine. Both options are impractical.
Leaving adhesive tape pieces as attachments is also frivolous - the panel will fall off under the weight of its own weight at the first vibrations of the unit.
Stage # 3 - install in sequence
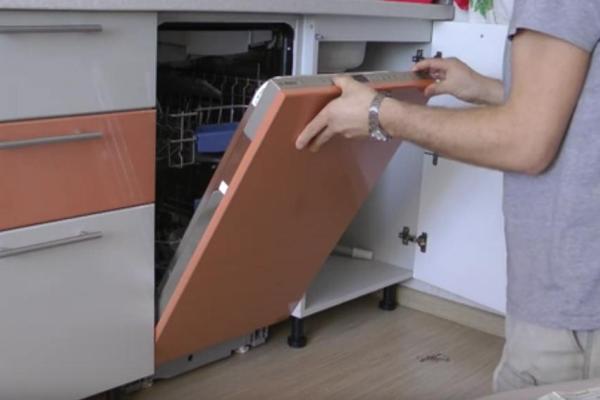
Before you start attaching the facade, you need to check how smoothly the dishwasher is installed relative to adjacent cabinets and countertops. An inclined position can cause the panel to be fixed crookedly.
The second point concerns the dimensions - once again you should check whether the length and width of the lining are adjusted exactly. If all is well, you can proceed.
Work order:
If, when closing the PMM door, large gaps and backlashes do not form, we tighten the fasteners, and this can be considered completed.

After decorating the front side of the dishwasher, do not forget to make side fastenings of the case.
To fix the side mounts, you first need to remove the upper basket for loading dishes, and then find the mounting holes and screw from the side of the washing chamber into the side walls of the screws that are suitable in length.
Professional installation tips
To avoid the most common mistakes, we suggest using the recommendations from experienced furniture makers:
- be sure to use a tape measure or ruler, do not act on the eye, do not be lazy to check the even position of the template and panel - the appearance of the kitchen facade as a whole depends on this;
- correctly select the length of the screws: they must confidently, deeply enter the panel canvas, while not leaving the front side and not deform it;
- when using a paper template, be sure to fix it on all sides;
- You can use a conventional screwdriver, but the use of a screwdriver speeds up the process;
- Fasten the handle, focusing on the location of the handles on adjacent cabinets, try to observe not only the position (parallel / perpendicular to the floor), but also the height;
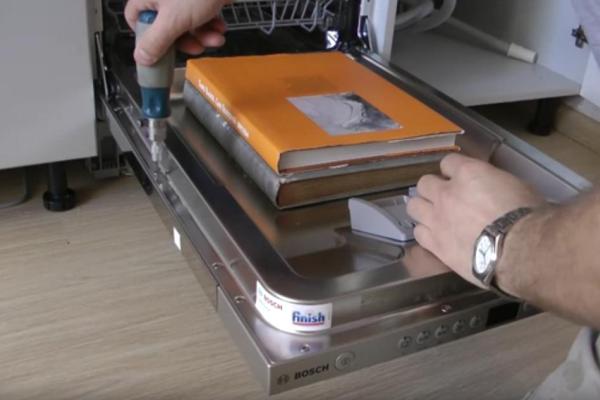
- so that the PMM door does not close during installation, put a couple of large books on it or another heavy object, such as an iron.
If you use a former cabinet door as the facade for the dishwasher, pay attention to the location of the old holes when trying on.
It is important to ensure that the old mounting holes do not come into contact with the new ones, otherwise the screws may pop out and the panel will partially recede.
After completing all installation work, you can begin to operate the equipment. But first, it is advisable to carefully study operating and maintenance rules dishwashers.
Conclusions and useful video on the topic
Video instructions help not only to present, but also to see the installation process in full detail. We offer several examples of self-installation of the facade for the dishwasher.
The sequence of actions on the video with useful comments:
Mounting the panel from the IKEA headset:
Testing the installed facade:
Mounting a decorative panel to mask a dishwasher is a simple procedure that does not require special skills. However you need to act very carefully and skillfully, otherwise you can ruin the pad.
If you are not confident in your abilities, invite an experienced furniture maker for installation - he will cope with the installation work in 15 minutes.
Have you completed the installation of the facade yourself and want to share your success with other users? Tell us about your experiences in the comments on this article and the difficulties you encountered. Also add photos of the finished work.
 How to choose a dishwasher: selection criteria + expert advice
  Installation of the built-in dishwasher: step-by-step installation instructions
 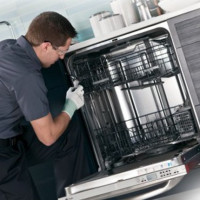 How to integrate a dishwasher into a finished kitchen: installation options + work procedure
  How to clean a dishwasher at home: the best mechanical and chemical methods
  How to load dishes in the dishwasher: the rules of operation of the dishwasher
  How to choose a built-in dishwasher: what to look for when buying + an overview of the best brands
  How much does it cost to connect gas to a private house: the price of organizing gas supply
  The best washing machines with dryer: model rating and customer tips
  What is the color temperature of light and the nuances of choosing the temperature of the lamps to suit your needs
  Replacement of a geyser in an apartment: replacement paperwork + basic norms and requirements
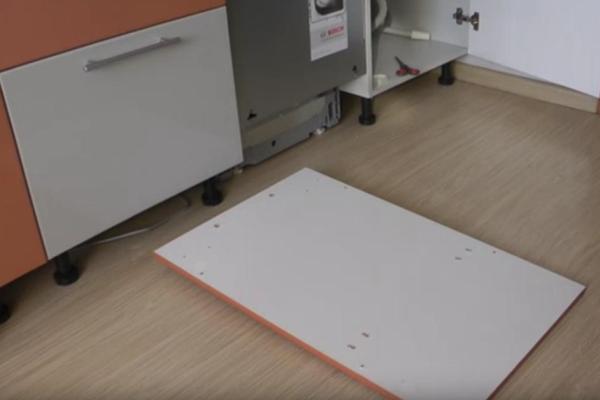
I decided not to do it myself, but to entrust this work to the masters. My wife was at home when the guys arrived. But, as it turned out, not everyone can be trusted, the master's hands clearly grew out of the wrong place. I installed the facade so that when the door is opened, it rests on the dishwasher and does not open completely. Yes, and fixed poorly, the facade is a bit loose. I remade it myself, in the course of work I realized that they strongly raised the dishwasher on its legs, because of this such a mismatch.
How did your spouse accept the job? It is clear that she is a woman, but it was necessary to see that the door does not rest. I will make the facade on Bosch, everything is just according to the patterns.
At home, at first we had a partially built-in dishwasher, this is when the facade is visible, and not disguised as a kitchen set. It was very beautiful, but this option involves more noise from a working dishwasher in the room. Not a washer, of course, but it still bothers me, especially when the baby is sleeping at home. Changed to a fully integrated version, it became much quieter. Almost nothing is heard now. So who needs maximum noiselessness, I recommend this option.