How to connect the air conditioner to the network with your own hands: cable routing + step-by-step instructions for connecting the indoor and outdoor unit

Air conditioning is one of the most popular types of equipment in the hot season, which is widely used in private homes, offices and apartments. High-tech equipment provides optimal microclimatic conditions in the room for work, work or leisure.
Installation and subsequent launch of air conditioning systems are rather complicated processes, agree? But if you understand the scheme, then you can try to do the installation and connection of the equipment yourself.
In this article we will talk about how to connect the air conditioner to the network and what tools will be required for this. We also describe in detail the connection steps and the requirements for the electrical network. To facilitate the perception of the material supplemented with visual photos and videos.
The content of the article:
Briefly about the principle of operation of the equipment
Modern devices to maintain an optimal microclimate in the room will help make life more comfortable, as well as protect the body from harmful external influences.
Climatic equipment is divided by the scope of use - industrial, semi-industrial and domestic. Depending on the type of installation, they are distinguished stationary and mobile models.
Depending on the type of construction, air conditioners are floor-mounted, wall mounted, outdoor, cassette, columned, channel, window.
The principle of their action is based on a change in the aggregate state of freon depending on pressure and temperature in a closed system. Devices alone do not produce heat and cold, but only transfer it, depending on the selected mode, from the premises to the street or vice versa.

Stages of connecting the air conditioner to the network
Connecting the air conditioner to the network is an equally important stage that occurs after the selection, purchase and installation of HVAC equipment.
All work must be carried out according to the schemes given in the installation and operating instructions. Also, the diagrams are depicted on the covers of the external and internal modules.
Stage # 1 - preparation of tools and materials
Connecting the air conditioner to the network, like any electrical work, is carried out using tools, including a drill, pliers, a set of screwdrivers and more.
Among the required consumables are screws, dowels, clamps, plastic box under the cable and so on.

The exact list of necessary materials and tools depends on several factors:
- device models
- air conditioning manufacturer requirements;
- the selected method of connecting to the network (via an outlet or through a separate supply line).
Particular attention should also be paid to equipment on which the stability of the device depends. So, if you regularly notice power surges, you should immediately pick up stabilizer for home.
To connect the air conditioner to the power supply network, you will need a socket, wire and circuit breaker.
To calculate the required wire length, you will need to consider:
- wall thickness;
- the distance from the wall to the outdoor and to the indoor unit;
- cable length under the modules themselves (approximately 1.2 - 1.5 m).
It is also advisable to provide an additional cable so that you can connect sensors, for example, temperature.
The wire cross section is selected taking into account the manufacturer's recommendations. The installation manual provides wiring diagrams for a specific model.

Fastening the wiring when laying communications using boxes is carried out using screws and glue. For the so-called hidden wiring, special clamps will also be needed, with which they fix the cable in the gates.
For the decoration of walls using special building plaster. This material allows you to quickly open the plastered layer if necessary.
Stage # 2 - learning network connectivity patterns
It is important to ensure reliable grounding for the air conditioner - in new homes there is a grounding conductor. But with the old housing stock, everything is not so simple - they do not provide for “land”, so most users turn on the equipment “as is”.
To protect against network overload, an automatic machine is installed on an individual line in the electrical panel. Detailed information is indicated in the technical documentation with step-by-step actions when connecting climatic equipment. Sticking to them, you can do the work on your own.
Also, under the cover of the outdoor unit of the split system, there is a diagram of how to properly connect the wires to the outdoor and indoor unit of the air conditioner, and connecting the latter to the power supply network.

Stage # 3 - connecting the blocks via cable
To connect the blocks to each other, it is necessary to lay an interblock wire from the internal module to the external one. This is done along with the laying of the freon highway. We recommend that you read the manual for laying the air conditioner.
Another wire will be needed to connect the indoor unit to a separate power line.

To make connections strip wires from insulation. This can be done using a conventional knife or a special device for stripping with cables and wires.
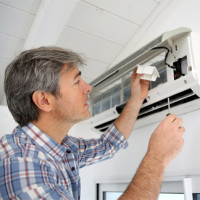
The connection of the external and internal unit of the air conditioner is carried out as follows:
- it is necessary to remove the front decorative panel or the protective cover of the unit;
- pull the cable and place it on the side of the module;
- strip the ends of the wires;
- insert them into the corresponding terminals and fix;
- fix the cable at the outlet of the block;
- cover the module.
On some air conditioner models, a separate wire is laid between the units for the temperature sensor.
Stage # 4 - connecting the device to the network
The electrical circuit for connecting devices in everyday life is fundamentally different for semi-industrial models installed in office premises.
In practice, two main methods are used:
- through a power outlet;
- with a separate conduct and connection of the wire of the air conditioner to the electrical panel.
The first option is used to commission almost all household devices.
If you decide to connect the air conditioner using a standard power outlet, this can only be done in certain situations:
- air conditioner power is small;
- the electrical network in the apartment or private house has sufficient power;
- the device will be located in this part of the room temporarily.
It should be borne in mind that it is forbidden to connect other household devices to the line.

If the outlet does not match the parameters specified by the manufacturer, the only way out of the situation is to lay a separate line from the shield to the indoor unit of the air conditioner. Connection via an individual cable is a safer and more reliable way to ensure stable operation of the equipment.
Installationautomatic machine for air conditioning protects against network congestion and from possible fire. In addition, thanks to the individual laying of cables for air conditioners, the modules can be placed anywhere.
Stage # 5 - checking the operation of the modules
Upon completion of connecting the blocks, it is necessary to check the correctness of the work performed, then test the assembled circuit by briefly starting the system.
Before checking the operation of the air conditioner and its first start-up, you should determine height differences between blocks. Manufacturer's recommendations are indicated in the equipment annotation.
Proper installation outdoor unit can be determined by several parameters:
- The outdoor unit vibrates during operation, so the wall for mounting it must be flat and strong.
- The block is set by level.
- The distance between the wall and the module itself should be 10 cm, otherwise the unit may overheat in summer in high temperature.
- Brackets must be attached to anchor bolts.
To protect the outdoor unit from ice and rainfall, install visor.

The maximum permissible distance between the blocks is three meters.Each model can have its own recommendations, they can be checked with the instructions.
Be sure to check the fastening of copper tracks. The tubes must be fixed, otherwise it is difficult to guarantee their performance.
For effectivecondensate drain The drain pipe must be inclined.
Conclusions and useful video on the topic
The connection diagram of the air conditioner to the network is described in detail in the following plot:
Cable routing tips can be found in the video:
Installation and subsequent connection of the air conditioner are summarized in the video:
Having the skills to perform electrical work, you can do it yourself to connect the air conditioning units to the network. Trial and short-term switching on is carried out at the end of connecting the modules, checking with the circuit, checking the connection and power supply of the external and internal units of the air conditioner.
Electricity does not forgive inaccuracies and errors. Before connecting yourself, you should adequately evaluate your own skills. If you do not know how to properly connect the air conditioner, then you should invite an electrician, otherwise independent attempts may result in the repair of expensive equipment, an electric shock or a fire.
If you have experience in connecting an air conditioning system, please share your story. A block for comments and questions is posted below this publication.
 How to disassemble a split system with your own hands: features and procedures
 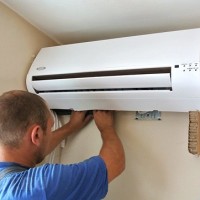 Do-it-yourself air conditioning installation: installation instruction + installation requirements and nuances
  Do-it-yourself split-system repair: the main breakdowns and how to fix them
 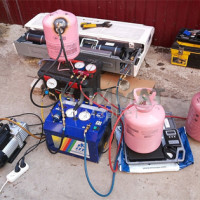 How to remove the air conditioner yourself without losing Freon: a detailed guide to dismantling the system
  What is precision air conditioning: classification of devices and the principle of operation of units
  DIY ventilation with heating: the nuances of air heating + assembly instructions for the system
  How much does it cost to connect gas to a private house: the price of organizing gas supply
  The best washing machines with dryer: model rating and customer tips
  What is the color temperature of light and the nuances of choosing the temperature of the lamps to suit your needs
  Replacement of a geyser in an apartment: replacement paperwork + basic norms and requirements