What to do if a humidifier is leaking: find the cause and recommendations for fixing the leak

A household humidifier, subject to operating rules, allows you to create the optimal microclimate in the living room. But with it, as with any other equipment, problems can arise, including leaks and so on. We noticed a puddle next to a working device and do not know what to do if a humidifier is leaking and can this problem be fixed on its own? Or is it better to contact a service center?
We will help to deal with these issues - in our article, we consider the possible causes of leaks and provides step-by-step instructions for identifying the location of the malfunction. We will also talk about what should be done to eliminate the breakdown, and in which case it will be more practical and cheaper to purchase a new humidifier.
The content of the article:
Safety measures for repairing the humidifier
An air humidifier is an electrical device, and the interaction of electricity and moisture can lead to negative consequences such as electric shock or short circuit (short circuit). And the short circuit can not only permanently disable the climate device, but also cause a fire.
Therefore, when identifying leaks, first of all, it is necessary to take care of safety measures.
Why should:
- disconnect the device;
- pour out the remaining water.
The last point must be performed so that the liquid does not get on the control board or any other electrical component during self-troubleshooting.

Leak Detection Tutorial
A problem such as water leakage from a humidifier can occur due to various reasons.
In order to identify a malfunction with minimal time and money, and eliminate it, you should perform a series of actions by checking:
- correct assembly of the unit;
- warranty validity;
- structural integrity;
- check the operability of electronics and other structural elements that ensure atomization.
Since the operability of an air humidifier that drips may depend on each of the listed actions, you should familiarize yourself with them in more detail - this will facilitate an effective troubleshooting and allow you to make the right decision.

Step # 1 - verify the assembly
The design of any humidifier has rubber elements. Namely gaskets cases, filters, valves. They are designed to prevent leakage, transfusion of fluid.
But it happens that these parts are not installed correctly, for example, after replacing the filter or disassembling the housing for cleaning and maintenance. This leads to a violation of the tightness of the structure and loss of performance.
The described cause of leakage is common and easily eliminated even at home. Therefore, repairs should always begin with a leak test. Especially when the malfunction manifested itself after performing any manipulations with the humidifier.
Many models begin to flow if the filter is not tightly screwed. If the humidifier has been used for many years, then the leakage may indicate that the service life of the rubber structural elements has ended and should be updated. What technically can be done simply and inexpensively, but there may be a problem with finding the right gaskets.
And yet, in most cases, the problem will be fixed quickly, for which you just need to perform the correct assembly of the humidifier.

Sometimes distortions and deformations that cause leakage are caused by the installation of the unit on an uneven surface. All that is needed in this case is to use a horizontal and solid support.
We recommend that you read the recommendations for choosing the right humidifier placement.
Step # 2 - clarifying the warranty period
If, following the steps listed in the previous section of the article, it is not possible to achieve the desired result, you should interrupt the search for the cause of leakage and remember when the purchase was made.
If it was relatively recently, then you should find the documents attached to the humidifier and see if the warranty applies to it.
If so, then there is no need to spend time independently searching for a malfunction and you just need to turn in the leaking unit:
- to retail outletwhich made the sale;
- to the manufacturer’s service center, whose specialists will be able to perform high-quality repairs or return the funds spent on the purchase of a humidifier.
If you still have the opportunity, you should definitely use the guarantee provided by the manufacturer. Since this is the easiest and most effective way to avoid financial losses and time costs.
A significant drawback of contacting a service center is the long repair period - sometimes you have to wait for the right part for months.
Step # 3 - search for mechanical damage
Often, the cause of the humidifier is leaking, cracks, chips and other damage that occur on the body as a result of mechanical damage.Namely, with falls, bumps and any other critical loads.

In these cases, to identify the cause of leakage of the humidifier is simple. For which it is usually sufficient to perform a visual inspection of the product body.
Eliminate leakage by replacing a failed structural element. But it should be understood that repair is not always advisable because of its high cost. Since it is often necessary to restore the large parts of the housing, namely its lower or upper part, to restore the humidifier’s performance.
If the damage area is insignificant, then you can try sticking a plastic patch over the crack if it does not interfere with the assembly, functioning of the parts and components of the humidifier.
Sometimes leakage is caused by damage or wear to the exhaust pipe. It is also easy to identify, but again, the feasibility of repair in this case is doubtful due to the high cost of the spare part.
Step # 4 - checking electronics and mechanics
The study of the condition of the interior of the humidifier should begin with those structural elements whose damage can be detected visually.
These include:
- water seal;
- distribution head for air supply.
Such a detail as gate often clogged. This leads to the fact that the liquid is squeezed out of the body of the product through any nearby holes.

Distribution head allows you to adjust the air pressure. Since excessive performance or high air velocity leads to the fact that part of the water splashes. In this case, simply adjust the humidifier.
But it happens that she wears out or fails for other reasons. Therefore, it is possible to eliminate the malfunction only by replacing the distribution head, and sometimes the fan.
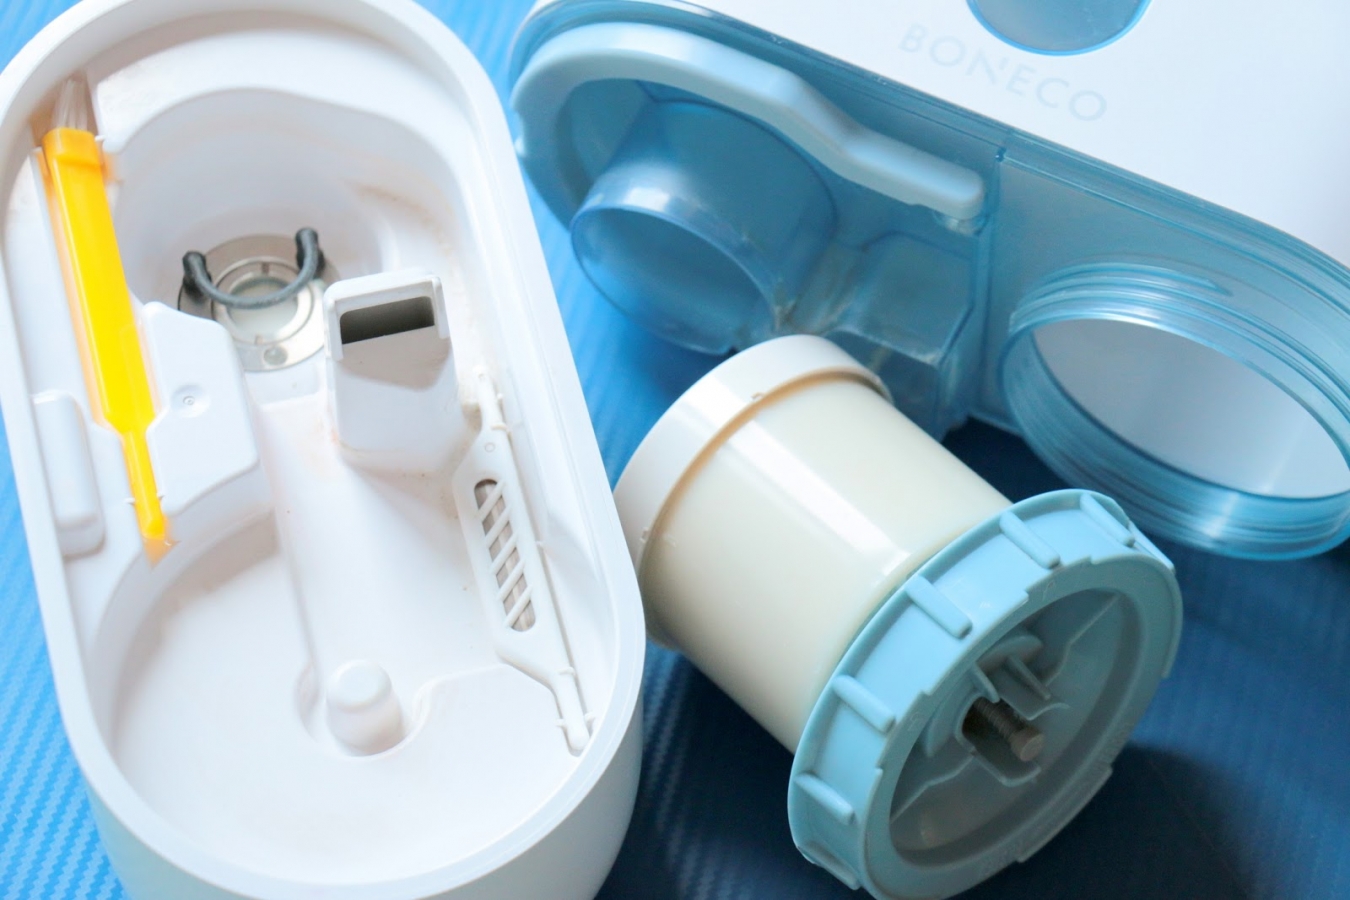
In construction ultrasonic humidifiers There is a mechanism called a membrane. Its task is to split water into the smallest particles. But sometimes the membrane (piezoelectric element) fails, which is easy to determine by the absence of a characteristic “gurgling” during the operation of the device. As a result, the fan blows out of the case not steam, but a drop of water, which leads to the formation of puddles of water around the unit.
These problems are resolved by replacing the part. But, if replacing the piezoelectric element (even on its own) is quite simple, drinking old and soldering a new one, then there may be difficulties in finding the right one.
In addition to leaks with a humidifier, other problems can occur. Therefore, we recommend that you familiarize yourself with most popular faults and how to repair them.
Conclusions and useful video on the topic
The video below explains how to replace the membrane yourself. And most importantly, this material will allow you to get acquainted with the design of humidifiers and how to disassemble it. Which will simplify the task of finding and eliminating the causes of leakage:
Finding out why your humidifier is leaking is relatively easy even at home.But it should be understood that a person who first encountered this problem can take a lot of time to solve it. Sometimes it happens that repairing a product is unprofitable - it's easier buy a new humidifier.
You yourself have dealt with the problem of leakage of a household humidifier and want to talk about the nuances of carrying out repairs to other users? Or do you have questions about our material? Ask them to our experts, share your own experience - the feedback block is located below.
 Air washing or humidifier - which is better to choose? Comparative overview of devices for humidification of air
  Is it possible to add salt to an air humidifier: the intricacies of water preparation and existing prohibitions
  Which humidifier is better - steam or ultrasonic? Compare two types of humidifiers
  Where to put the humidifier in the room: choosing the best place for the device + expert advice
  Which is better to choose - an air purifier or a humidifier? Detailed device comparison
  Humidifier Errors: Popular Humidifier Failures and Recommendations for Repairing The Humidifier
  How much does it cost to connect gas to a private house: the price of organizing gas supply
  The best washing machines with dryer: model rating and customer tips
  What is the color temperature of light and the nuances of choosing the temperature of the lamps to suit your needs
  Replacement of a geyser in an apartment: replacement paperwork + basic norms and requirements