How to make a mirror screen for a bath: step by step instructions

Arranging a small bathroom, where every inch of the area counts - is not an easy task. A win-win option in this situation will be the installation of a mirror screen. It will visually expand the space and allow you to organize a place to store accessories. But you need to know how to build it, agree?
We will tell you how to make a mirror screen for a bath so that the result of the work pleases with its appearance and impeccable service. The article we have proposed describes in detail the assembly and fastening technology of a not at all simple construction. Taking into account our recommendations guarantees a high final quality of the product.
The content of the article:
What are mirror screens made of?
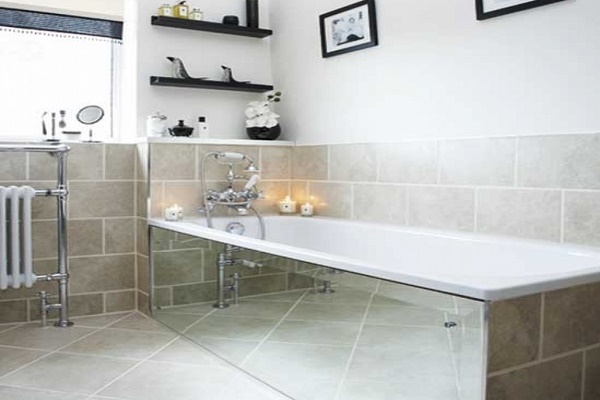
The mirror screen is a structure consisting of a frame frame, inside of which rigid curtains are fixed having a mirror surface. Panels, depending on the design solution, can be integral or consist of several parts.
The main requirement for the material used to make the screen is moisture resistance and the ability to easily tolerate temperature fluctuations. Both of these criteria are mirrored surfaces. They do not absorb moisture, are resistant to mold damage and also do not deform under the influence of temperature changes.
When arranging bathrooms, it is recommended to use acrylic mirrors. They are most suitable for specific rooms and are highly resistant to chemical influences.

In addition, acrylic surfaces are famous for their high impact resistance. They are five times stronger than glass mirrors. In fact, you can only break the acrylic reflective panel with a lot of effort. Therefore, you should not worry that children or animals accidentally break fragile material and get wounded by its fragments.
As a reflective material, it is better to choose a silver amalgam. Compared to the aluminum counterpart, silver amalgam is characterized by increased resistance and durability.

For cladding panels you can use tinted and colored mirrors. To create them, a colored layer of amalgam is applied to the glass: golden, bronze, blue ...
Frame construction is assembled by their aluminum profiles. They are not expensive in cost, light in weight and easy to install. In addition, aluminum profiles do not rust, and wear out not so fast. Profiles for the frame can also be made of thick plastic.

Combinations of materials look interesting. For example: the bottom of the panel is made of metal, and the top is decorated with a mirror or glass.
To enhance the decorative qualities of reflective surfaces around the perimeter of panels or along their upper edge, a backlight can be mounted.

The only drawback of mirror surfaces is that they are always visible to the remnants of splashes and dried drops. Therefore, in order to maintain a presentable appearance, they should be regularly cleaned with a cloth moistened with a detergent.
Design options
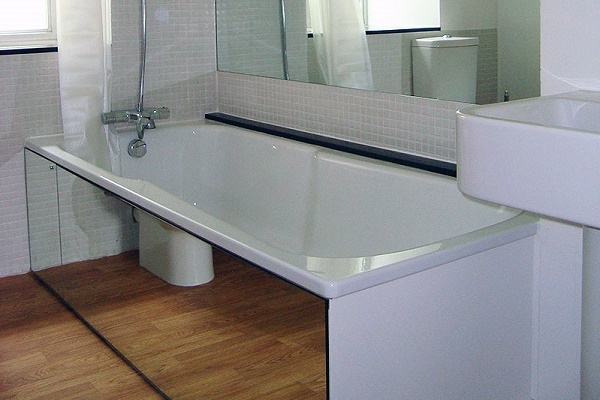
Depending on the design, the mirror screens for bathtubs are divided into two main types: stationary solid structures and sliding systems. The screen configuration depends only on your technical skills and economic opportunities.
With all existing varieties of screens used in the arrangement of the bath, will introduce next articlewhich we advise you to read.
Tightly closing walls
Fixed screens are tightly closing structures that perform a decorative function and hide from prying eyes laid under the bottom of the bathroom communications.
The solid, mirror-lined walls have a presentable appearance. But such constructions should be installed only if you know for sure that the piping under the bath is in perfect order.
For the possibility of routine inspection, the structures are equipped with inspection holes. But if it is necessary to carry out repair work involving a partial replacement of communications, the design will still have to be completely dismantled.
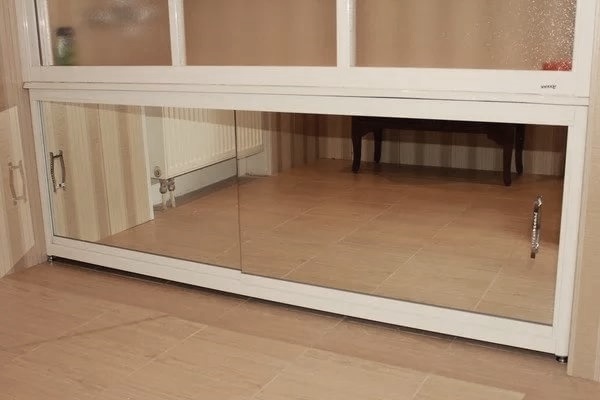
Swing and sliding systems
Moving screens are more functional designs because they are able to provide an approach to pipes in a matter of seconds.

They may have:
- Hinged doors. Swing sashes open on the principle of a book - sideways or forward.
- Sliding on special grooves of the system. In them, the doors move along the guides to the sides.
Swing screens are easy to use. The number of doors depends on the dimensions of the bowl itself. But, when choosing swing structures to equip your bath, keep in mind that to fully open the wings at 90 °, you need to allocate additional space.
When arranging a small bathroom, preference should be given sliding models, with the specifics of their assembly will familiarize us with the article recommended by us.

A convenient sliding system makes it possible to save extra centimeters of the area of a small room, while ensuring free access to the farthest corners under the bottom of the bowl.
Additional design features
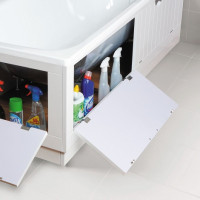
If we consider additional "options" in the form of internal filling, then the screens can be equipped with capacious internal shelves or a pull-out unit. The choice is simple or functional design depends on what shape the bowl has and what area is reserved for the room.

Due to the fact that the bowl has a concave shape, the space under the bathtub can be conveniently used as a kind of pantry for storing powder bags and bottles with cleaning products.
Shelves hidden behind the shutters can be made in horizontal or vertical form.
On narrow shelves located along the front of the bowl, it is convenient to place:
- household chemicals (bottles with fresheners and detergents, containers with gels and conditioners);
- household items (sponges, brushes and napkins used for cleaning rooms).
The design of such improvised lockers can be of two types: extendable and sliding. To increase functionality, the built-in cabinets are complemented by sliding pallets.

The technology of manufacturing a mirror screen
There is nothing complicated in making a mirror under the bath. The main thing is to decide whether you need lockers with doors for storing household trifles or whether you can restrict yourself to a conventional design without shutters. In fact, the manufacturing process is slightly different from regular screen assemblies, the difference is only in the device of the mirror surface.
Selection of required materials
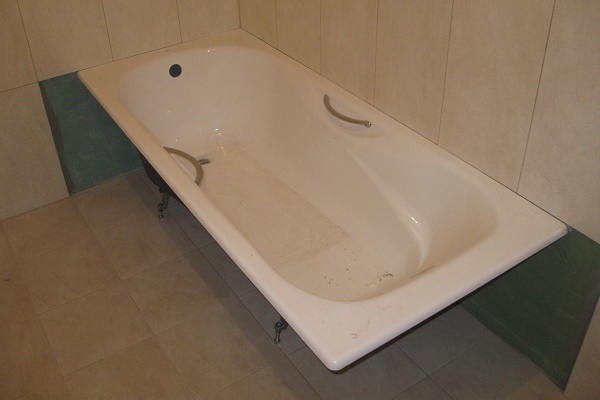
The size of the structure under construction depends on the dimensions of the bath. They can have a length of 1.5 to 1.7 meters and a height of 50-65 cm.
For the manufacture of the frame, a reinforced metal profile of the PN 27 * 28 brand or a wooden bar with a section of 40x40 mm is suitable.
When planning to use a wooden beam, take care to extend the life of the frame. To do this, treat the surface of wooden blanks in 2-3 layers with a special primer, which includes antiseptic moisture-repellent components.
Of the tools for the work required:
- building level;
- plumb line;
- Bulgarian;
- hammer drill;
- construction knife;
- screws and screws;
- polyurethane foam;
- sealant;
- "liquid Nails".
The size of the screws should correspond to the thickness of the profile used for the construction of the frame. Observance of this condition will prevent damage to the bowl during installation.
As noted above, it is better to use acrylic mirrors to decorate the panels. They are two times lighter than glass counterparts. For their processing, you can use standard cutting tools.

Acrylic canvases can be mounted on or without a base. In the first case, the glass is glued with "liquid nails" to the blanks cut from particleboard or MDF. And in the second, acrylics with the back side are simply fixed to the frame or inserted into the grooves of the guide profiles.
When planning to install accessories, for example, door handles, pay attention to the quality of the material. It must be corrosion resistant. Otherwise, after a short time, the doors on the handles will become unsightly. The best option is galvanized steel fittings.
Assembly of the structural frame
The first thing to do when constructing the frame is to correctly calculate the dimensions of the structure.

Failure to comply with this condition is fraught with the fact that during operation, under the force of gravity of the bathtub filled with water, the frame simply deforms.
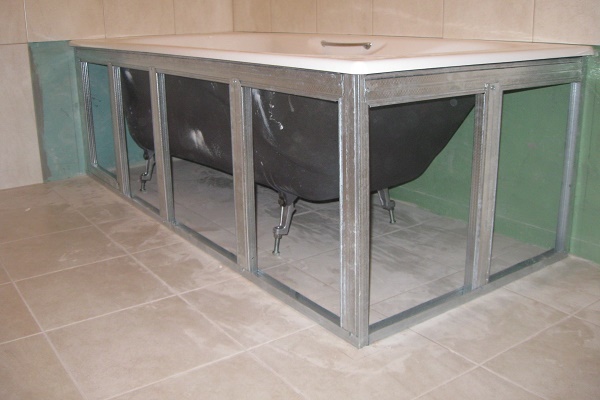
The installation process of the frame consists of the following steps:
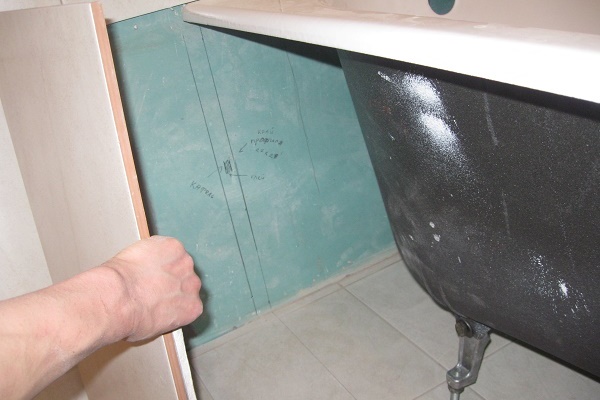
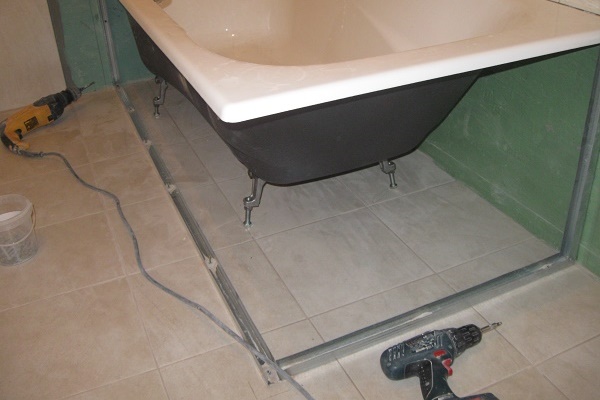
- Marking installation of fasteners. Along the contour of the bath along the entire length of the bowl, using the building level and plumb, mark the location of the profile. The marking should be flush with the edge of the bowl. As a starting point for measurements, the upper side of the bathtub is taken.
- The construction of the front and side framing frame. Billets of the appropriate size are cut from the metal profile, and then they are fixed to the floor covering, being guided by the intended lines.
- Installation of angular and intermediate rails. To the corners of the framing frame to connect it to the floor by means of dowels, vertical profiles are attached. The intermediate rails are placed at a distance of 60 cm from each other.
- Fastening panels to the frame. Finished panels are carefully inserted into the guide profile.
When marking strips under the starting profile, it is necessary to leave a gap between the bathtub to insert future material. The width of the gap depends on the thickness of the lining. To facilitate the assembly of the structure, marks are applied not only to the floor, but also to the wall plane.
The joining of the frame elements is performed using self-tapping screws. And the rails adjacent to the wall are screwed onto the mounting bolts.To increase the rigidity of the structure in the area of the side stops and in places where it is supposed to install shelves or place a drawer, additional racks are made of a metal profile.

To ensure a tight connection of the guide profile with the floor covering, thereby preventing moisture from entering the space under the bottom of the bath during operation, the lower edge of the frame is glued with sealant. The upper profile is better to blow out with foam.
Covering the screen panels
When planning to install sliding doors, a W-shaped guide profile is installed along the lower side of the frame. The upper guide is installed after the mirror panel is inserted.
To adjust the level of deviation of the screen from a vertical position, loops are installed on the sides of the profiles. When fixing the profile, it is important to ensure that there is no gap between the side walls and the rail.
For the manufacture of cladding panels from chipboard, one or two blanks of appropriate sizes are cut.
If you intend to make a blank screen, cut the workpiece to the full size of the front panel. When planning to build a design with sliding doors, prepare two identical blanks of such a size that in the closed position of the screen they overlap each other by several centimeters.

In the place where the technological window is provided, a hole 30x50 cm in size is carefully cut with a knife. Later it can be equipped with a ready-made plumbing hatch with a removable panel. They come in swivel or folding design.
Cladding panels are cut using a construction knife and grinder. Mirror panels are attached to blanks cut from MDF or particleboard using “liquid nails”.
Treated workpieces are attached to a wooden frame, planted on "liquid nails." Gluing the canvas allows you to create the effect that the mirror screen is made without a frame.
When creating a blank screen, dowels are used to fix the panels to the metal profile, maintaining a distance between the attachment points of 15-20 cm. To decorate the attachment points, plastic sides are installed around the perimeter of the structure.

Want to install pens? Use suction cup models. So you can protect yourself from problems arising as a result, when curious little households begin to climb the lockers. Using removable handles on suction cups, you can remove them at any time and be sure that the child will not harm himself by accidentally removing cleaning chemicals from under the bathtub.
At the final stage, in order to increase aesthetic qualities and ensure the tightness of the structure, technological gaps are filled with a silicone-based compound.
If as a cladding screen under the bath use a tile with a mirror surface, then the effect will be similar. The method of the device of this design is described in detail in our recommended article.
Conclusions and useful video on the topic
Video # 1. A selection of design options for mirror screens:
Video # 2. Mounting technology of the frame structure:
There is nothing complicated in making a mirror screen on your own. The main thing is to be extremely attentive and accurate. After all, with an error of even 5-10 millimeters, the slightest flaws will immediately become noticeable on the mirror surface.
Do you have experience in the construction of mirror screens for arranging a bath? Perhaps you know the technological subtleties that will be useful to site visitors? Please write comments in the block below, share information and photos on the topic of the article, ask questions.
 How to make a screen under the bath yourself: analysis of the nuances of installation
  How to make a screen for a bathtub from a tile: methods of self-arrangement
 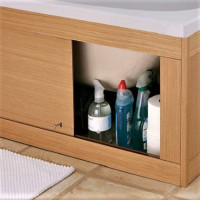 Sliding screen for the bath: step-by-step instructions for assembling the factory design + tips for craftsmen
 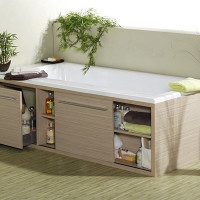 How to make a functional screen under the bathroom with shelves
  How to install a steel bath with your own hands: step by step instructions
  DIY acrylic bathtub installation: detailed step-by-step installation instructions
  How much does it cost to connect gas to a private house: the price of organizing gas supply
  The best washing machines with dryer: model rating and customer tips
  What is the color temperature of light and the nuances of choosing the temperature of the lamps to suit your needs
  Replacement of a geyser in an apartment: replacement paperwork + basic norms and requirements
The mirror screen on the bathtub is, in my opinion, already too much, though ... if you walk around the bathtub in “slippers from pillows or wrap them with foam rubber”, this is probably a great, very beautiful option. The security issue should come first. And if the family also has children ..? I would recommend a frame made of plastic panels. The choice is huge in thickness, color and width, so you can choose any option. Well, and if you really want to, there are SLRs. What to make the frame from is the master’s business. If you have hands, any option is possible. For "homemade" a huge field of activity, especially for beginners.
Danila, what are you talking about? Or didn’t they read the article except the word “mirror”? This is not about a mirror on glass, but about an acrylic mirror. And do not need foam slippers.
Yes, apparently the person read the article diagonally, did not want to delve into the technical details, but nevertheless there is a portion of criticism. Perhaps, indeed, there is no understanding of what is being said.
The mirror screen under the bathroom is a kind of false panel, behind which the interior of the bathroom itself is hidden. That is, you can equip a place to store something (for example, household chemicals) and hide it behind a mirror screen.
If you are concerned about safety, especially children, then the article suggests the installation of acrylic mirror screens. This is a fairly durable material that will not break from mechanical stress, as can happen with a conventional mirror. In addition, acrylic has nothing to do with the chemical effects associated with the use of detergents and high humidity in the bathroom. Therefore, I advise you to read the material carefully so as not to mislead anyone.