Do-it-yourself cast iron bathtub repair: common damage and repair

The main defects in the coating of the bath include cracks, scratches and chips. Damage occurs after inaccurate installation of furniture, plumbing and falling into the bowl for bathing heavy objects. Calling a wizard to fix problems would be expensive, so it would be nice to learn how to repair a cast-iron bath with your own hands, right?
We will help you in solving this issue. The article provides detailed instructions for removing chips, small and deep scratches, and also describes effective methods for the restoration of cracks. Having studied the material, you can restore the attractiveness of the cast-iron bowl and extend the life of the bath.
The content of the article:
Shallow Scratch Repair
The use of multicomponent cleaning agents, cleaning a contaminated surface with a hard brush, careless handling of metal objects during repair - all this leads to the formation of shallow scratches.
Such scratches should be immediately eliminated, since the ingress of moisture, caustic chemicals into the formed gap leads to the formation of rust, the multiplication of moisture-loving microorganisms and an increase in the size of the scratch. Which will lead to further destruction of the surface of the bath.

Factory enamel on a bowl cast iron bath very durable, so removing shallow scratches is necessaryscrewdriver. If it has already been restored with acrylic or epoxy enamel, a sandpaper is suitable for treating micro-scratches.
Also for processingmicrodamage will be required:
- fine sandpaper markings P1200, P1500 orscrewdriver with a nozzle for attaching an abrasive wheel;
- finely abrasive carpolish - ekonomic polishes for single use are pastes firmsWILLSON andRUNWAY;
- wax polish no abrasive, eg, Golden Wax.
The first step is to flush the surface Pemolux, Comet, Sorts or baking soda for degreasing. After removing the product, you need to dry the bath.
Next is surface grindingsmall fraction sandpaper orscrewdriver with an abrasive wheel - null, until leveling. When processing scratchesscrewdriverminimum speed is set.
The treatment area should be constantly moist to prevent cracking during heating. Therefore, at the entire stage of initial polishing for damage, it is necessary to pour a thin stream of water.
After the treated surface becomes smooth and matte, it is necessary to apply a granularpolish. Treatmentlow abrasive the composition is made vertically, then horizontally, until a smooth, uniform surface is obtained.
The final step in eliminating minor scratches - finishing the coatingcar polish with wax.Polishes with a wax content have water repellent properties and give a sparkling sheen to any coating.

After obtaining a shiny surface, it must be washed with soapy water ornon-aggressive liquid cleaner:Tercy, Oh yeah,Sarma. Immediately after this, the bath can be used.
Methods for removing chips and deep scratches
The enamel coating is subjected to mechanical stress, chips and deep scratches appear on the bowl, which expose the cast-iron base.
Then it’s time to think about the repair, but not every owner knows how to repair the cast iron bathtub with their own hands. A call of specialists will be expensive.
In fact, it’s not difficult at all - you just need patience and perseverance. Next, we will consider options for resolving the problem and the order of the work.
Chips are repaired in several ways:
- applying a porcelain patch;
- applying glue BF-2 and a pigment filler;
- using automotive putty and enamel;
- spot filling of the cleavage site.
Each method of restoration of coverage is within the power of any home craftsman. The durability of the patch depends on compliance with the instructions on the packaging of the installation material and on the quality of the preparatory work.
If a chip or scratch formed a long time ago and the bare metal had time to rust, the rust coating is removed. A powdery detergent is suitable for this.Chistin Sanitary or Surge. With deep penetration of rust, oxalic acid can be used.
A significant layer of powder is applied to the cleavage site, which is moistened with a small amount of water until gruel is formed. The latter is rubbed into a chip or scratch with a foam sponge.
The composition must be left for 15 minutes. Abrasive substances damage and weaken the enamel, so they are applied directly to the damaged area. After time, the bowl is washed with plenty of running water.

After treatment with an anti-corrosive substance and in the case of fresh chips, they begin to prepare the bath.
Work Technology:
- At the first stage, cleaning and degreasing with baking soda orPemolux. In a place where the enamel is damaged, more thorough processing is carried out.
- After degreasing, the area is treated with a drill using a grinding stone or abrasive end nozzles.Grinding chips with an abrasive makes the inner surface of the damage rough, which improves the adhesion of materials.
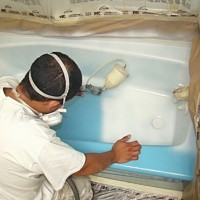
- After abrasive treatment, the bowl must be washed and dried. To do this, it is better to use a building hair dryer, as forced drying ensures complete evaporation of moisture from the treated coating.
- When the surface of the cast-iron bath is dry, you need to degrease the place of cleavage and enamel around. For this purpose, diluent 646 or acetone is suitable. Now you can begin to primer and restore the surface.
Grinding deep scratches helps align the edges, expand the grooves, create a microrelief for better adhesion. Good adhesion to materials can be achieved with a scratch width of at least 1 cm.

Method No. 1 - Epoxy and Porcelain
To repair the cast-iron bowl, you will need epoxy and porcelain. Any broken cup, mug is suitable, the main thing is that the color of the dishes match the enamel color, then the masked chip will not be evident. Before filling the chips, the pieces of porcelain are ground into a fine powder.
First, a layer is applied to the surface of the chip.epoxy, porcelain crumbs are poured on it. If this is not enough to level the damage with the surface, then after 2.5 hours, another layer of epoxy and porcelain powder are applied.
At the end of the time specified in the instructions, the surface is polished finely grainedsandpaper.
Method No. 2 - BF-2 glue
Rigid, heat-resistant, elastic, durable surface instead of chip on the cast-iron bath is formed by the polymer in the glue Bf-2. To obtain white mounting material, dry whitewash, chalk, tooth powder are added to the transparent BF glue.
After preparing the two components, the glue and filler are thoroughly mixed and applied to a chip or scratch. This mixture dries within 24 hours, the finished surface can be polished.
If one layer of glue is not enough to fill the chip, the next layer is applied after the previous one has completely dried, after 24 hours. When applying such a multi-level patch, polishing and use of the bath is possible no earlier than after 72 hours.

Method number 3 - car putty
Reliable repair of the cast-iron bathtub with your own hands is possible if you choose a high-quality water-repellent, heat-insulating primer, putty and enamel.
Such materials include automotive putty andcar enamel. In a normal environment, materials experience significant loads, operate at high temperatures, with humidity and vibration.
Therefore, the gentle climate in the bathroom will provide materials with minimal wear. Subject to surface preparation technology and application technology, damage will be practically invisible.
For the repair of chips and scratches suitable waterproof car puttyNovol Fiber, Body Soft. The material is applied to the prepared surface with a plastic or rubber spatula.
When filling in damaged areas, make sure that there are no voids under the putty layer. The surface of the patch should be flat, without recesses.
If cavities have formed, then after the first layer has dried, it is necessary to put the putty on the second. If the coating is uneven, it should be leveled with fine-grained sandpaper.
The treated surface can be painted with automotive or two-component acrylic enamel, then the coating will be glossy and shiny.

Method №4 - enamel restoration
Shallow fresh chips and scratches can be removed. enamel for restoration. This method is the simplest, but does not provide perfect alignment of the surface. If grinding is carried out with an emery cloth and degreasing immediately after the formation of the defect, the enamel will last a long time.
Enamel restorer is sold in any plumbing store and is a tube or bottle with a brush filled with synthetic resin enamel.
Enamel for repairing scratches and chips is applied to the damaged surface with a thin layer. 4 hours after drying of the first layer, the paint is applied a second time. You can use the bathroom after 24 hours.
In addition, plumbing stores are filled with ready-made sets for restoration of coverage and spot repair of the surface of the bathtubs. Buyers are increasingly buying crack and scratch repair compounds, chip removal kits, and spray enamels.

If yellowness is not removed from the surface of the bowl, or a net of small scratches has formed on the bathroom over time, then it is better not to conduct a local restoration complete painting.
Crack restoration methods
Cast iron bathing bowls have become popular due to their high wear resistance and durability. But even such durable products have defects in the form of enamel chips, corrosion or cracks.
The occurrence of a crack as a result of plumbing or natural changes in the temperature of water and air becomes one of the reasons for replacing the bath. In some cases, it is possible to repair the defect.
Ways to eliminate cracks in the cast iron base of the bath: using cold welding, by applying epoxy resin, soldering with lead-tin solder.
Option # 1 - Cold Welding
At the first stage, degreasing and cleaning the bathPemolux or soda. If there is rust around the edges and inside the crack, a hard abrasive likeSanox or Chistin Sanitary.
The anticorrosion agent is applied to the surface of the crack with a thick layer, wetted and left on the damage for 20 minutes. After washing off the cleaning agent along the visible edges of the crack, on one or both sides, depending on the location, micro-holes with a diameter of 3 mm are drilled.
After degreasing, the surface is ground with a grinder, an electric drill with a grinding wheel or abrasive. Not only is the crack cleared, but also the enamel around it is 1.5-2 cm wide.
The grinding wheel removes the coating up to the metal. At the crack site, a hollow is carved out over the entire length of the fault.

After grinding, the tank cover is cleaned of saw cuts and dirt. When the bathroom dries, the crack should be degreased with a solvent, alcohol or cologne.
Hot water is poured into the bowl for half an hour, after it is drained, the surface is dried with a hairdryer. Now the treated coating defect can be coated with cold welding.
You can use the bath no earlier than 24 hours. To even out the tone of the coating, the crack area can be painted with two-component acrylic or epoxy enamel.
Option # 2 - Epoxy
The process of preparing the surface for applying epoxy resin is practically no different from the technology of preparing the bath for applying cold welding.
Scheme of work:
- cleansing and degreasing;
- grinding and grooving;
- additional degreasing.
After completion of the preparatory work, it is necessary to prepare an epoxy resin or putty based onepoxy. A layer of epoxy resin is applied to the crack site, fiberglass fabric is on top and again adhesive mounting material.
After drying the structure, it is necessary to repeat the procedure:epoxy - fiberglass - epoxy. The result should be a patch above the enamel level, if not, then the procedure is repeated a third time.
After the patch has dried, 2 days after filling, the surface must be treated with fine-grainedsandpaper and enamel Stacryl or other resistant paint.

Option # 3 - soldering cracks
If you have soldering skills, you can solder a small crack in an iron bath. This requires careful cleaning and the release of metal from enamel.
Soldering is carried out with a 100-200-watt soldering iron using lead-tin solder and a special flux for steel and aluminum.
This way of solving the problem takes time and skill. The seam will not last long, but it will do for a temporary fix.
To extend the attractiveness and service life of a refurbished bath, you must correctly pick up detergent. Hard brushes that can damage smooth enamel cannot be used to clean the surface.
Conclusions and useful video on the topic
For reliable adhesion of materials and durability of the coating, it is necessary to observe a clear sequence of preparatory and restoration work:
High-quality repair of a cast-iron bath is a careful restoration of the most important sanitary fixture in the apartment.
Restoration of the damaged surface is possible as a result of the "jewelry" work of the master. The result of painstaking work and many hours of expectations will be a bathtub without visible chips, scratches and cracks, which will last another ten years.
Share with your readers your experience in restoring damaged cast-iron bath enamel and performing restoration work. Please leave comments, ask questions about the topic of the article and participate in discussions - the feedback form is located below.
 How to paint a cast-iron bath: common tools and technologies
 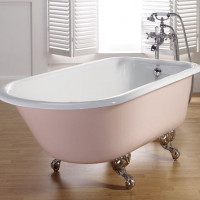 DIY cast iron bathtub installation: a detailed step-by-step guide
 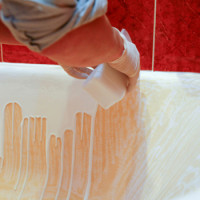 Restoring a bath with liquid acrylic: DIY repair of an enamel coating
 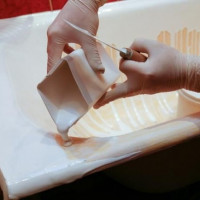 DIY enamel bath: how to treat the bath with liquid acrylic at home
 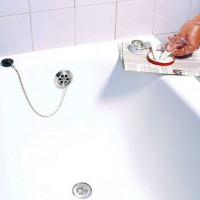 Restoring a cast-iron bath at home: step-by-step instruction
 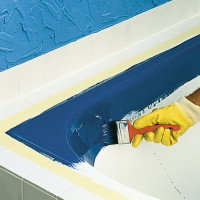 DIY bathtub painting using epoxy enamel and liquid acrylic
  How much does it cost to connect gas to a private house: the price of organizing gas supply
  The best washing machines with dryer: model rating and customer tips
  What is the color temperature of light and the nuances of choosing the temperature of the lamps to suit your needs
  Replacement of a geyser in an apartment: replacement paperwork + basic norms and requirements
Our bath is about 20 years old, if not more. Of course, during this time she was very worn out, scratched, maybe because I always brush with abrasives and a brush. I decided to restore the glass on my own, I sent my family to the cottage for the weekend, because I can’t use the bathroom, and it’s very smelly when applied. The main thing is to clean the bath well with sandpaper and then remove all the dust. You need to pour the glass in carefully, although it has the property of being slightly distributed. It took a long time, naturally, but it was worth it. The bathtub looks like brand new.
It is very good that ready-made bath restoration kits with everything you need are now sold. I, as a woman, do not understand all this, but here everything is ready and even with instructions. I bought such a set with enamel, putty, even with a special wand for mashing - instead of sandpaper.She did everything herself, it was absolutely uncomplicated. The bathtub has become like new.
I doubt that such an independent repair will last a long time. In the best case, one and a half years will have to be repeated.
Hello. It all depends on:
- The quality of the coating and materials.
- operating conditions.
- The use of certain detergents.
- The quality of the water.
- Frequency of use.
- Competent cleanliness of the device.
Any paint and any coating over time require updating. Previously, wooden windows were painted with much less contact with moisture (internal frames), almost annually. Maybe not the most successful comparison, and yet.
Why so sure? Personal experience? If you did not know, then the cast-iron baths in five years will turn yellow anyway, no matter what you paint. Isn't it easier then to buy an acrylic bath right away?
On account of the fact that the enamel on the cast-iron baths turns yellow in five years, this is a well-known fact. At the same time, yellowness is not excreted by any cleaning agents, since this effect comes from the oxidation of cast iron.
But this does not mean that the only optimal solution is to replace the cast-iron bathtub with an acrylic one. There are several alternatives that can help you upgrade your bath and save a budget:
1. Filling a cast-iron bathtub with acrylic. You will get a durable bathtub with an acrylic coating that will not turn yellow like enamel.
2. Installing an acrylic bathtub in a cast iron. Special acrylic bathtubs, which are made to the size of cast-iron, and are installed inside.
As you can see, it’s not necessary to buy a new bath; you can upgrade the cast iron with acrylic.
Hello. Acrylic bathtubs also have many drawbacks. As for yellowness - not a cast-iron bath turns yellow, but its coating due to operation, water quality, use of unsuitable cleaning agents. Acrylic also turns yellow and here the cause may be the material itself and its coating.
After 5 years, they turn yellow anyway - there are no such statistical dates. She can stand as long as she wants and not turn yellow. depends on the quality of the coating, operation, washing, water and other factors. I have had a cast-iron bathtub for 10 years and have not turned yellow with daily use. True, the coating in some places with children's toys was scratched.