What to do if the drain tank does not hold water: causes and methods for troubleshooting

Any breakdown of the toilet is a real stress for the owners, as it is associated with unexpected expenses, unpleasant emotions and loss of time. If the drain tank does not hold water, and you do not know what to do in such a situation, then check out our tips.
We will talk about how to determine the cause of the malfunction. We will show you how to fix the breakdown yourself step by step. In the article we proposed, damage options are described in detail, as a result of which the tank ceases to hold the accumulating water, and ways to solve problems.
The content of the article:
Features of the tank
The mechanism for draining water from the tank is of two types. In the first, all water is drained by pressing the button or while lifting the handle. In the first embodiment, there are two buttons for the rational use of water. When you click on one of them, the water is partially drained, and using the second one you can remove all the water from the tank.
If the flush works fine, then the water enters the toilet bowl quickly and without delay with a characteristic sound. In case of problems, the flow of water either does not stop and the walls of the toilet are constantly wet, or the water overflows from the tank.
Such a breakdown can cause flooding of the toilet room, or provoke the formation of limescale on the walls of the toilet and, undoubtedly, lead to a large consumption of water due to its constant collection. Another malfunction can be indicated by the condensation that appears on the cold water pipe, which leads to the toilet.

To avoid further problems and eliminate leakage, it is important to find out cause of leak and determine in which part of the tank a breakdown occurred and check all the details. To do this, shut off the water in the riser, then clean the tank and study the design.
Flush structure device
If before the tank body was made of cast iron, today ceramic, faience or special plastic is used. All the main elements of the tank are connected to each other.
There are only three key mechanisms: inlet, adjustable by a float, flushing and overflow systems:
- Inlet or bulk valve blocks the flow of water into the tank after it is full. The necessary water level "measures" the float.
- Locking or drain mechanism. This is a shutter / valve that opens during flushing.
In modern models there are buttons for this. They can be single or double to adjust the amount of flushed water. In old Soviet toilets, a chain, lever or rope is used, which are attached to the lever with a pear. These elements are connected by traction. And the pear is at the bottom of the tank.

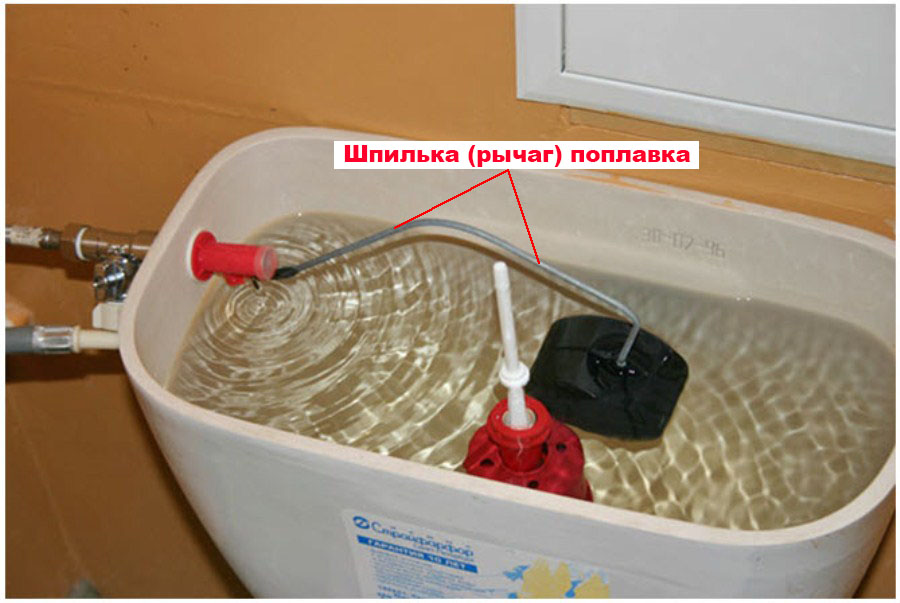
Regulates the operation of the locking mechanism and controls the level of water being drawn toilet float, the design of which depends on the option of supplying water to the tank (bottom or side).
There are several types of floats, but inside there is air:
- The first, hollow, made of rubber. It is located at the bottom of the tank and functions as a rocker.
- The second is a plastic, glass-like float. Located at the top of the tank. He, when filling the tank with water, rises up and works almost silently. The latter type is used only in older models; in modern toilets, the first type is installed.
The overflow system protects the entire toilet room from flooding if the loading mechanism does not work for some reason. When more than normal water gets into the tank, then flush tank fittings drains it into the toilet. If you find a leak, then do not panic, but remove the toilet lid and understand what the problem is.
Causes of leaking tank
To find out the exact location of the breakdown, you need to carefully inspect the fittings. Continue from checking one part to another until you eliminate the cause of the leak. Prepare the toilet for work. It is necessary to shut off the water using a shut-off valve. It is mounted on a water pipe leading to the toilet.
If there is no such valve, block the water on the outlet pipe. Then remove the cap from the tank. To do this, dismantle the button or lever. Sometimes it’s enough to gently pull on the cover and disconnect it from the shutoff valve.

If the button is decorated with a ring, it is necessary to unscrew the system from it counterclockwise. Or pry off with a sharp object and take it off. It is easy to remove the double button: press the small, then the large halves of the mechanism and turn it counterclockwise without removing the pressure.
Reason number 1 - breakdown of key components of the valve
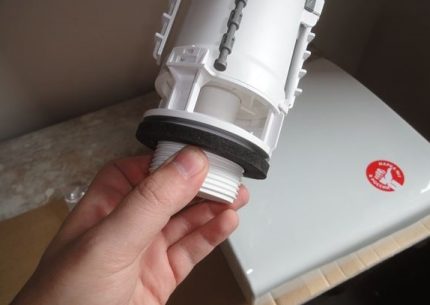
Having opened the tank, proceed to check filling valve. To do this, raise the float lever. If after this the water continues to flow into the tank, then the mechanism can no longer hold it. There may be several reasons for the breakdown: either the rubber gasket has been erased, or there is debris under the valve itself, or the valve itself is broken.
We proceed to eliminate the breakdown:
- turn off the water and rinse;
- then dismantle the shut-off valve itself;
- thoroughly clean it and the drain hole, wipe and dry;
- inspect the rubber gasket;
- if it has deteriorated, then replace it;
- when complete, you can install the mechanism in place.
If after these manipulations the water still flows, then the shut-off valve must be replaced with a new one. Before buying, take an old part and try to find a copy or analogue of it.
To replace it, you should:
- Unscrew the part connecting the valve to the water supply with a wrench or adjustable wrench.
- Then remove the float lever, nuts and pull out the lever itself.
- Dry the nuts and lever, if necessary, clean them with sandpaper.
- Install the new valve and all parts in place.
Check your work. Very often, a float becomes the cause of the leak. Let's analyze the most common cases.

The float was depressurized. Because of this, the system cannot shut off the flow of flowing water in time, which subsequently overflows and ends up on the floor. This happens if the toilet uses an empty plastic float for a long time.
Over time, it can wear off and water will begin to flow into it. The ideal option is to install a new element. If this is not possible, then we offer two temporary measures. You can wrap the float with dense cellophane or polyethylene. Or solder holes with plastic.
To do this you need:
- Cover the water and rinse, then remove the float, twisting the bolt, wipe it dry.
- After, cover the crack with plastic (waterproof) or wrap with polyethylene.
- Dry again, replace the float and check operation.
In any case, try to achieve maximum tightness. Then you will have one or two months to search for a new part. In some tanks, the float is connected to a plastic holder. To adjust it, unscrew the nut holding it. Then move to the desired position and fix everything again.
The float is not configured correctly.. During prolonged use, the mechanism mount loosens and it loosens. To solve the problem, you should set the float in the correct position and thus the water level will drop. How to repair, tell the holder material.
The pin holding the beam can also break. It can be replaced with thick wire. Just unscrew the old part, and install a new one in its place.
Float lever failure due to prolonged use. In most cases, it simply bends. Therefore, it must be gently bent and locked in a strictly horizontal position. This part should be located 20 mm from the valve through which water enters the tank.

Siphon membranehas fallen into disrepair. Such a detail is used in modern toilet models. Unfortunately, it cannot be repaired, but can only be replaced with a new one. Before buying, also check the siphon itself. It may be worthwhile to completely replace the entire mechanism.
Replacing is pretty simple:
- drain all water from the tank;
- shut off the water supply so that the tank does not fill up again;
- unscrew the nuts that secure the drain hose with a wrench;
- then do the same with the siphon mount. It is located at the bottom of the tank;
- remove the siphon and replace the old membrane with a new one. They must be completely identical;
- Reinstall all parts and nuts.
If the filling valve and float are in order, then a broken drain system or its elements may cause leakage. Most often, a pear and gasket come into disrepair.
Rubber bulb breakdown can provoke a continuous flow of water of different intensities. A pear is an element of the Soviet-era tank drain system with a side control lever. It should be carefully inspected for damage.

For example, the loss of elasticity of a pear occurs due to the constant contact of rubber with hard water. Therefore, the rubber becomes stiff and the position of the part on the saddle changes. As a result of this, gaps are formed that allow water to pass through.
There are two ways to solve the problem. The first is suitable if you are faced with such a problem for the first time. You can simply make the pear more weighty by placing old nuts or something heavy in it. The second way is that you need to replace the old pear with a new one if the old one has become unusable.
Saddle. The pear is located on the saddle. The problem may be plaque formation due to hard water and settling rust on the saddle itself. Use sandpaper to remove sediment. If there is a gap between the saddle and the bulb, you just need to tighten the nuts with the socket wrench.
The gasket in the drain mechanism has become unusable. This is evident if the plumbing device without delay water is flowing. Only replacement for a new part will help here. To do this, shut off the water, rinse, unscrew the bolts, raise the tank and replace the old gasket with a new one. After that, put everything in place.

If out of order drain system (device at the bottom of the tank with a diameter of 20 mm), then the water will be continuously drawn into the tank and, as a result, will flood the toilet. How to check?
Carry out a test: turn off the water, turn on the flush and at the same time press the overflow valve. If the leakage stops, then the fixing nuts are loosened. You just need to pull them up a bit and check the operation, opening up access to water to the toilet.
If the problem persists, you need to drain the tank again and try to completely unscrew the nuts that hold the nozzles of the drain system. If it turned out, then wrap the sealant on the dried thread of the overflow valve so that it can be installed in the hole on the bottom of the tank.
If not, pour silicone glue or paint into the gap between the nozzle and the bottom of the tank. Leave to dry and check the result. If it is unsatisfactory, then tank repair will require other actions.
Reason # 2 - damage to the toilet bowl
Leakage may begin due to damage to the walls of the tank or problems with its attachment to the toilet. Or if the connecting sleeve / gasket or seal is worn out. This can be seen visually, or using a paper towel. The paper must be attached to the mounting location. Where it gets wet, there is a malfunction.
Replace the situation will be able to replace the cuff or purchase a special clamp. As a temporary measure, the sealant can be fixed with construction tape or liquid silicone.
Leak can provoke a hose connecting the tank and the toilet bowl. If it began to leak at the attachment point, then we change the gasket, and if it drips from the corrugation itself, then it should be replaced with a new one.
Weak tank mounting may result from rush or miscalculations of installers. To fix the situation, you just need to tighten the bolts with an adjustable wrench. In this situation, the main thing is not to pull and not break the thread. Then you definitely have to carry out a complete toilet change.

Cracks on the walls of the tank most often occur due to wear of the fittings or if something heavy has fallen on the toilet.A quick repair can be done using special glue for ceramics. You need to understand that this is only a temporary measure and after a while you will have to completely change cistern.
In order to protect the tank from breakdowns in the future, conduct a regular inspection of the fittings and clean it from time to time. Monitor the condition of the toilet bowl and check the flexible water hose for leaks.
If you find puddles on the floor next to the toilet, do not rush to panic. It is possible that this is just condensate formed on the flushing tank. On how to deal with this problem, it is written in the next article, the content of which we highly recommend to read.
Conclusions and useful video on the topic
The author tells in detail about the device of the drain tank and shows on an example how to repair shut-off and overflow valves. Also from the video you can find out about the causes of the breakdown, how to fix it:
The wizard shows how to use the improvised means to eliminate the leak of the tank. It is shown how to subordinate the drain valve, install an additional part:
The author offers his own way to repair the float. It shows in detail how to find out the cause of a leak and repair the valves:
As you can see, among the components of the tank there are no complex elements. Therefore, if desired, everyone can cope with the repair. The main thing is not to rush and outline a preliminary work plan.
But if you are not confident in your abilities or failed to fix the problem on your own, then you should turn to plumbers.
Want to talk about how to fix the situation with a water-holding tank with your own hands? Do you have information about technological subtleties that may be useful to site visitors? Please write comments in the block below, ask questions, post a photo on the topic of the article.
 Why the toilet bowl sweats: the causes of fogging and how to eliminate them
 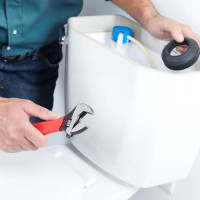 The toilet is leaking after flushing: possible causes of the malfunction and how to eliminate them
 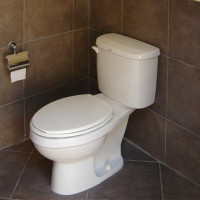 How to eliminate a leak in the toilet: determining the cause of the leak and how to fix it
  The toilet bowl is leaking: what should be done when a leak is detected
  Repair of the installation for the toilet: possible malfunctions and methods for their elimination
 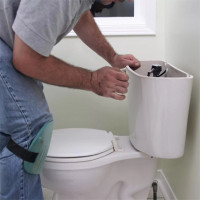 How to disassemble the toilet flush tank: instruction on working with various designs
  How much does it cost to connect gas to a private house: the price of organizing gas supply
  The best washing machines with dryer: model rating and customer tips
  What is the color temperature of light and the nuances of choosing the temperature of the lamps to suit your needs
  Replacement of a geyser in an apartment: replacement paperwork + basic norms and requirements
I ran into a different problem. Water was drawn into the tank very slowly, and there was clearly not enough pressure to flush the toilet completely. I went through the entire drain mechanism on my own. Everything turned out to be simpler than I expected. The water that is supplied to our homes contains a lot of invisible debris. As a result, a plastic filter clogged. After thorough cleaning, the problem was resolved. However, over time, you will have to repeat this procedure.
I once came to such a flood. Lucky only that the neighbors have waterproof ceilings. When I called the locksmith, it turned out that the problem was in the gasket. So, I also had to pay for a new gasket, and I bought it myself, quickly reaching the desired store. Now I try to carefully monitor the pressure of the water.