Electric welding for beginners: the nuances of welding and the analysis of basic errors

An apartment, let alone a private house, needs regular maintenance and repair work. A home craftsman has to be a generalist, able to perform many different tasks. Therefore, the masters want to master as many technologies as possible.
One of the most sought-after skills is the ability to perform welding work. Practice shows that electric welding is best for beginners - the technology is simple and accessible to anyone who wants to learn how to use it. Before you begin to master the method, you should familiarize yourself with the theoretical aspect of the question, agree?
All the necessary information is detailed in our article. We described the principle of electric welding and identified which device is best to choose for working at home. In addition, the article provides a step-by-step technology for welding parts, methods for making seams, and also lists the possible defects of the joints.
The content of the article:
What is electric welding?
Electric is called one of the welding methods when an electric arc is used for heating and subsequent melting of metals. The temperature of the latter reaches 7000 ° C, which is much higher than the melting point of most metals.
The process of electric welding proceeds as follows. For the formation and maintenance of an electric arc, a current is supplied from the welding device to the electrode.

When the electrode rod touches the surface to be welded, a welding current flows. Under its influence and the influence of the electric arc, the electrode and the metal edges of the elements being welded begin to melt.A weld pool is formed from the melt, as the welders say, in which the molten electrode is mixed with the base metal.
Melted slag floats to the surface of the bath, which forms a protective film. After turning off the arc, the metal gradually cools, forming a seam covered with scale. After the material has cooled completely, it is cleaned.
Non-consumable and consumable electrodes can be used for welding. In the first case, a filler wire is introduced into the melt to form a weld, in the second this is not required. Special equipment is used for the formation and subsequent maintenance of the electric arc.
Domestic welder skills are required to complete an extensive range of tasks:
What is needed for welding at home?
For work, you will need, first of all, a welding machine. There are several varieties of it.
Decide which one to give preference.
- Welding generator. A distinctive feature is the ability to generate electrical energy and use it to create an arc. It will be useful where there is no current source. It has impressive dimensions, so it is not very convenient to use.
- Welding transformer. The device converts the alternating voltage supplied from the network into alternating voltage of a different frequency, which is necessary for welding. The devices are simple to operate, but they have significant dimensions and react negatively to possible surges in mains voltage.
- Welding rectifier. A device that converts the voltage supplied from the network into direct current, which is necessary for the formation of an electric arc. Differ in compactness and high overall performance.
For operation at home, an inverter-type rectifier is preferred. They are usually called simply inverters. The equipment has a very compact size. At work, they hang him on the shoulder. The principle of operation of the device is quite simple.
It converts high frequency current to direct current. Working with this type of current provides the highest quality weld.

Inverters are economical, work from a household network. In addition, it is with them that it is better for a beginner to work with them. They are extremely easy to operate and provide a stable arc.
The disadvantages of inverters include a higher cost than other devices, sensitivity to dust, moisture and power surges. When choosing an inverter for home welding, pay attention to the range of welding current values. The minimum value is 160-200 A.
Additional equipment features may make it easier for a beginner.
Of these pleasant "bonuses" it is worth noting:
- Hot start - which means an increase in the initial current supplied at the time of ignition of the welding arc. Thanks to this arc, activation is much easier.
- Anti stick - automatically reduces welding current if the electrode rod is stuck. This facilitates its separation.
- Arc force - increases the welding current if the electrode is brought to the product too quickly. Sticking in this case does not occur.
In addition to a welding machine of any type, electrodes are needed. Their brand is best chosen according to a special table, which indicates the type of material being welded.
A welding mask will also be required. Best of all, one that is worn on the head. The models you need to hold in your hand are extremely uncomfortable.

The mask may be a simple darkened glass or the so-called "chameleon". The latter option is preferable, since when the arc appears, the glass automatically darkens.
Work only in special clothing that protects against splashes and ultraviolet radiation. This can be a dense cotton overalls, boots or high boots, canvas or rubberized gloves.
Electric welding technology
Learning how to properly weld parts with electric welding is better under the guidance of experienced welders. If this fails for some reason, you can try it yourself. First you need to properly organize the workplace. This is very important, since welding refers to high temperature, and therefore fire hazardous processes.
For work, you need to choose a workbench or any other base made of non-combustible material. Wooden tables and similar products are strictly prohibited. It is advisable that near the place where the welding will be carried out, there are no flammable objects.
Be sure to place a bucket of water near you to eliminate possible sources of ignition. In addition, you need to determine a safe place where the remains of used electrodes will be added up. Even the smallest of them can provoke a fire.

For the first independent seams, you need to prepare an unnecessary piece of metal and pick up electrodes for it. Experts recommend using 3 mm rods in such cases. The smaller diameter is used for welding thin sheets, which are inconvenient to learn. Larger diameter electrodes require high power equipment.
We begin by stripping the metal section on which the seam will be located. There should not be rust and any pollution.
After the part is prepared, take the electrode and insert it into the clamp of the welding machine. Then we take a clip "grounding" and firmly fix it on the part. Check the cable again. It must be tucked into the holder and well insulated.
Now you need to select the operating current power for the welding machine. It is selected according to the diameter of the electrode. We set the selected power on the panel of welding equipment.
The next step is ignition of the arc. To do this, the electrode must be brought to the part at an angle of about 60 ° and very slowly held on the base. Sparks should appear. As soon as this happens, lightly touch the electrode to the part and immediately raise it to a height of no more than 5 mm.

At this moment, an arc flashes, which must be maintained throughout the entire operation time. Its length should be 3-5 mm. This is the distance between the end of the electrode and the workpiece.
Keeping the arc in working condition, you need to remember that during operation the electrode burns out and becomes shorter. If the electrode is too close to the workpiece, sticking may occur. In this case, you need to slightly swing them to the side. The arc may not light up the first time.Perhaps there is not enough current, then it needs to be increased.
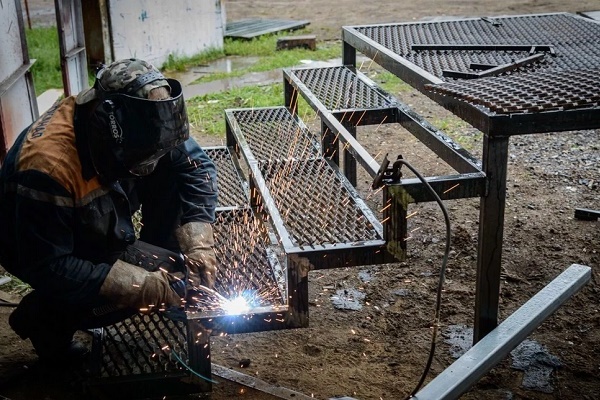
After the novice welder has learned to ignite the arc and keep it in working condition, you can proceed to the fusion of the roller. This is the simplest of all operations. We set the arc on fire and begin to very smoothly and accurately move the electrode along the future seam.
At the same time, we perform oscillatory movements resembling a crescent with a small amplitude. We sort of “rake” the molten metal to the center of the arc. Thus, you should get an even seam that looks like a roller. On it will be present small undulating influx of metal. After cooling the seam, you need to knock down the scale into it.
Arc Welding Techniques - Welding Methods
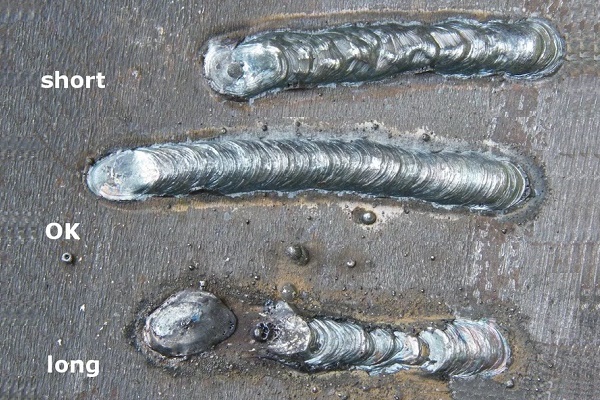
To get a high-quality seam, you need to learn how to maintain, and then move the arc. Particularly affects the quality of the length of the electric arc. If it is more than 5 mm, then it is considered long.
In this case, nitriding and oxidation of the molten metal occurs. It is sprayed with drops, while the seam is porous and not strong enough. If the arc is too short, a lack of fusion can occur.

Different methods are used to perform welding. We consider in detail the main ones.
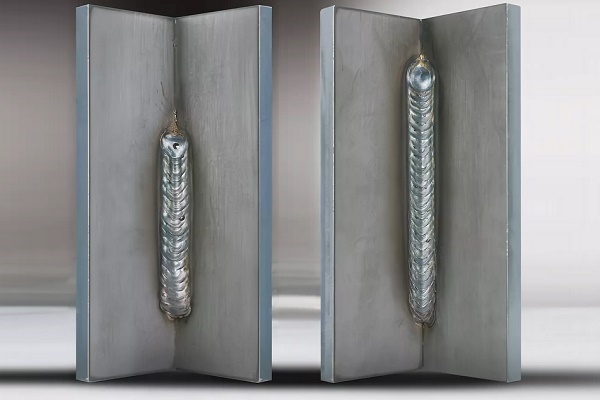
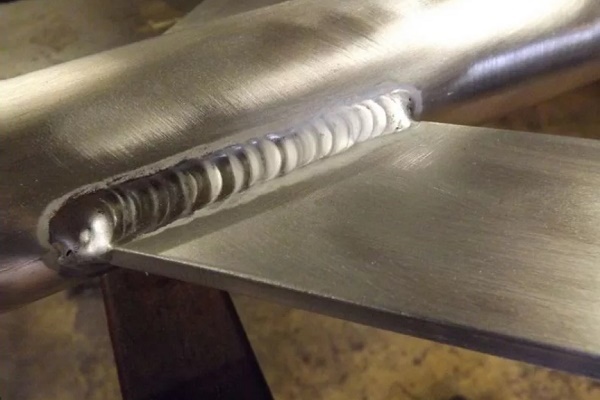
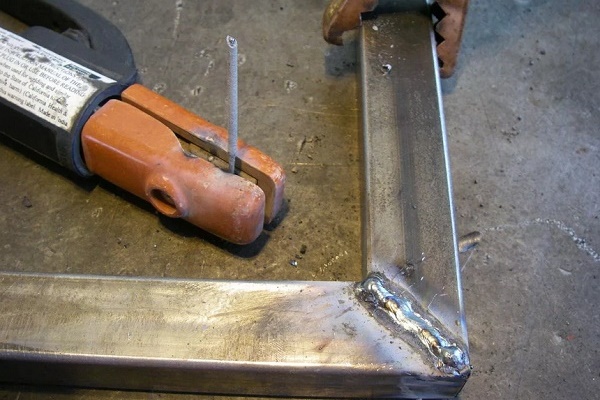
Option # 1: bottom butt joints
The most common and easiest way to connect parts. For metal thicknesses up to 0.8 cm, double-sided welding is used. For metal joints thinner than 0.4 cm, only one-sided welding is performed.
For work, electrodes are selected whose diameter is equal to the thickness of the metal. If it exceeds 8 mm, welding is carried out with cutting edges. Furthermore, angle of cutting is about 30 °.
Welding is carried out in several passes. It is advisable to use removable linings made of steel or copper to avoid burnouts. The first pass is performed with an electrode of small diameter, not more than 4 mm.
In the process of performing the first seam, its accuracy and penetration depth are very important. After its application, there should be no molten metal beyond the edges.
For the second and all subsequent passes, electrode rods of a larger diameter are used. They are chosen for high-quality filling of the recess formed between the edges.
The electrode is slowly moved along the seam, while performing oscillatory movements, as if swaying the electrode from side to side to completely fill the voids with molten metal.
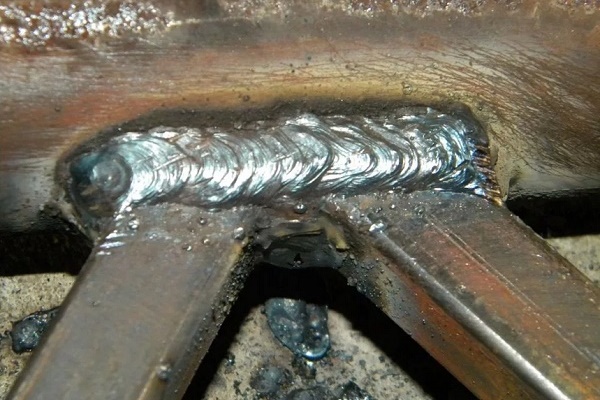
Option # 2: lower corner joints
Experienced welders claim that good results can be achieved by welding corners "in a boat." This means that the parts to be joined are installed at an angle of 45 ° or another.
This ensures the highest quality penetration of the walls of the product, and the risk of undercutting and lack of penetration is reduced. This welding method allows surfacing welds of large cross section in one pass.

There are two types of “boat” welding - symmetric and asymmetric:
- Parts inclined at 45 °. The likelihood of sagging or undercutting of one of the walls is minimal. Reverse and direct polarity welding is carried out at maximum current values. When conducting reverse polarity of welding, the length of the electric arc should be minimal.
- Tilt parts at an angle of 60 ° or 30 ° - asymmetric "boat". This option is very convenient if the work is performed in hard-to-reach places, since the amplitude of the electrode motion is small. The welder directs the arc to the very root of the seam, while making sure that it does not go beyond the limits of the future seam. It is also not allowed to deposit too much metal in one pass.
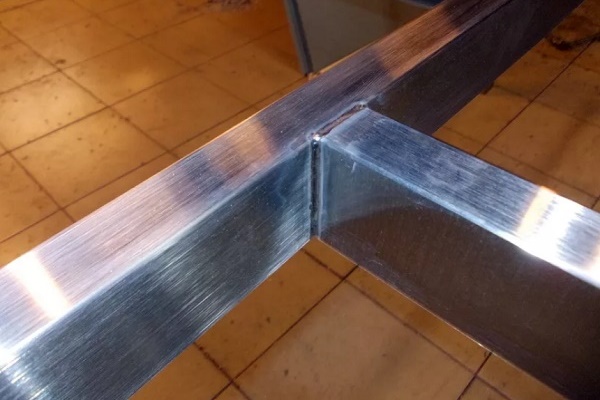
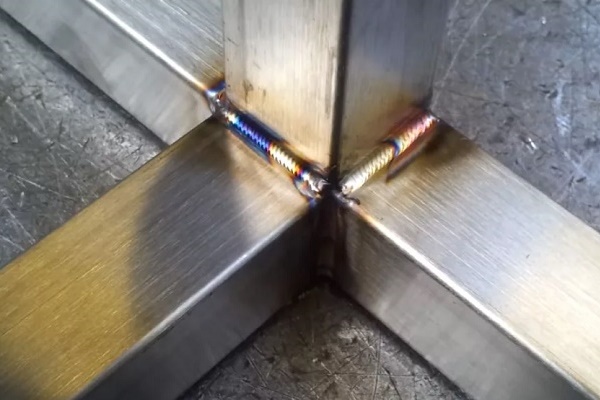
Corner joints can be T-shaped, so you need to learn how to weld metal correctly and without errors in several passes.
The use of one pass is possible only when simple structures are welded to the sides, which form an angle of 45 ° at the fillet weld. The diameter of the electrode in this case cannot exceed the thickness of the metal by more than 0.15-0.3 cm.
Standard multi-pass T-welding is performed as follows. For the first pass, an electrode of a larger diameter is taken than those selected for subsequent passes. For example, an electrode is used, the sizes of which vary from 0.4 to 0.6 cm.

Welding is carried out smoothly, without transverse vibrational movements. When performing the remaining passes, they are necessarily performed. It is important that the amplitude of the oscillations is within the acceptable width of the seam.
Another significant point. When performing T-welding of an angled joint, the electric arc should always be ignited on a shelf located horizontally.
When doing do-it-yourself electric welding of corners, you can apply an overlap type of connection. In this case, the parts to be welded are placed one on top of the other with an overlap. The arc with a straight polarity should be short, with a reverse - as short as possible. Direct the arc exactly to the root of the junction.
During the welding process, it is necessary to perform a small amplitude reciprocating motion with the electrode. Thus, it will be possible to uniformly heat up the entire joint area. In this case, the weld pool is evenly filled, and the seam will be convex and full-sized.
Option # 3: vertical seams
Seams directed vertically perform only a short arc. The working current should be 10% -20% less than when welding parts in the lower position. These requirements are easily explained.
Less current means that the molten liquid metal will not drain from the weld pool. A smaller arc is more convenient to use.

Experienced welders prefer to cook vertical seams from the bottom up. The arc is set on fire at the lowest point of the future seam. Then prepare a small horizontally located platform, the dimensions of which correspond to the cross section of the future seam.
Then slowly move the electrode rod up. In this case, movements across the connection are necessarily performed.
They can be in the form of a Christmas tree, corner or crescent. The last option is the easiest to perform. In addition, it is important to observe the correct electrode position.Theoretically, penetration is best performed if the rod is perpendicular to the seam, i.e. horizontally.
Butt welds are characterized by the following criteria:
Practice shows that in this position of the electrode rod, liquid metal flows down the seam. To avoid this, the angle of the rod is chosen in the range of 45 ° -50 °. This is the best option for vertical welding. To weld parts in the direction from bottom to top, electrodes are selected whose diameter does not exceed 0.4 cm.
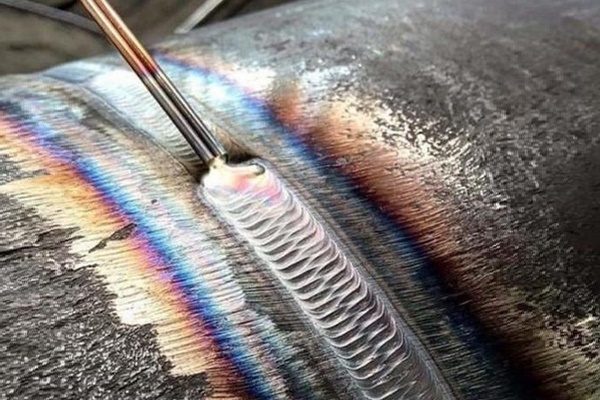
Option # 4: pipeline details
At home, you often have to remember how to weld a metal pipe with electric welding. A vertical seam is usually made on the side of the part, and a horizontal seam around the circumference. Steel pipes butt weld. All edges are sure to boil well.
In order to minimize the influx inside the pipe, the electrode is brought to the product at an angle of no more than 45 °. The width of the seam should be 0.6-0.8 cm, height - 0.2-0.3 cm.

Before welding, the parts to be connected are thoroughly cleaned. The ends of the pipe are inspected. If they are deformed, they are straightened or cut using a pipe cutter. Then, the edges of the parts are smoothed to a metallic luster inside and out at least 1 cm from the edge. Then proceed to welding.
The joint is welded without interruption until it is completely brewed. For non-rotating joints of pipes with walls up to 0.6 mm wide, two welding passes are performed, for products with walls from 0.6 to 1.2 cm wide, three passes, for parts with walls wider than 1.9 cm, four passes.
Moreover, each subsequent seam is applied only after the scale has been removed from the previous one.
Most important is the quality of the first seam. In the process of its implementation, all blunts and edges should completely melt. Cracks, even the smallest, should not be. If they are, they are smelted or cut down. Then the fragment is brewed again. Similarly, welding of rotary pipes is performed.
Possible defects in welding joints and seams
Electric welding is a complex process and not always everything goes smoothly.
As a result of errors in the work, the seams and joints can have various defects, among which:
- Craters Small recesses in the weld bead. May appear as a result of an arc break or errors in the execution of the final fragment of the seam.
- Pores. The welding seam becomes porous as a result of contamination of the edges of the parts with rust, oil, etc. In addition, porosity can appear when the seam is cooled too quickly, at a high welding speed and when working with non-dried electrodes.
- Undercuts. They look like small recesses on both sides of the suture bead. Appear when the electrodes are displaced in the direction of the vertical wall when welding corner joints.In addition, undercuts are formed when working with a long arc or if the welding current is too high.
- Inclusions of slag. Inside the weld bead are pieces of slag. This can happen when the edges are dirty, the welding speed is high, or if the welding current is too low.
These are the most common weld defects, but there may be others.
Additional information on welding vertical and horizontal seams with electric welding is presented in this article.
Conclusions and useful video on the topic
Features of pipe welding:
How to choose a welding inverter:
If desired, any home master can learn the basics of welding. It is not so difficult. It will take patience, accuracy and, of course, the exact execution of all instructions. Everything will be much simpler if the process of mastering a new skill is held under the guidance of an experienced specialist.
Do you have personal experience joining parts using electric welding? Want to share your knowledge or ask questions about the topic? Please leave comments and participate in discussions - the feedback form is located below.
 How butt welding of polyethylene pipes is performed: briefing on the work
  Welding machine for polyethylene pipes: which is better to buy and how to use it correctly
  Soldering temperature of polypropylene pipes: the main stages of self-welding + table of values
 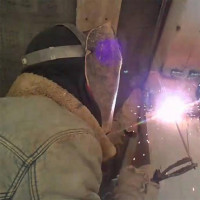 How to cook vertical and horizontal seams with electric welding: step-by-step instructions
  How much does it cost to connect gas to a private house: the price of organizing gas supply
  The best washing machines with dryer: model rating and customer tips
  What is the color temperature of light and the nuances of choosing the temperature of the lamps to suit your needs
  Replacement of a geyser in an apartment: replacement paperwork + basic norms and requirements
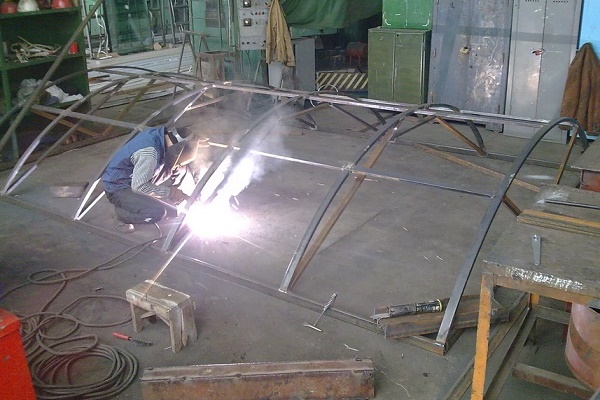
Thank! I learned a lot of useful things for myself. How to weld square pipes at an angle of 90?
Useful video, in my opinion, especially for delitants.
Thank! It was very interesting to read.
thanks for the info