How to collect a sink drain: instructions for installing a drain with overflow
The sink drain, like any other plumbing equipment, is vulnerable to breakdowns and often the home foreman is faced with the question of replacing the device. Its installation is a simple procedure, for the sake of which it makes no sense to invite a professional plumber.
We will consider in more detail how the drain for the sink is arranged and what nuances to consider when choosing a device. We also describe the step-by-step technology for assembling and installing the drain fixture.
The content of the article:
Purpose and design features
The drain for a sink in the bathroom or kitchen with overflow is a curved structure, the key purpose of which is to redirect excess water to the sewer, thereby preventing overflow of the bowl of the sink.
Device bath drain system almost identical to the design designed for the sink.
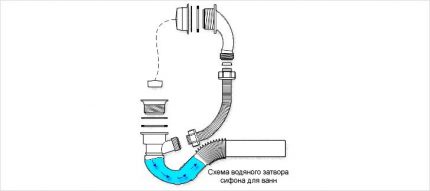
Structurally, the overflow overflow for a sink or sink consists of the following elements:
- water trap - It is a “U” -shaped element that performs a dual task: it prevents the smell of smell from the sewage system and protects the drain pipe located below from clogging.
- drain pipe - made of corrugated or rigid plastic pipe and designed to redirect wastewater to the sewage system.
The main secret of the siphon functionality in its design. Due to bending, the water does not completely leave the pipe. Formed water lock and acts as a barrier to the penetration of sewer "amber" into the drain hole.
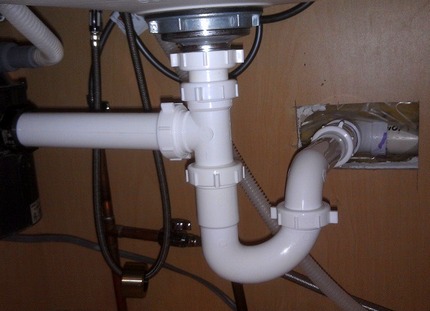
Such structures are convenient in that in the event of clogging, it is not difficult to remove and clean them mechanically or chemically.
Want to install a more durable device that is not so afraid of clogging? In this case, it is better to purchase a design in the form of an overflow drain for the sink. It differs from traditional models in that it is equipped with an additional handset.
This device connects the hole made in the upper side of the side of the bowl with the drain system elements located in front of the siphon. Due to this, the overflow drains the liquid from the sink, thereby preventing overflow of the bowl.
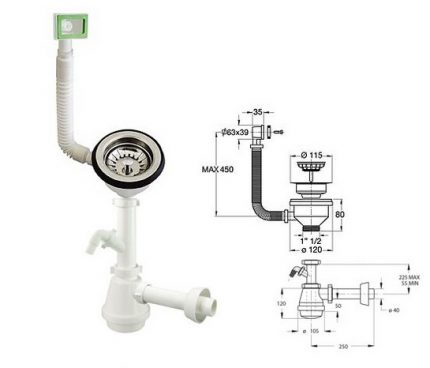
On the outside, the drain hole covers the grill. It performs a protective function, delaying small debris and hair, thereby protecting the system from clogging.
The main types of drain devices
There are several types of drain systems. One of the most common options is a design in which the drain is fastened by means of a large locking nut. This method of fastening can be found even in the bathrooms of houses built more than two decades ago.
Device classification
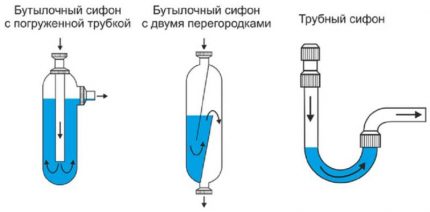
The drain siphon systems used to connect the sinks come in three types: bulb-shaped, knee-shaped and combined.
They vary in type of construction:
- Bottle or bulb. The main structural elements are two cylinders immersed in each other. A tee is installed inside the flask of the device, which distributes the liquid and forms a hydraulic barrier.
- Trumpet. The main element of the two-turn design is the “S” or “U” -shaped bend of the pipe, which forms the hydraulic damper.
- Mixed Type Devices. In addition to the structural elements of the bottle structure, supplemented by two partitions, they are equipped with a corrugated hose.
In bottle-type devices, the effluent entering a siphon moves down the inner pipe of a smaller diameter. Having reached the bottom, drains rise through the cavity between the inner and outer cylinders and are discharged into the sewer pipe.
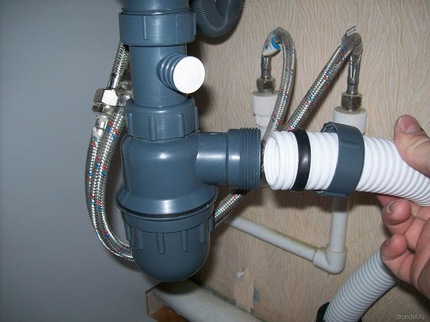
Bottle siphons are advantageous in that even with the rare use of plumbing fixtures water trap in the sewer system does not dry out for quite a while. This effect is achieved due to the fact that the output from the siphon is located approximately in the middle of the flask.
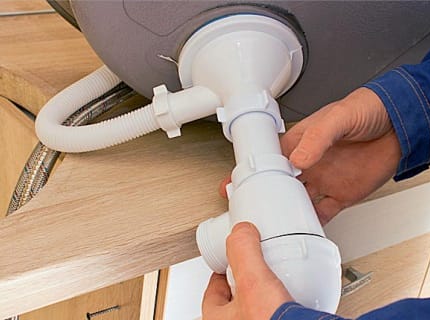
Many owners prefer bottle siphons and for the reason that, if necessary, several drains can always be connected to them. For this, the design only needs to be equipped with an additional element.
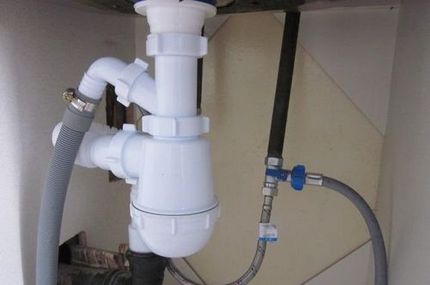
Mixed type siphons have proven themselves in work. The corrugated siphon used in the arrangement of the drain structure of a mixed type is a modified version of a conventional curved tube.
Unlike bottle and pipe versions, among the combined options there are no models with sockets, and therefore you can not attach overflow systems and household appliances to them.
Production Material Division
Presented for sale sink sinks Depending on the material of manufacture, there are two types: those made of polymers and those made of metal alloys.
Polymer products are famous for their low price and ease of installation. Constructions equipped with a corrugated pipe are conveniently adjustable in length.
But the service life of PVC structures is relatively short. And the sealing properties of the assembled structures leave much to be desired. Therefore, all the connecting elements without fail during assembly are equipped with rubber gaskets.
In terms of reliability and durability, metal elements of drain systems are more advantageous. Non-ferrous metal models: brass and bronze are most in demand in domestic applications. The strapping made of such materials often has a chrome coating, due to which it acquires a rather presentable appearance.
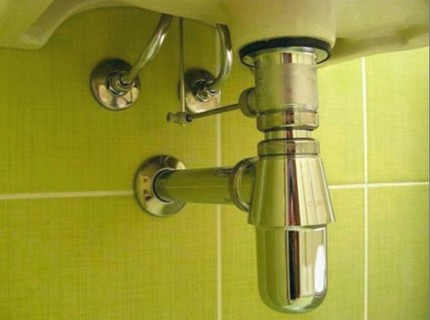
To prevent the accumulation of mud deposits on the inner surface of the walls during the manufacturing process, manufacturers coat metal products with a protective chromium film.
Installation of metal structures is not particularly difficult. The hitch can occur only at the stage, if you need to shorten the outlet pipe.
Siphons for non-standard equipment
For non-standard models of double “twin” sinks, siphons equipped with two outlets are used. Such siphon devices are connected to the drains of both sinks, and a little lower along the flow of waste water they are combined into a common flask.
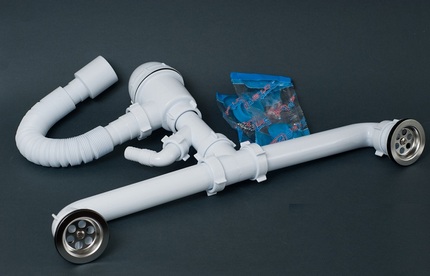
Do you need to connect a sink placed on an open shelf to communications? Then choose a model that involves hidden installation. Yes, for the price it will be slightly more expensive than traditional options, but it will completely hide the unaesthetic elements of communications.
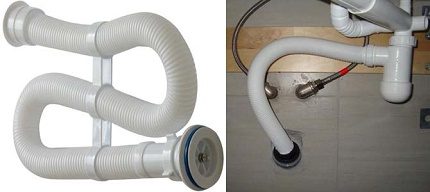
Drain systems of such structures will not be difficult to hide in a niche, covered with a decorative screen. But it is worth remembering that if the bend of the outlet pipe turns out to be too short, the risk of an unpleasant sewer “aroma” is great.
Overflow drain technology
There is nothing complicated in establishing a drain overflow on your own. In the kit, each device usually comes with instructions. It contains information about in what sequence you need to assemble the structure.
The easiest way will be an independent master who installs the sink with an overflow channel provided for in the design of the sink:
Step 1. Preparation of necessary materials and tools
With all the variety of models of drain equipment siphon installation technology almost identical. Therefore, even if a drain system, for example, a bottle type, was installed on your plumbing fixture, you can easily replace it with the same combined version.
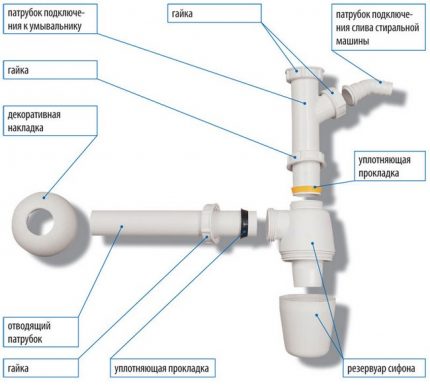
The standard siphon includes the following items:
- device body;
- branch pipe;
- decorative slip overlay;
- plastic and rubber cuffs;
- connecting nuts and screws;
- rubber flat gaskets.
To better understand the sequence in which you need to assemble the structure, lay out all the elements of the siphon on the table or on the floor.
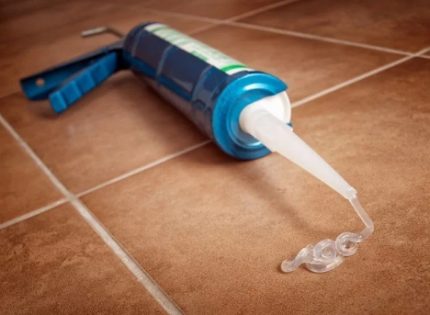
Installation of the system will not be possible without a set of necessary tools.
To work, you will need:
- flat screwdriver;
- adjustable wrench;
- FUM tape;
- sealant;
- capacity for collecting water;
- cotton fabric.
If during the work you need to cut pipes and corrugations to the desired size, prepare roulette and hacksaw in advance. For grinding the edges of the pipe - sandpaper.
Step # 2. Dismantling the old siphon
To remove the siphon device that has expired, it is necessary to unscrew the centrally installed screw in the grate located in the drain hole.
Often, the screw and nut of the drain grill “stick” to each other during operation. If you can’t unscrew them in any way, first dismantle the lower part of the siphon, leaving the upper pipe intact. By rotating this part, you will help loose a dry nut and screw.
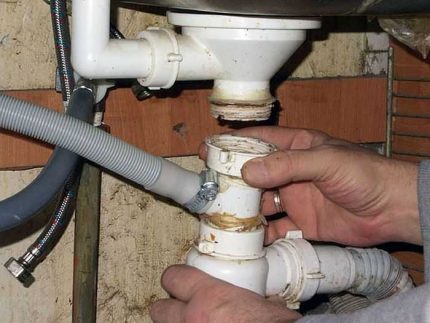
From the moment of dismantling the old siphon to the start of connecting the new equipment, it is better to “plug” the sewer socket with a rag or cork of the appropriate size.
Step # 3. Assembly of structural elements
When installing a pipe drainage system, assembly of the structure can be performed during the installation process, sequentially "stringing" all the elements. If you have to work with a flask-like system, before you collect such a drain for the sink, you need to carry out a number of preparatory work.
First of all, the device is placed under the bowl and preliminary testing is carried out in order to make sure that the sizes are consistent. After that check the reliability of fastening the bottom tube.
To do this, unscrew the plug by thread and inspect for chips and other defects of the rubber seal. Neglecting this step is not worth it, since the lower plug constantly takes over the pressure of the system.
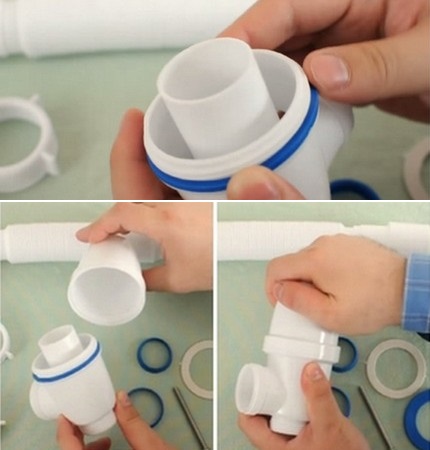
If burrs are found on the surface, they can be cut with a sharpened knife. If not removed, they can damage the O-ring during installation.
After making sure of the quality of the installed gaskets and threaded connections, proceed to the assembly of the flask.
The work is carried out in several stages:
- Putting on the thread of the device rubber gasket, screw the bottom.
- At the ends of the spout tube, put on the gasket, and on top on a long nut.
- Having inserted the end of the spout tube into the hole in the upper part of the siphon body, fix it in a predetermined position by tightening the nut.
- Equipping the device cover with a rubber gasket, the drain is screwed with a nut to the body.
To increase the reliability of the connection, the annular gasket embedded in the groove must be coated with a sealing compound. It is also worth covering the lower part of the threaded connection.
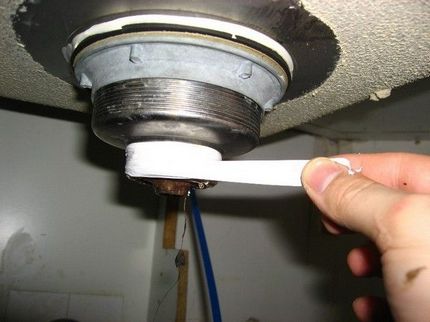
After that, the sink is installed on the seat and proceed with the installation of the drain device.
Step # 4. Features of overflow assembly
When dealing with models equipped with overflows, before assembling this element, you need to determine the height of the tube. This parameter should correspond to the depth of the bowl. If everything matches, the tube is connected at a given height with the main pipe.
If the overflow tube is a prefabricated structure, then its height is easily adjustable according to the principle of telescopic extension. The corrugated pipe simply stretches to the required length and bends in the right place.
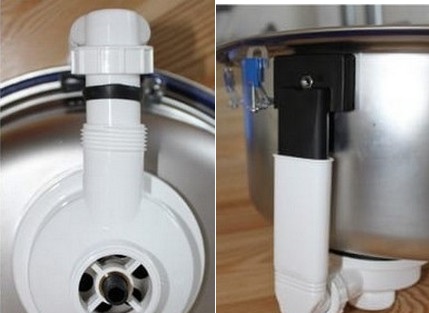
When fixing the overflow pipe to the sink, be sure to lay the included rubber gasket between the surfaces. The connection point of the outlet with the overflow pipe is fixed with a clamping nut. In order not to damage the connection, tighten the nut by hand, without applying special effort.
Step # 5. Mounting the drain device
Before connecting the assembled structure to the waste system, the surface of the sink in the area of the drain hole is thoroughly degreased and cleaned. During installation, the first step is to combine with the drain hole of the bowl a protective grill equipped with 5-6 divisions.
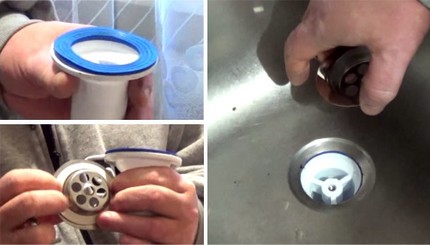
The upper end of the branch pipe is equipped with a rubber gasket and docked with a hole in the sink. Firmly pressing the upper side of the nozzle to the drain, fix it with a D6 mm screw inserted into the protective grill.
The thread into which it must be inserted is pressed into the body of the pipe itself. When tightening the screw with a flat-blade screwdriver, it is important to achieve a tight fit, while avoiding turning the flange and gasket.
The chamfer is chamfered from the lower end of the pipe. This is necessary in order to ensure free flow of the end of the pipe into the siphon cavity.
A plastic coupling nut is "strung" onto the branch pipe, placing it with the thread down, and the conical gasket, laying with the wide side to the nut. Then they dock it with the outlet pipe, not forgetting to seal the connection.
To fit the outlet pipe with a sewer pipe, the diameter of which is traditionally 50 mm, an installation rubber sleeve is used.
So that it tightly covers the pipe, thereby preventing the spread of sewer "aromas", use a product whose inner diameter is slightly less than the outer diameter of the outlet pipe.
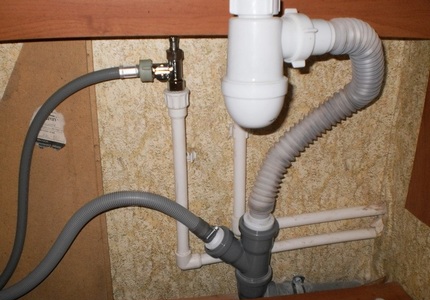
Tip: if the diameter of the outlet does not match the size of the sewer pipe, use a ready-made plastic adapter.
The corrugated siphon is as simple as possible to connect. It is equipped with two rigid nozzles at both ends. To connect it, you just need to attach it to the exhaust pipe, then stretch it a bit and give the desired bend. After this, the second branch pipe to the sewer.
Step # 6. System Health Check
At the final stage, it remains only to check the tightness of the joints and the operability of the system. For this, a section of the floor under the siphon is covered with a piece of cotton napkin or a paper sheet. Some masters for this purpose substitute a container under the siphon.
They open the faucet and watch how the water escapes into the drain hole and, passing through the siphon, falls into the sewer.
If there are no leaks at the joints and no drops appear on the napkin, the work is done efficiently. If they are found, tighten the nuts tightly, and the connection is additionally sealed.
Installation technology of branched siphons, allowing connect washing machines to the general drain, practically no different. The only difference is that flexible hoses coming from household appliances are additionally screwed to the design bends.
For those who plan to install and connect a new sink to the sewer, we recommend that you read the article Installing a sink in the bathroom: installation instructions for modern models
Conclusions and useful video on the topic
Video review of how to collect a siphon:
Sink installation and drain connection:
Modern sink drain models are not so difficult to install. The main thing is to correctly select a model that is optimal for specific conditions, and strictly adhere to the installation instructions.
To all those interested in the matter of installing a sink drain, we suggest leaving comments and asking questions. Please share your personal experience in connecting plumbing. The contact form is located in the lower block.

 Installing a siphon in the kitchen: how to assemble and install a device + circuits and installation example
  How to properly mount the sink to the wall: step-by-step instruction
  Corner sinks in the bathroom: general overview + installation instructions
  Hanging bathroom sink: step-by-step installation instructions
  Water lily sink: selection and installation tips when positioned above the washing machine
  Bottom valve: intended use, device + instruction on replacement
  How much does it cost to connect gas to a private house: the price of organizing gas supply
  The best washing machines with dryer: model rating and customer tips
  What is the color temperature of light and the nuances of choosing the temperature of the lamps to suit your needs
  Replacement of a geyser in an apartment: replacement paperwork + basic norms and requirements
The sink drain had to be installed more than once. Periodically, it becomes clogged, mainly in kitchen sinks. Dishes are washed there, a lot of fat and similar pollutants. To clean the drain under the sink in the kitchen you need to disassemble, clean and reassemble. Also, the components of the drain sometimes break, and then you have to change them. It changes simply, only it is necessary to tighten all the connections that are on the thread, but do not pinch so that they do not burst!
A couple of months ago I had to change the sink in the bathroom with a stand. Since this is a troublesome job, I need to dismantle the old sink, mount a new one with dimensions under the pedestal, I decided to call the master. When it came to installing the siphon, the master rejected the one I purchased in the store and advised the siphon, the drain pipe of which is smooth, without bends, not corrugated. He explained that this option implies a lesser degree of contamination of the tube walls. Is it so?
I do not understand one. Overflow of the shell occurs through its internal cavity. Why does this cavity have two holes below? The drain hole was plugged and the overflow occurred on the floor.