Installing the faucet in the bathroom: device and step-by-step installation manual

Sometimes it seems that installing a mixer in the bathroom is only possible for professionals. Especially if this question came before an inexperienced owner. Everything looks complicated, incomprehensible and from this even more frightening. But you can cope with this task yourself, only a little understanding of the intricacies of the process.
We will tell you how not to make a mistake in choosing a mixer, what parameters to look for when buying a device, and also provide step-by-step instructions for installing it.
We completed all stages of assembly and installation with detailed diagrams and visual photographs. For a better understanding of the process, video clips with instructions on installing the crane are provided.
The content of the article:
The subtleties of choosing a bathroom faucet
The need to install a faucet in the bathroom can arise for various reasons - due to a full-scale repair, breakdown of an old familiar unit or just wanted to change a boring model.
If this is one of the last two options, then dealing with the issue will be quite simple. The main thing is to calmly deal with the device, installation features and the most common errors.

The first thing to do is choose a new mixer or, as users often call it, a crane. Indeed, now almost no one sets a faucet separately for cold and separately - for hot water.
It is convenient for the consumer to use the mixer - it is practical and beautiful. Due to the variety of offers on the market, you can choose a model of any style for different interiors.
Mixers: they are so different ...
Manufacturers offer a wide variety of models, radically different in price. First, it’s up to you to decide which model is needed.
Depending on how the mixer will be installed, they are divided into three types:
- with horizontal installationwhen to be mounted on a horizontal surface;
- with vertical - when the installation will occur in a vertical plane;
- recessedwhen all parts are mounted on the wall.
Horizontally oriented mixers assumed mount on board baths or shells. Vertical - to the wall. Recessed ones are quite a rare occurrence for our consumers. It is difficult, very expensive, impractical for standard apartments and requires the participation of professionals.

Often in the bathroom at least two taps are used - separately for bathing and for the washbasin. Here you have to choose the option that is suitable for a particular room. If you are not planning a full-scale repair with redevelopment, you will only have to buy a new crane of the same type as the old one.
Depending on the internal structure, mixers are divided into the following types:
- two-valve;
- lever;
- Thermostats
- non-contact.
The most favorite option for many customers is dual-valve. It is perhaps difficult to find an adult who does not understand what is at stake. This type of mixer has two valves, respectively, responsible for hot and cold water. They use rubber gaskets or ceramic discs as seals.
The second option is preferable - it has a longer service life. But, when hard water with a large amount of impurities flows from the pipes, and individual cleaning filters are not installed in the apartment or house, it is more advisable to choose the option with rubber gaskets.

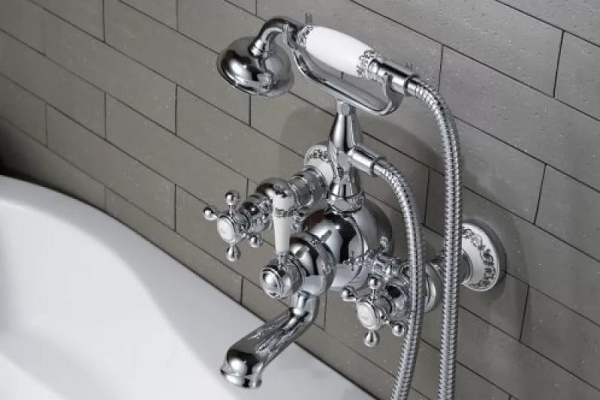
The lever-type mixer has only one tool for adjusting the water temperature - the lever. The process of mixing water occurs by turning the lever in one or the other direction.
Due to the ease of use of such models and moderate cost, the demand for them is constantly growing - manufacturers offer a wide single lever mixer selection. As for the installation, it is also not particularly difficult.

A more expensive option is mixer thermostat. It does not require constant human involvement in the adjustment and adjustment. It is enough to set the desired water temperature once.
This type of faucet is absolutely not suitable if hot water is often turned off in a house or area - the thermostat will block the flow of cold water. So, coming home from work in the evening and wanting to wash your hands, you can get a lot of unpleasant emotions and spend a lot of obscene expressions.
Although this is a very convenient option for swimming - when there are sharp changes in water temperature and you need to constantly adjust the desired one, the thermostat will become a real find.

The non-contact type of mixer is most often chosen for installation in public places. For home use, it is taken in rare cases - when it is the embodiment of an original design idea or it is simply interesting to try something new in your bathroom.

Materials for the manufacture of cranes
If you focus on the price range, the cheapest models are those made from an alloy of aluminum and silicon - silumin.They are significantly lighter in weight and have a short warranty period. It is rare that such a mixer will be used much longer than this period.
More expensive options are made of a multicomponent alloy of copper - brass. They immediately give out an impressive appearance and weight, which significantly exceeds the weight of their counterparts from silumin.
Choosing a mixer for yourself, it is better to avoid those models in the coating of which nickel was used. This can cause health problems. It’s good to choose chrome plated options. Moreover, they compare favorably with colors and imitation of various metals.
The most expensive faucets are design. They are usually very original and are able to give a special mood to the interior of the bathroom. It is precisely their quality that significantly affects the final cost, which can reach fantastic sizes.
By choosing this option, you can be sure that none of your friends has the exact same faucet in the bathroom.
As for the variety of models, it is more advisable to choose not only a beautiful option, but also a convenient one for a sink in the bathroom. It should be noted that in the process of washing hands and washing it was convenient to place your palms under a stream of water.
Here, the original low models with a small faucet lose an order of magnitude - after all, it is completely inconvenient to perform daily hygiene procedures with such a faucet. A faucet without a tap is also not the best option for a washbasin, and for bath procedures it may turn out just right.
DIY installation of the mixer
Having decided on an independent installation of the crane, you will first have to buy it, then prepare the necessary tools and, after unpacking the box with a new mixer, you can begin the installation process.
But first, let's talk a little more about what it feels like mixer deviceused for the bathroom.

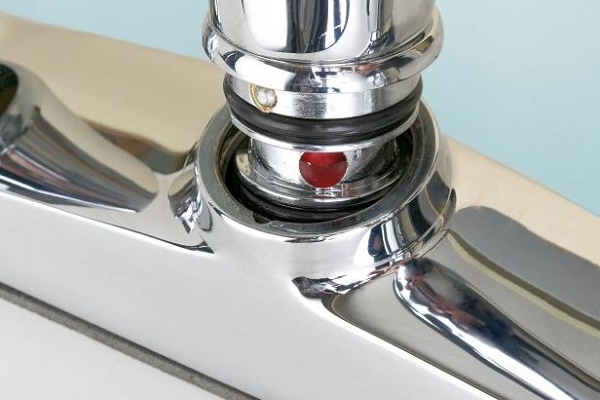
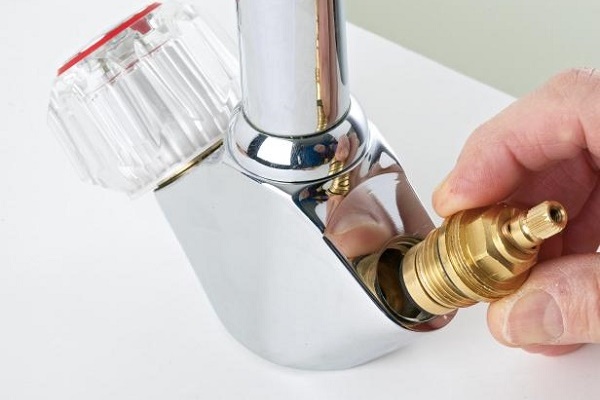
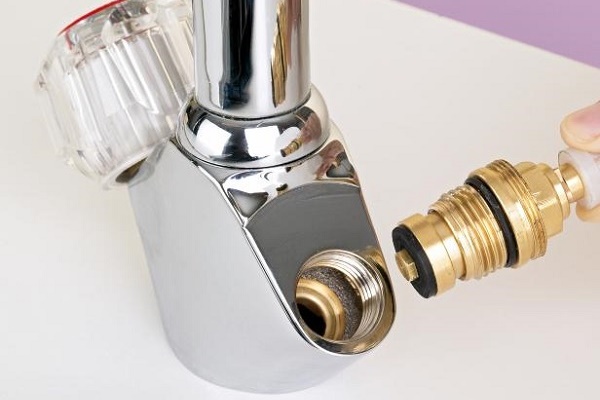
A traditional faucet, as a rule, consists of two valves that control the supply of hot and cold water to the mixing chamber. To ensure their operation, use parts such as a lock washer, a special seal - an oil seal, gaskets, axle boxes, a coupling with guides, a saddle.
All this is in an already assembled state, which does not require additional attention when installing a new mixer.
Step 1. Checking the product structure
Having chosen the best option for your bathroom, you have to consider the contents of the box - open all the bags and boxes that are in the package with the purchased model.
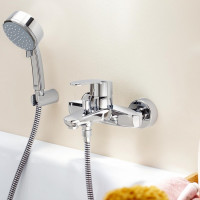
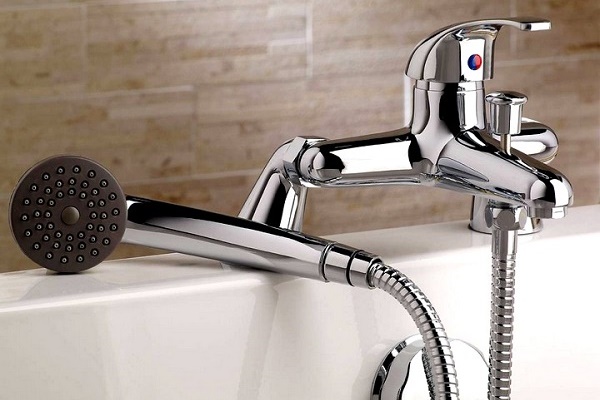
If this is a bath faucet, then in the bag you can find a shower head, a flexible hose for it and an additional mount - a holder bar. It will have to be mounted on the wall, side of the bathtub or on the tap body to hold the watering can.
Also a crane with valves or a lever, which will be connected to the rest of the parts according to the instructions. The set always includes a set of gaskets, nuts, decorative reflectors on the wall, transitional eccentric bushings and a spout for the crane.
Having considered all the components, it is not at all necessary to study what spare parts they are assembled from. It is enough to tighten everything carefully, following the instructions supplied by the manufacturer in the kit.

Step # 2. Necessary installation tools
Before starting the installation, it is best to prepare all the tools and parts that may come in handy:
- a box with a mixer and all its components;
- pliers, construction level, tape measure, adjustable spanner, spanners;
- flax tow and paste “Unipak” / silicone or special sealing fum tape;
- soft cloth / small towel, paper napkins / toilet paper.
All of these components will be needed during the installation process. It would be nice to use tools without teeth, but if there are none, then in order not to scratch the top cover of the devices and its parts, a cloth or towel should be applied to them.
This technique will help protect against external mechanical damage, which is especially true for home masters who first install a mixer.

The paper is useful in order to carefully wipe everything after installation and check if something is leaking.If so, then you have to disassemble everything and reassemble, not forgetting to tighten each connection tightly and put gaskets to each nut.
Step # 3. Preparation of the crane installation site
Before installing the mixer, do not ignore generally accepted standards. So, if the faucet will be installed for simultaneous servicing of the bathtub and washstand, then, according to the standards, the installation height should be at least 1 m from the floor level.
Depending on the functions performed and the placement, the height will be different:
- 80 cm from floor level - for the mixer serving the bath;
- 20 cm from the washbasin - for faucets on the sink;
- not lower than 120 cm from the floor - if shower mixer.
Another point that needs attention is the location of the crane. Depending on it, the basic installation process will differ. If this is simply replacing the old crane with a new one, then you must first remove the used one.
In the case when there is a repair with a full replacement of old water pipes with new ones, you need to carefully consider where the plumbing will be installed in order to provide for the installation of water sockets in appropriate places.
To output the fittings to which the mixer will be attached, it is necessary to carefully calculate the distance between the pipes of cold and hot water - exactly 15 cm. It is important that they are strictly horizontally in relation to each other.
Also, the fittings should not be too long - they should end at the same level with the facing material of the bathroom or be a couple of mm smaller.
After completing the work on the conclusion of fittings, you can proceed to the standard installation of mixers.

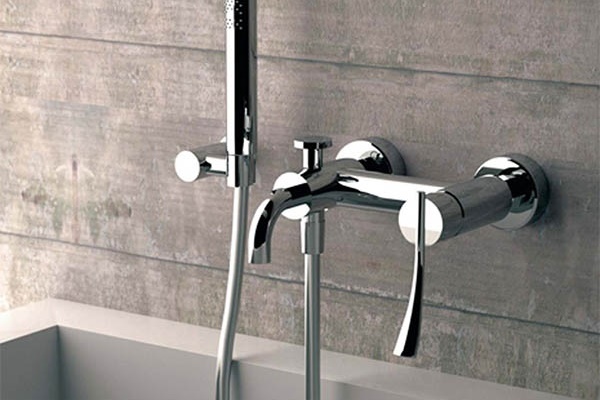
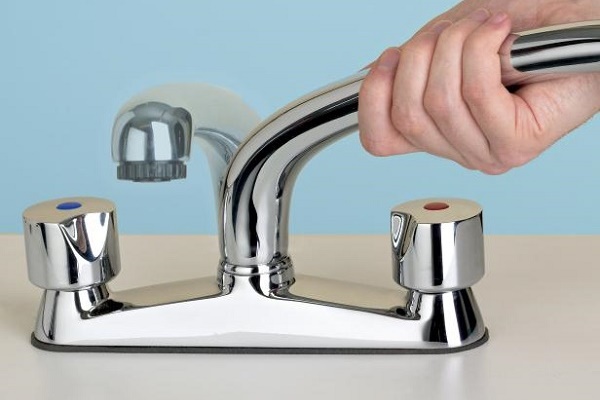
Step # 4. Wall mounted crane
The most important thing in installing cranes yourself is not to overtighten the nuts so that nothing breaks or breaks. After all, buying new parts for a new mixer is extremely unpleasant and insulting. Therefore, there is no need to rush and tighten everything tightly - it’s better to twist a little tighter then than to run to the plumbing store.

Vertical mixers are characterized by mounting directly on the wall, from which water pipes with cold and hot water exit. Ideally, the distance between water outlets should be at least 15 cm, but almost always here you can find a persistent mismatch.
To correct this drawback, special adapter sleeves - eccentrics are designed. These are such slightly curved parts that have threads on both sides. It happens that the length of the eccentrics included with the mixer is not enough. In this case, you need to buy these larger parts separately.
First of all, before starting the installation, you need to turn off the taps on the pipes with hot and cold water, using hands or keys of the right size for this - it all depends on which taps are in a particular room.
Then, making sure that the water does not flow, you can remove the old mixer. To do this, you have to use the prepared tools, unscrewing the nuts and removing all the old parts in turn.
Having reached the water pipes, some craftsmen leave the old eccentrics without changing them. But, they must check the suitability for further use.

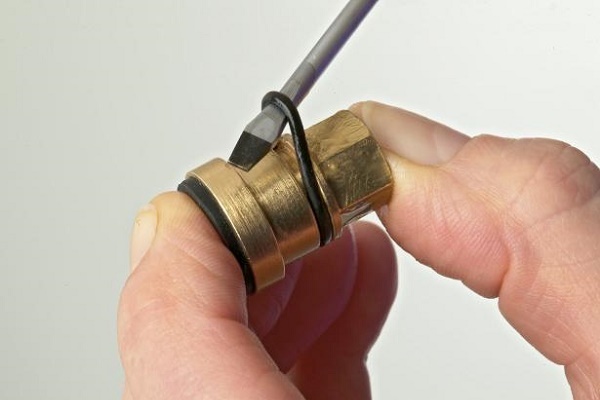
Before screwing the eccentric bushings, carefully tighten the sealant - tow. Then apply a thin layer of silicone or Unipak paste on it.
After screwing these parts in, you need to check with the help of a level their horizontal position relative to each other and, and with a tape measure, the distance between them. If everything is in order, then you can proceed to further assembly.Now we have to wind decorative reflective cups that cover the holes in the wall.
After - you can connect the inlet pipes of the mixer with eccentric bushings using the union nuts supplied in the kit. Under the nuts, be sure to put a gasket seal. Having carefully twisted everything, they connect a spout and a flexible shower hose to which the watering can is screwed.
Now we have to check whether everything is well established and if there are any leaks. It is necessary to open the taps that are responsible for the supply of water to the apartment and turn on the just installed mixer.
It is better to check first with a small pressure, then increase the power of the jet to the stop. If all is well, then be sure to switch the water to the shower hose and check how this part of the system works.

In the absence of leaks, you can congratulate yourself on the first independent, and most importantly - the correct installation. If there is a leak, then you will have to carefully look where exactly this happens, then turn off the water again, remove everything that has been installed, and carefully repeat the process again.
It is important to carefully inspect each gasket and nut - perhaps some kind of fastening was tightened, which led to damage to one of the parts. The tow on the eccentrics also has to be rewound.
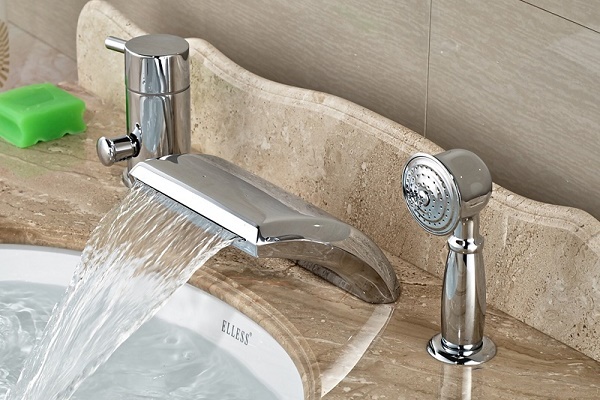
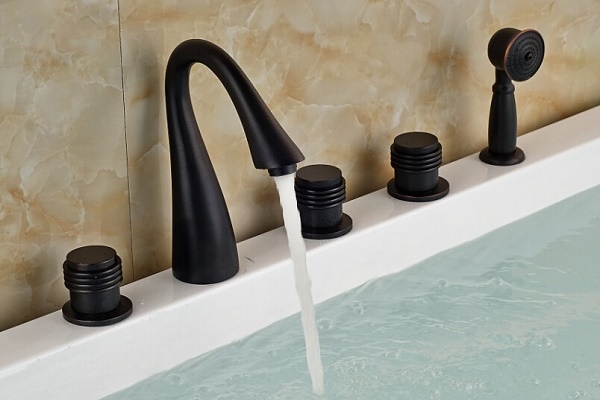
Step # 5. Installation of a horizontal mixer
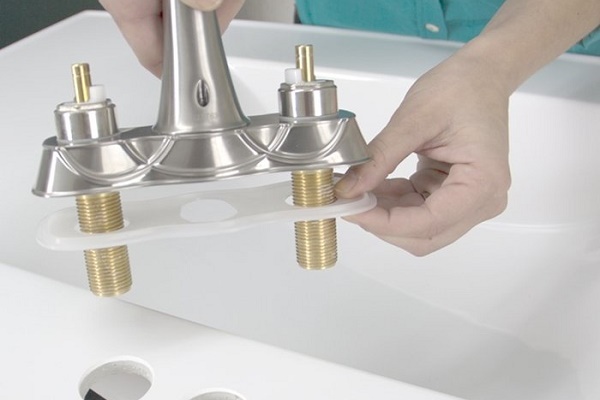
Having figured out how to independently install a vertical type mixer in the bathroom, we consider the option of horizontal installation. It differs from the previous one in that mounted on the washbasin or bathtubs where special openings for the mixer are provided.
Sometimes there are no such holes, but the width of the sides allows you to make this kind of installation. Here you have to work hard - cut holes for the tap on the shelf of the bathtub yourself.
Such work has to be done very carefully so as not to damage the coating of the container. Home craftsmen got the hang of cutting holes not only in acrylic, but also in steel and cast-iron baths without damaging the enamel.
The main convenience of this type of mixer is that the location of the water pipes can be at any distance. This will not hinder the installation of the selected crane model - it will have to be connected using flexible hoses or copper tubes.

Having screwed the horizontal mixer into special plumbing holes, it must be additionally fixed with a clamping washer with a gasket. Flexible hoses must first be threaded into the hole on which the crane will be installed.
Now the hoses will have to be connected to the water pipes with hot and cold water, using a tow or a special fum tape as a sealant.
After these manipulations, it remains to check the quality of their work - open the taps that shut off the water supply to the apartment and turn on the mixer. If nothing leaks anywhere - the valve is installed correctly. Otherwise, you need to disassemble everything and do all the work again.

Conclusions and useful video on the topic
A detailed video on how to choose a mixer:
A little about the device of the mixer of two valve and lever type:
Video record about self-installation of the faucet in the bathroom:
A clip about the main subtleties of the mixer installation with your own hands:
Having found out the main nuances of installing the mixer in the bathroom, you can safely begin an independent replacement. The most important thing is to do everything consistently and carefully so as not to damage the parts by using excessive force.
Before installation, it is necessary to block the water pipes so as not to flood the neighbors from below. Self-installation will take a little time and will save on plumbing service.
Have experience replacing an old faucet or installing a new tap? Or have questions about the topic? Please share your opinion and leave comments. The contact form is located below.
 The device and repair of the bathroom faucet: the main types of breakdowns + recommendations for their elimination
  The device of the kitchen faucet: what do standard faucets consist of and how
 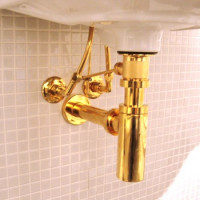 Rigid eyeliner for the mixer: device, pros and cons + installation features
 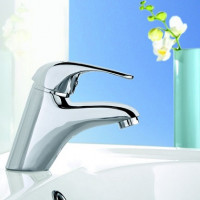 Bathroom sink faucets: device, types, selection + popular models
 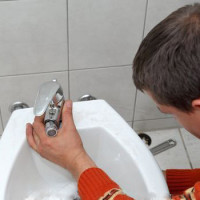 How to Install a Bidet Mixer: Installation and Connection Guide
  How much does it cost to connect gas to a private house: the price of organizing gas supply
  The best washing machines with dryer: model rating and customer tips
  What is the color temperature of light and the nuances of choosing the temperature of the lamps to suit your needs
  Replacement of a geyser in an apartment: replacement paperwork + basic norms and requirements
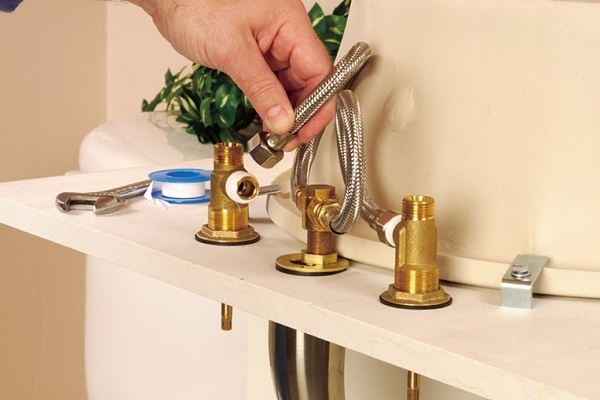
Enrage single-lever mixers, half an hour you stand you regulate the necessary temperature, who invented them at all? Two-valve ones are already classic, comfortable. But there is also a drawback: they always leak, you do not have time to change the gaskets. Of the whole variety, it’s true there’s nothing to choose, even though you hang up the washbasin in the village) It’s already easier to install, even a novice will assemble and install the required faucet.
I decided to abandon the two-valve mixer - too much water flow is obtained (one tap was unscrewed, then the second - and the water all flows). Non-contact is good, but still expensive and not too adapted for our hard water. I bought and put the lever instead of the two-valve that stood before. Installed vertical, on the wall. It went well - the nuts are whole.
Error in the text. Where the installation of the vertical type is described, it cannot be put on the wall, only in the bath hole, well, or there will be towns. But you can’t put a horizontal type on board the bath, since the exits to the hot and cold water go in a horizontal plane and are connected to the eccentrics in the wall. But in the article everything is confused.
Hello, tell me please, I installed a new mixer in the two-lever bathroom, the problem arose when turning on the water to the tap, the water flows from the watering can, but when switching to the neck, the tap does not flow. What is the problem and how to solve it? The mixer is new.
I will share my experience. In the country it was necessary to do a sink. They bought the sink itself, I laid the tiles on the wall (this was the first time mine, so it was so crooked, then I drove the ditch already), they took the countertop from the computer table, cutting out a hole for it in it. It was the turn of the mixer. My children are very nimble, not one mixer died with them. Therefore, a brilliant idea came to mind - see the photo.
There are many details, but I did not recognize the most important thing: why screw the mixer if there are no pipes in the wall? Just a tile.
And how to wind new pipes on old Soviet ones? How to make old carvings if they run along the wall? And the fact that you need to shut off the water and check for leaks is understandable ...