How to Install a Bidet Mixer: Installation and Connection Guide

The lack of free space in the bathroom is not a reason to refuse additional amenities. Even a small bathroom can provide maximum comfort to its users by fitting a bidet in their bowels.
Moreover, the installation can be done independently by placing a mixer for a bidet or by connecting a special cover with similar functions. Doubt your strength?
We will tell you how to choose a suitable mixer model, what characteristics of a plumbing fixture to consider when buying, and also give step-by-step instructions on how to install and connect it. The information provided will help to carry out installation work independently without involving plumbing.
The content of the article:
Do I need a bidet mixer?
Bidet is a special bath, visually similar to the toilet, but acting as a sink. This plumbing fixture is used for hygienic purposes and will not be able to work without warm water. It is not comfortable to use cold or hot water alone.
Therefore, a bidet needs a mixer. Moreover, in many models of this kind of plumbing there are corresponding openings for installation. It is the mixer that can provide an acceptable temperature regime for washing certain parts of the body.

If you do not install a special tap on the bidet, but use the device like a bath, pouring water into it if necessary, then the whole idea of a convenient way to perform hygiene procedures will lose its meaning. After all, the user should be comfortable.
When there is absolutely no place in the bathroom, and there is a desire to install a bidet, the problem is solved by purchasing a special lid on the toilet, which has the functions of a bidet. It does not require the installation of a mixer - the entire system is supplied assembled.Such a device will only have to be correctly installed on the toilet and connected to the water supply.

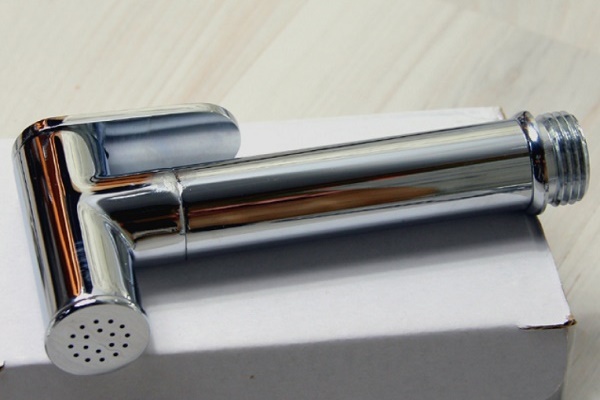
Another option is to install a mixer with a watering can. This is a special plumbing product designed to wash certain parts of the body when you can use a toilet bowl instead of a bidet bowl. And it is installed near the toilet, so that it is convenient to get a watering can.
A watering can designed for a hygienic shower is equipped with a convenient button for turning on / off the water. Its size is much smaller, the location of the nozzles is also excellent compared to a shower head.

There is also a bidet option that does not require a mixer - this toilet with bidet function. Here you only need to install and connect it correctly, and all the functions of mixing and discharging water are performed automatically.
One drawback - the cost of the device is high. Although users unanimously claim that this unit fully justifies the money spent.
Detailed description of mixers
Faucets designed to serve the bidet are very similar in appearance to sink appliances. It is easy for an inexperienced master to get confused among the variety of plumbing fixtures and acquire by mistake not what is required. So that this does not happen, you need to consider in more detail the features of these cranes.
Features of bidet taps
Whichever bidet model is purchased, it has a significant drawback - you need to additionally buy a special siphon and mixer. And then these devices still install and connect.
Do it yourself or trust experienced plumbers - it depends on the wishes of the owner.

The faucet is slightly different from the usual one installed on the sink or bathtub.
Its main differences:
- it is slightly smaller in size;
- able to regulate temperature more clearly;
- has a special nozzle-aerator for high-quality spraying;
- the nozzle is able to rotate in all directions;
- has a thermostat, interchangeable nozzles, additional functions.
This special faucet, which is able to clearly control the pressure of the jet and temperature, allows you to make the washing procedure as useful and enjoyable as possible.
Constructive types of devices
Mixers designed for installation on a bidet differ externally in the installation method, operation principle, material of manufacture, configuration, functions and other characteristics.
So, according to the type of control, cranes are:
- valve;
- lever;
- non-contact.
Valve mixers assumes the presence of 2 valves - to adjust the supply of cold and hot water.

Lever mixer - control of the supply and mixing of water occurs through a special mechanism - a lever. This adjustment is smoother and more comfortable.

Contactless faucets (sensory) are also very much in demand. Especially when they have a thermostatic element. This is the most acceptable option, allowing you to set the desired temperature for the water used for the bidet.
Subsequently, you will not have to spend time and energy on adjusting the comfortable temperature - the device will carry out the given command.

According to the installation method, there are mixers for open and flush mounting. The first ones are installed on the side of the bidet or on the wall, and all components, including flexible / rigid eyeliner, are hidden behind the device.

On a complete set mixers are:
- a simple device designed to be installed on a bidet;
- with special additional nozzles;
- with spout for a bidet of internal filling;
- with a watering can / hygienic shower;
- bidet cover without mixer.
In the latter version, the bidet cover only needs to be supplied with cold water. It has programmable functions to set the desired water temperature.
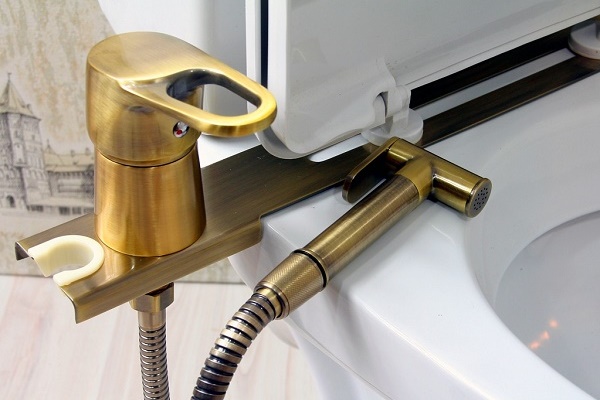
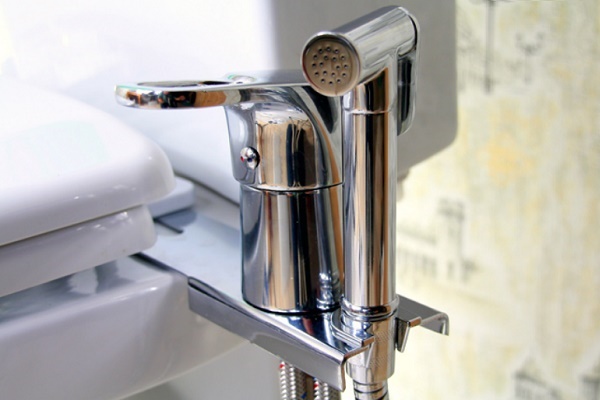
Model faucets with hygienic shower often installed on the sink when the watering can itself is mounted on the wall next to the bidet / ordinary toilet. Water is supplied by pressing a special button on the watering can itself. This is very convenient - if water is not needed, then one click is enough to turn it off.

How to choose the right model?
In order to choose the right version of the mixer, ideal for the purchased bidet, you need to consider a number of features of your device.
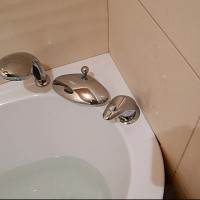
Firstly, the installation and design features of the bidet are important - it is with internal or external filling. With external filling, the choice of the mixer is not limited to prohibitions. With internal filling, you have to choose an option that is designed for this type of bidet.
Internal filling means that water will be supplied through holes in the edge of the appliance itself. Faucets for all bidets with internal filling consist of 2 taps and a switch located between them.
As for the installation site, it can be a wall, a bidet rim, a sink rim. It all depends on the availability of free space in the room, the model of the plumbing fixture, the preferences of future users.
Secondly, it’s important to pay attention that the selected model fits the bidet in size. And the design should be given attention - the faucet should not be knocked out of the general composition of the bathroom.

Thirdly, choose the right model that suits the installation method. Indeed, each room has its own characteristics - some wiring pipes in the bathroom already displayed for installing a bidet, other potential users have nothing of the kind yet.
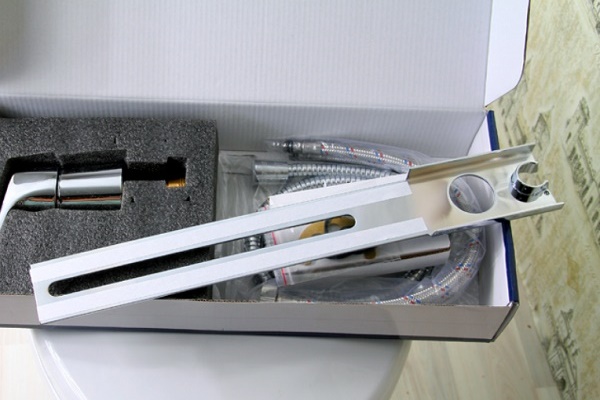
Fourth, the mixer should be of high quality and have a complete set from the manufacturer.In the box with the device there is a kit for its installation and special flexible or rigid hoses for connecting to the water supply.
Fifthly, you must immediately purchase a special siphon to connect the bidet to the sewer system.
At sixthIt is better to avoid models of mixers with plastic parts. It is better to choose a more reliable configuration and do not forget to check the availability of a warranty card from the manufacturer.

Mixer installation and connection
When the mixer is correctly selected for the bidet, and the siphon is purchased, it is time to deal with the installation issue. This can be done on their own, to attract plumbing or craftsmen from a reliable company. It all depends on the selected faucet model and the features of a particular bathroom / toilet.
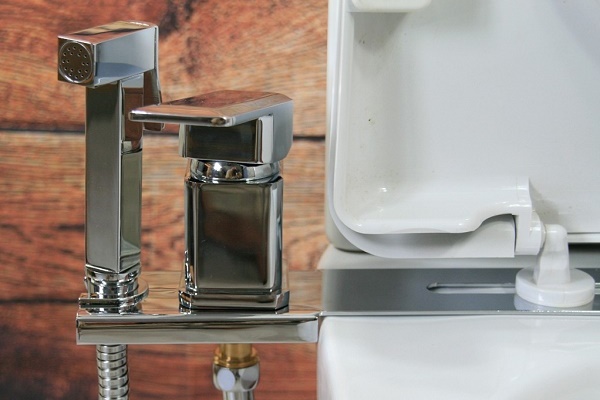
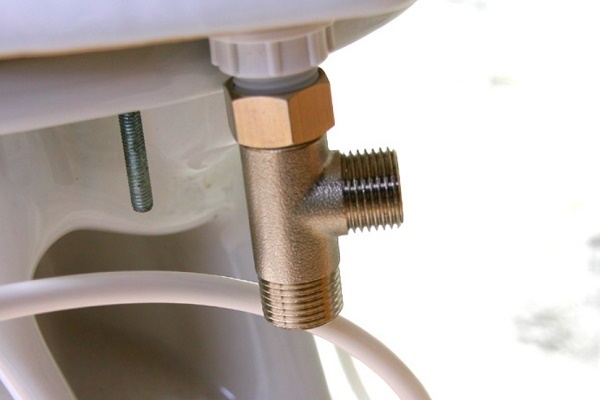
Photo briefing on installing a faucet with shower
Installing a faucet with a hygienic shower that acts as a bidet includes a series of standard steps. A selection of photographs will familiarize them with their sequence.
Following the guidance presented, a completely inexperienced performer will cope with fixing and connecting the device:
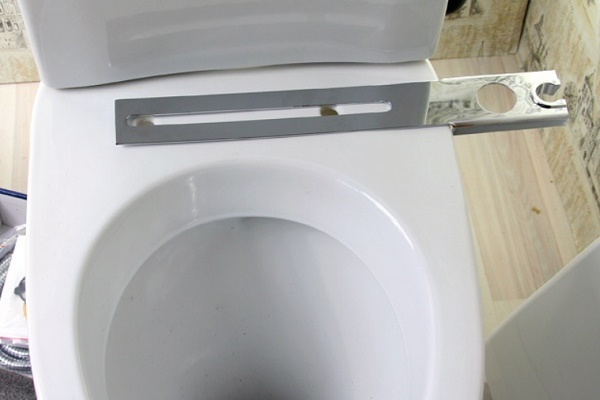
We assume that the first steps have been successfully passed, the mixer is mounted on a metal bar. Now you need to connect it:
How to install a tap on a bidet?
If the mixer will be installed by specialists, then the owner will only have to check the quality of work at the end of installation. Otherwise, you have to do the process yourself.

All installation work will consist of the following steps:
- preparation of tools;
- mixer assembly;
- installation and fastening in the workplace (bidet side, wall);
- final fixation of the mixer;
- sealing;
- siphon assembly;
- installation of the siphon and fixing it at the workplace.
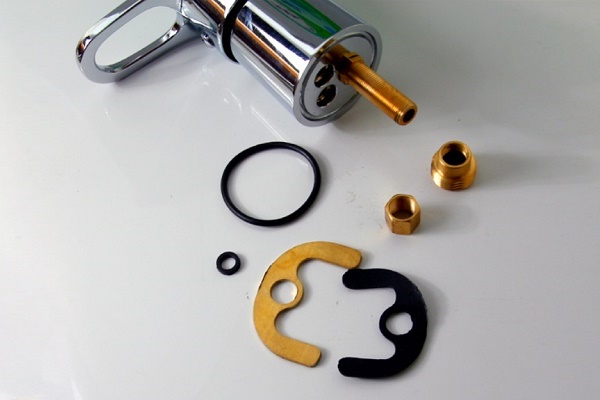
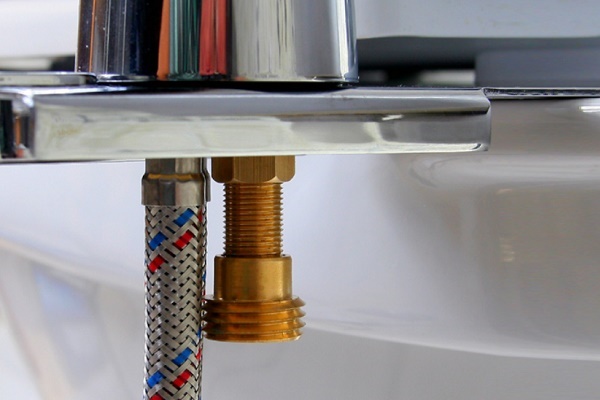
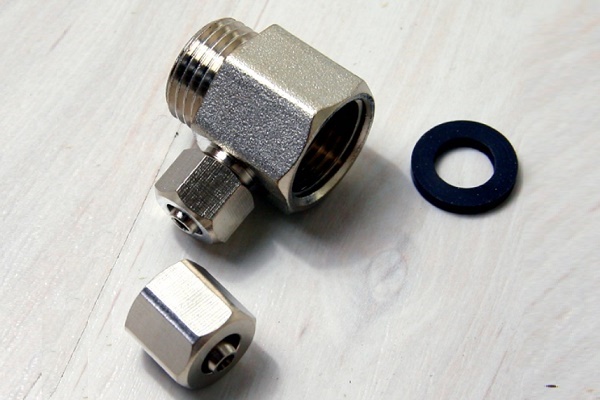
When the tools are prepared, and the instructions for the mixer are read, you should carefully consider all the accessories that come with the device. Here you can see the rubber gaskets, nuts, other fasteners and parts necessary for installation.

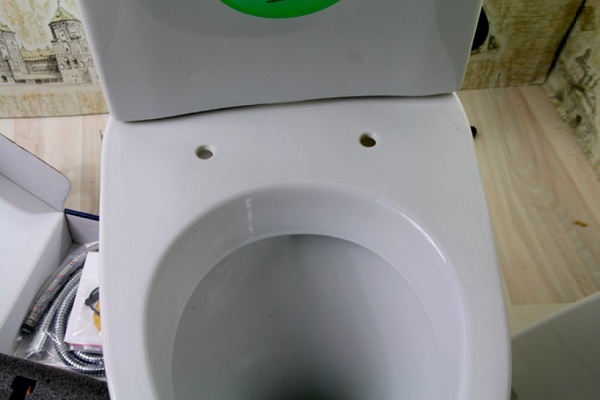
Then you have to assemble the mixer. When assembled, it can be put in a special hole provided in the bidet.

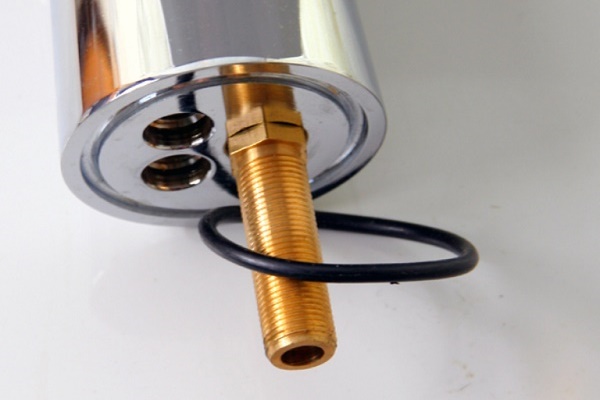
If you use rigid hoses for water supply, then it will be a little more difficult. For self-assembly, it is more convenient to use a flexible connection option. It is more expedient to entrust a rigid eyeliner to experienced masters.

Now you can throw a nut and bait. Next, it is important to check whether the mixer is level with respect to the sides of the bidet. If everything is in order, you can tighten the nuts by hand or with a wrench that is suitable for these purposes.
The next step is sealing. To do this, you need to take a silicone sealant and carefully process the contact points of the mixer elements with a bidet. Allow material to dry.
It remains to get a siphon for a bidet, purchased earlier, from a separate package. Moreover, the diameter of the product must match the diameter of the corresponding holes in the bidet.
The siphon consists of a rigid and flexible part. Flexible - this is most often a plastic corrugation. To place a siphon in a bidet, you need to put a gasket on the drain hole, a protective grill and carefully tighten the lock nut. Here you should not pull with all your might - you can accidentally break the thread. Now you need to attach the corrugation with a plastic nut to the siphon.

When required installation of a mixer with a watering can, then it is most often put on a sink next to it. The kit includes a flexible supply that will be connected to the water supply system, as well as a watering can with a decent length hose.
Some models of faucets with a hygienic shower are mounted on the wall when there is no sink next to the bidet or it is installed very far.
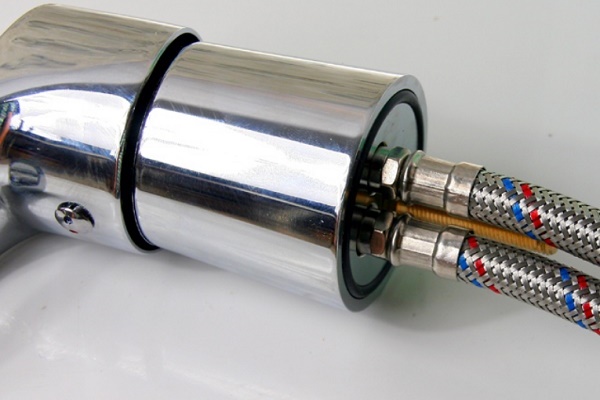
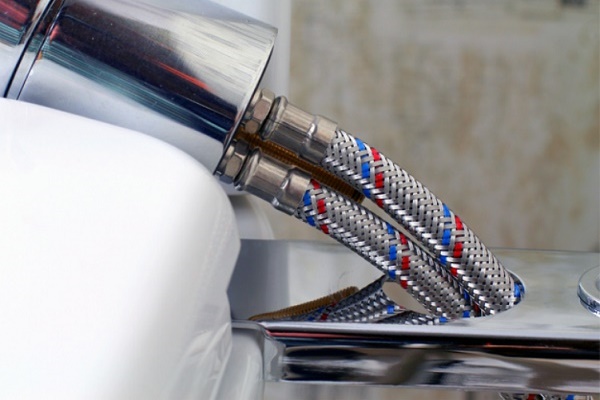
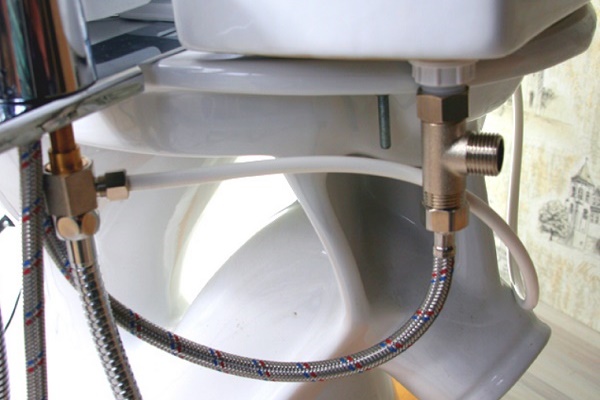
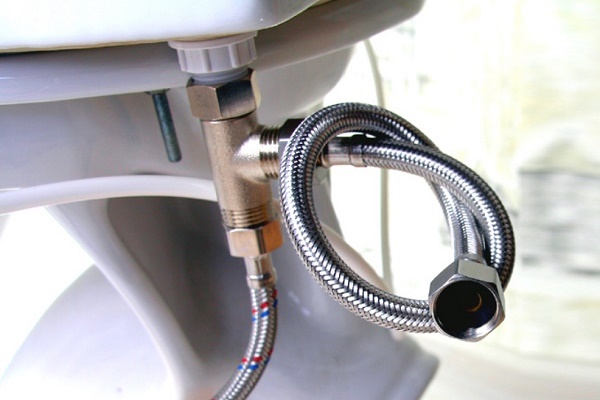
Connecting the mixer to the water supply
After installing the mixer with a siphon at your workplace in the bidet, you only need to connect it in order to check the quality of the work performed. To do this, you need to connect the flexible hoses that extend from the mixer with the corresponding pipes that supply cold and hot water to the house / apartment.

After connecting the plumbing equipment to the water supply system, it remains to connect it to the sewer system.
This is done like this:
- first you need to take the rubber ring and treat it with sealant;
- then tightly fix in the sewer socket;
- Now you can put in the ring the second end of the corrugation.
Everything - the mixer is installed, and the bidet is connected to the sewer and water supply networks.
Mounting a special cover
If the bathroom is combined and the bidet does not fit in it, do not be upset. A special toilet lid is sold for hygiene. It can conditionally be called a descendant of the classic bidet, rapidly gaining popularity.
This cover is called a bidet cover. It can be semi-automatic or fully automatic. Many manufacturers equip their models of covers with a mass of additional functions - drying, deodorant, self-cleaning and others.
To install the bidet cover, you will first have to remove the old one from the toilet. Then, having studied the installation instructions, secure with the nuts and bolts that come with the kit to the toilet. If the model is volatile, then plug in the plug.

It remains only to connect it to the water supply. Everything is extremely simple here - a special tee is included in the kit, which is worn on a pipe that brings water to the drain tank.
A drain tank connection is screwed into one of the holes of the tee, and first a filter must be placed in the second hole, and then a flexible hose that will provide the device with water.

Connection to the plumbing system is complete. The main thing is that all connections are made reliably. You don’t have to connect to the sewer system - the toilet is already connected.
For more information about choosing and installing bidet covers, see:
- Electronic bidet covers: types, device, how to choose a good model
- Cover for a bidet for a toilet: how to choose a convenient nozzle seat
- Bidet prefix for a toilet: an overview of the types of bidet consoles and methods for their installation
Conclusions and useful video on the topic
A detailed video on the assembly of the mixer and its installation on the side of the bidet, as well as on the installation of the siphon:
Video about connecting a bidet located in the bathroom and installing a mixer:
The bidet cover is a simplified version of the classic bidet. Its installation will not be difficult - features of the connection in the video review:
Design features of the mixer and a demonstration of the watering can for a bidet in a video clip:
Video about connecting a bidet to the supply of cold and hot water and to the sewer:
Installing a mixer and connecting a bidet to water supply and sewage systems is within the power of any home master. The main thing is to do everything carefully, focusing on the manufacturer's recommendations for a specific plumbing product.
At the end of the installation process, you must remember to check the quality of your work by opening the tap and carefully inspecting all joints for leaks.
Have something to supplement, or have questions about choosing and installing a bidet mixer? Please leave comments on the publication and participate in the discussion of the material. The contact form is located in the lower block.
 How to install the mixer on board the bath: step-by-step installation instructions
 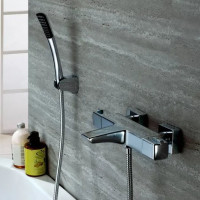 Thermostatic mixer: how to choose and install a mixer with thermostat
 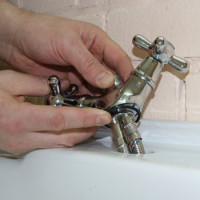 How to install the mixer on the sink: a detailed analysis of installation technology
 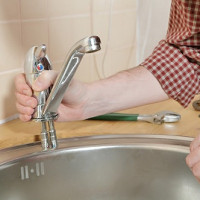 How to install a faucet in the kitchen: step-by-step instruction on the work
 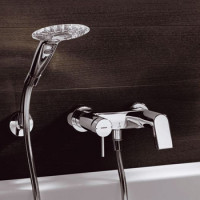 Installing the faucet in the bathroom: device and step-by-step installation manual
 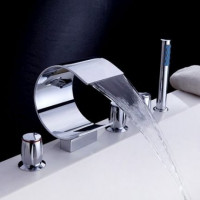 Cascade mixer waterfall: device, pros and cons + review of the best manufacturers
  How much does it cost to connect gas to a private house: the price of organizing gas supply
  The best washing machines with dryer: model rating and customer tips
  What is the color temperature of light and the nuances of choosing the temperature of the lamps to suit your needs
  Replacement of a geyser in an apartment: replacement paperwork + basic norms and requirements
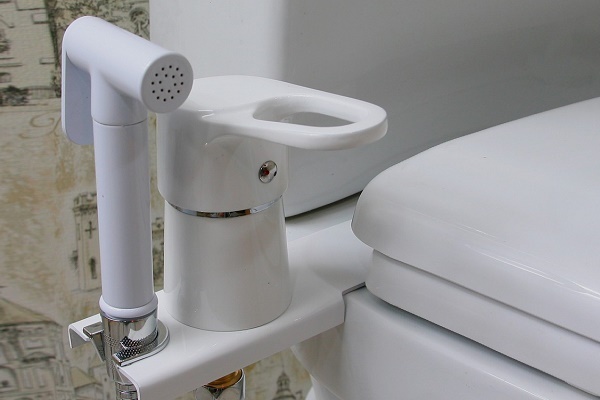
Bidet, of course, is not such a need for a bathroom, but with it it is much more convenient and comfortable. Now, of course, you can buy a special pad on the toilet, but this idea doesn’t really impress me, it’s not very convenient. I took a hidden mixer, put all the components in the box. It looks prettier when only a mixer sticks out of the wall. There is nothing complicated during the installation process. He also connected the sink, the main thing is not to confuse the hot hose with the cold one.