Repair of a water column of a geyser: assembly of a node, major breakdowns and detailed instructions for repair

Like any other mechanism, the water block has wearing parts in its design. When they become unusable, the operation of the heater deteriorates or stops altogether. Familiar situation?
In the event of a malfunction, the home master is quite capable of repairing the water column of the geyser independently, having disassembled the gearbox and replacing the spent consumables. To begin with, we suggest figuring out how to personally disassemble and repair the water assembly of the instantaneous water heater device. The information will come in handy when performing preventive examinations. We will provide the material presented with thematic photos and video materials.
The content of the article:
- Purpose of the water node
- The device frog instantaneous water heater
- Preparing to repair a water unit
- Possible malfunctions of the “frog”
- Diagnosis of causes and troubleshooting
- Problem # 1 - a small pressure of hot water
- Problem # 2 - the column does not turn on
- Problem # 3 - turning on a delayed column
- Problem # 4 - the column works after closing the tap
- Problem # 5 - the water heater is not gaining power
- Problem # 6 - no clicks are heard when firing up
- Problem # 7 - there is a leakage of water from the gearbox
- Problem # 8 - when the water is turned on, the stem is inactive
- Rules for dismantling and disassembling the gearbox
- Conclusions and useful video on the topic
Purpose of the water node
Regardless of the complexity of the design, gas water heaters used to heat water in homes where there is no domestic hot water (hot water) operate on a general principle. The water passing through the heat exchanger is heated by gas, which is supplied to the burner when a liquid flows through the water unit and shuts off when the hot water tap is closed.
A water unit is the first automatically working gas column block in the cold water path.

The main task of the water block is signaling to enable or disable the gas unit working with it in pairs, adjust the gas supply to the burner and water supply to the heat exchanger coil (ensuring normal operation of the column).
Thanks to the original internal device, when the hot water tap is opened, the water reducer gives a signal:
- to gas discovery provided that the flow rate of heated water is not lower than provided;
- to cut off gas supply when the tap is shut off or the pressure of hot water is insufficient.
At the same time, a water reducer (it is also a frog, or a water regulator) is one of the safety devices of a water heater, since with a low pressure of water it prevents overheating of the heat exchanger, which fails from regular overheating. ABOUT heat exchanger repair We talked in another of our articles.
The device frog instantaneous water heater
In order not to engage in blind repairs, you need to understand how a particular node works. For a better understanding of the purpose of the parts and the principle of operation, we consider the device of the water block used in the everyday life of a gas column. Let's do it using one of the most common columns as an example - Neva.
A water reducer is colloquially called the heart of a water unit. The “heart” case consists of two parts - the base and the cover, connected by screws. In the Neva, the body is made of brass. In modern columns, gear housings are also made of silumin, polyamide or high-strength plastic.
In the lower part of the base are made inspection holes for draining the water, plugged with screws.


The base has two nozzles. Through the introduction to the frog, water enters. Using a union nut, the pipe is connected to the water pipe. A sealing gasket is also installed here, which protects from leaks, and a filter mesh that protects the frog's interior from debris from entering the water. The presence of a filter extends the life of the membrane, which is particularly sensitive to the presence of debris, acting during the flow of water and the movement of the membrane like an abrasive.
The outlet pipe is equipped with venturi fitting. With a pipe through which water from the gearbox goes to the coil of the heat exchanger, the pipe is connected with a union nut. A gasket is also installed here. A bypass hole was made over the narrowed part of the Venturi fitting in the base body, through which water from the lower regulator cavity through the nozzle enters the upper cavity separated by a membrane - under the cover.
The gearbox lid resembles an inverted bowl shape. In its center is a channel for the passage of the rod and the installation of the sleeve, equipped with a nut. At the lower end of the stem (on the inside of the lid), a disc plate is mounted in contact with the membrane (diaphragm). The upper end of the stem mechanically transmits a signal to the valve of the gas block.
On the side of the cover there is an overflow channel equipped with an adjusting screw and a moderator ball made of metal or plastic. The lower hole of the channel (when connecting the halves of the housing) coincides with the bypass hole of the base. The ball channel works like a ball valve.

Between the cover and the base is a membrane - which performs the main function of the unit. Membranes used to be made of rubber. Of modern materials, silicone is the best. There are also combined - rubber-metal diaphragms. Along the edge of the membrane disc are holes for fastening screws, as well as a bypass hole.
The principle of operation of the venturi
In order to understand in detail the principle of the frog, we understand how the individual parts of the device work. Let's start with the Venturi fitting. It is a tubular cylinder, in the channel of which an artificial constriction is made. The narrowing of the channel causes an increase in flow rate and a decrease in pressure in a bottleneck.
The result is a difference in fluid pressure:
- before narrowing, water presses on the walls with greater force;
- in a bottleneck where the flow velocity is maximum, the pressure is lowered.
Where the pressure is minimal when opening the tap, a bypass channel begins, through which water from the lower frog cavity enters the upper one. With the tap closed, there is no water flow to the coil. The pressure differences in the fitting and in front of it, too. In both communicating cavities of the pressure reducer, the pressure is the same. The membrane is in the middle.

The pressure of water in the lower cavity is a constant value equal to water pressure in the water supply. The water pressure in the upper cavity of the frog is a variable value. The maximum pressure in it, equal to the pressure of the water in the water supply, is achieved with a closed hot water tap. With the crane fully open, the flow velocity at the point of restriction of the nozzle is maximum. The pressure in the bypass channel is reduced to a minimum, followed by a decrease in the water pressure in the upper cavity of the gearbox.
How does the frog membrane work?
When you open the hot water tap and the pressure difference appears, membrane, trying to bend upward, presses with force on a plate rigidly fixed to the stock. The rod extends outward and transfers force to the valve of the gas block, which is responsible for turning on the gas supply to the burner. The pressure drop is sufficient to generate the necessary force due to the area of the membrane, transfer it through the plate to the stem and overcome the elasticity of the spring mounted on the rod.
When closing the tap, the flow of water in the column stops, the pressure difference disappears. The membrane returns to its original position, ceasing to press on the rod. A spring returns the stem back and the gas valve closes.

From all of the above, it becomes clear that the membrane is one of the most important parts of the assembly, ensuring its automatic operation and working "for wear". It is the violation of the integrity of the membrane that is most often the cause of the failure of the water unit.
The purpose of the moderator ball
If you remove and shake the cover of the water reducer, you can hear a metal ball rolling with a knock on it. It can be seen by unscrewing the adjusting screw.When turning the column on and off, a small steel (or plastic) pea rolls along the bypass channel, then partially blocking its lumen, then freeing up more space for the flow of water.
Rolling back in the direction of the screw when the crane is turned on, the ball partially blocks the lumen of the channel. Water from the upper cavity leaves slowly, so the gas valve opens smoothly. When the valve is closed, the pea moves in the opposite direction, the lumen is quickly released, and the pressure drop is eliminated. Therefore, turning off the gas column is fast.

In this way, the smooth opening of the gas and its quick shutdown are also carried out automatically, so the channel with the ball is also called a ball valve. The smooth opening of the gas is regulated with the help of an adjusting screw hidden under a screw plug. This is done in extreme cases, since the gearbox is usually well adjusted by the manufacturer.
On the role of the plate and stem
Assembled, these two parts look like a mushroom with a hat. The rod is a metal rod that extends when the hot water tap is turned on towards the gas block.
A plastic plate is attached to one end of the rod, which, bending, is pushed by the membrane, the second end of the rod presses gas assembly valveopening the gas supply to the burner.
To prevent water leaks into the gas supply channel and the microswitch platform, several glands are installed in the rod connections.


In modern models, the gas valve control mechanism is duplicated. Switching on is done mechanically (by pressing the rod on the valve) and using a micro switch. In the latter, when the foot is retracted (by a retractable stem), a short circuit is made and a signal is given to open the valve.
Bypass and other gear innovations
In modern water heaters, for example, the Electrolux brand, you can find improvements - bypass with water flow regulator. This is a channel parallel to the venturi, the flow of water through which is regulated.
When the bypass is closed by the regulator, all water goes through the nozzle, therefore, the pressure drop is maximum, the gas opens at full capacity. When the bypass is opened, the water flow through the venturi decreases, while the pressure drop decreases and the gas valve opens slightly less. The temperature of the heating fluid is reduced.
In the same columns, the base of the body is equipped with valve, which regulates the flow of water through the frog (feedback device). If the pressure increases in the water main, the valve will partially close and open wider when the pressure decreases.

Another of the protective devices of the water node is safety valve, relieving pressure and thereby protecting against rupture of the column pipe.It consists of a tube, the end of which is closed by a stopper, and inside there is a spring-loaded (holding spring, the compression force of which is regulated by the pressure screw) holding valve. If there is a leak in this place, the clamping screw is screwed a little tighter.
Preparing to repair a water unit
Often, disassembling a frog to install a new membrane, you may find that in addition to it you need to replace one or more gaskets of different diameters. Therefore, you need to start the repair by buying in advance a complete repair kit for the water unit that matches the model of your gas column.

In addition to spare parts, you will need a tool. For units of the old type: adjustable spanner, screwdrivers for screws with straight and crosswise slots. For modern Neva models and Chinese water heaters, a Ph2 screwdriver, preferably magnetized, will be needed. There are devices with "tricky" fasteners. It will not be superfluous to solve the problem of sour screws, for example, WD-40.
You will also need two adjustable gas wrenches. They are necessary so that during dismantling and reinstallation during fitting of the fittings (flexible hoses or fittings), do not damage the unit fittings.
If excessive force is applied in the fittings, microcracks, or hidden cracks, which are not visible from the outside, can be formed. To prevent this from happening, hexagonal pads are made on the fittings, which adhere to the offset by one of the keys. The second key is screwed or unscrew the accessories.
Possible malfunctions of the “frog”
The body of the water regulator is durable, designed to work with a large pressure of water (flow rate up to 3 m3/hour). There are few parts that can become unusable and cause breakdowns in the gas column.
Possible malfunctions:
- membrane breakthrough;
- violation of the integrity of the plastic plate - the membrane cannot move the stem;
- scale formation on the stock, slowing down the movement of the rod or leading to its jamming, which occurs due to leakage of the stuffing box;
- ball retardation (very rare, but it happens), clogging of the channel, jamming of the ball;
- filter mesh full of debris, which reduces the pressure of the water due to the closure of the passage;
- Debris entering venturi due to which the pressure in the hot water tap decreases, the column does not work;
- wear of gaskets, oil seals This is the cause of leaks leading to scale formation.
Most of these malfunctions have characteristic symptoms that can be detected by external examination.

Any leaks require intervention, which should not be postponed for a long time. Long exposure to water oxidizes the contacts. As a result, the microswitch becomes unrepairable, completely unusable.
Diagnosis of causes and troubleshooting
Most internal abnormalities can be detected even with external diagnostics by testing the operation of the column. External symptoms indicating a violation of the frog, most often indicate the immediate culprit. Only part of the external manifestations can be the result of various reasons, which will become clear after the dismantling of the water node.
Problem # 1 - a small pressure of hot water
If the pressure in hot water is less than cold, the cause may be filter strainer. It is eliminated by cleaning, which does not require dismantling the frog, however, more often this reason is not the only one, therefore it is necessary to disassemble the VU, at least for the purpose of prevention.
One more reason - Venturi fitting channel blockage. In this case, disassemble the gearbox, unscrew and clean the fitting.
Other causes of weak water pressure in the column we examined in this article.
Problem # 2 - the column does not turn on
If the column does not turn on with sufficient water pressure, then it is possible aperture breakthrough. They eliminate it by dismantling the frog and replacing the membrane. The best way to replace it is with silicone. Normal - to the "native" (sold separately or in a repair kit). Not the best - a replacement for a suitable or made independently.
One more reason - stock souring. Remedy: the gearbox is disassembled, the rod is descaled, ground and lubricated with mineral oil, the glands are replaced.

Also among the possible reasons plate break. Without it, the membrane is not able to move the stem. Eliminated by replacement.
Problem # 3 - turning on a delayed column
If the column is turned on with a significant delay when the hot water tap is opened, this may be due to incorrect ball valve adjustment (the adjusting screw is turned out too much). To fix the screw is screwed in a few turns.
More reasons: bypass blockage or ball retarding. Need to parse a frog. The blockage is eliminated by cleaning the canal with a thin stick of wood and washing. The ball can be removed by unscrewing the plug and adjusting screw.
Problem # 4 - the column works after closing the tap
If the column, after closing the tap, continues to work for some time and then turns off, most likely the reason lies in incorrect adjustment of switching smoothness. The adjusting screw must be loosened a few turns. To adjust the smoothness of turning on the gas, unscrew the plug, then use the screwdriver to screw the adjusting screw a few turns to speed up the gas supply, or unscrew it a few turns to slow it down.
Also, the cause of this problem may be microswitch sticking. From the ingress of flowing water, its internal contacts are deformed and crack. The device is replaced with a new one. After replacing the microswitch, the test column is turned on for a couple of minutes and turned off. The leak itself is an occasion to dismantle the frog and revise the stem seals.

Another reason is the appearance interference with free stem movement. Two options are possible: the reason is in the design of the gas part or in the malfunction of the water unit. In the latter case, the rod may be delayed by the resulting scale or not move due to breakage of the springs. The gearbox is disassembled, cleaned and, if necessary, replaced parts.
The last two faults (sticking and microswitches) can lead to serious consequences. Immediate removal required.
Problem # 5 - the water heater is not gaining power
The full capacity of the water heater is not achieved, while the blue flame of the burner is sluggish and goes out during operation. The most likely reason is leaky membrane. Eliminated by replacement.
Problem # 6 - no clicks are heard when firing up
If (with the wick ignition of the burner) the nozzle is cleaned, but the flame dances too far from the edges of the burner, its tongues are more than 3-5 cm, then the diaphragm has broken through. It is required to disassemble the assembly and replace the membrane.
Problem # 7 - there is a leakage of water from the gearbox
The main reason is wear on gaskets or gaskets. Make a replacement.
Problem # 8 - when the water is turned on, the stem is inactive
In some models, the movement of the stem can be observed visually.If the stem, when opening the hot water tap, remains stationary or does not extend all the way, it means leaky membrane or in plate breakingas it turns out when parsing a frog.

This breakdown is eliminated by replacing a damaged plate or membrane. Before disassembling the assembly, it is advisable to stock up with new gaskets and seals.
Rules for dismantling and disassembling the gearbox
Regardless of what kind of gas column modification, before starting repair or preventive maintenance, turn off the supply of gas and cold water to the unit.
To drain water from the system, open the hot water tap, located below all water-folding devices powered from the column. Under the dismantled water unit we place a wide tank (basin or bucket) where the rest of the water from the gearbox will merge.
Removing the gearbox from the column
Often the frog can be removed separately. But in some columns it is impossible to do this, so you have to dismantle both blocks together. There are models of instantaneous water heaters in which in order to gain access to the frog's interior, it is not necessary to dismantle it at all - just remove the cover.
Dismantling the frog water heater "Neva 3208"
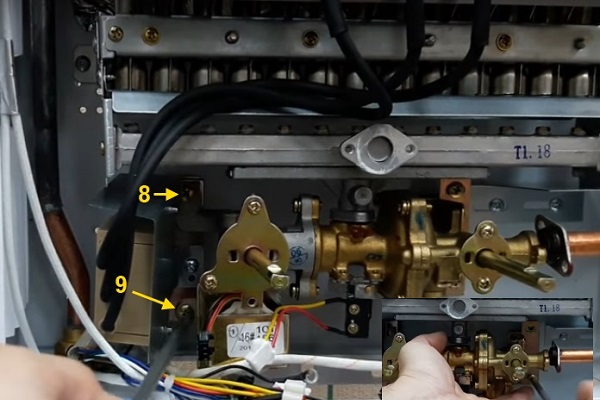
In the Neva 3208 column, it is easy to dismantle the gearbox, as in other similar devices. To do this, unscrew the union nuts on the inlet and outlet pipes of the housing, as well as unscrew the three screws that secure the frog to the gas unit. When unscrewing the nuts and screws securing the water regulator, we hold the dismantled unit by hand so as not to accidentally deform the parts of the gas unit.

The procedure for extracting the gearbox "Neva-transit"
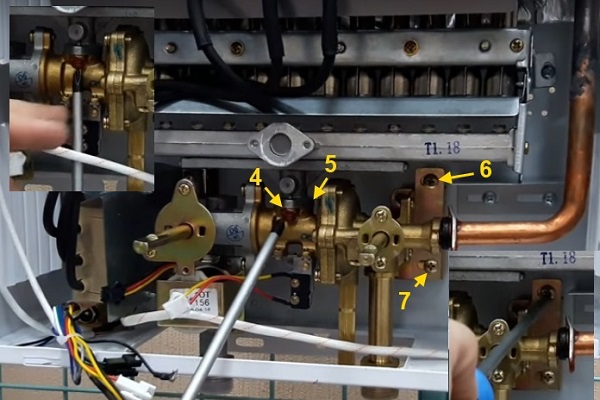
To repair a water reducer, it must be removed from the column housing. We will analyze how to do this using the dismantling of the Neva-Transit column as an example, since the fastening of gas-water units in many modern models is very similar. First, remove the control knobs on the front panel. They are simply dressed on stocks.
After that, having unscrewed the screws, remove the front panel. Please note that the digital display on the front panel is connected using pluggable terminals to the electronic devices of the speaker. Therefore, pulling the panel towards you, disconnect the terminals and only after that remove the panel completely.
Next, we will consider the process of extracting the water node in the following photo selection.
Do you have a Neva gas column? Read more about typical faults and how to eliminate them.
Dismantling the water regulator
Having released the frog, and draining the last water out of it, unscrew the lid. Often the screws are soured. To facilitate the work and not to break the slots, we use the special tool WD-40. Having unscrewed the screws, remove the cover, remove the membrane and inspect the condition inside.
We replace damaged parts, clean and wash the insides (surfaces, channels, if necessary, clean the case from the outside), set the parts in place and assemble the frog in the reverse order.
Frog assembly
It is especially important to set the aperture correctly. The bypass hole must exactly match the same holes in the cover and base. If the channel connecting the cavity of the base and cover is blocked, the column will not work.
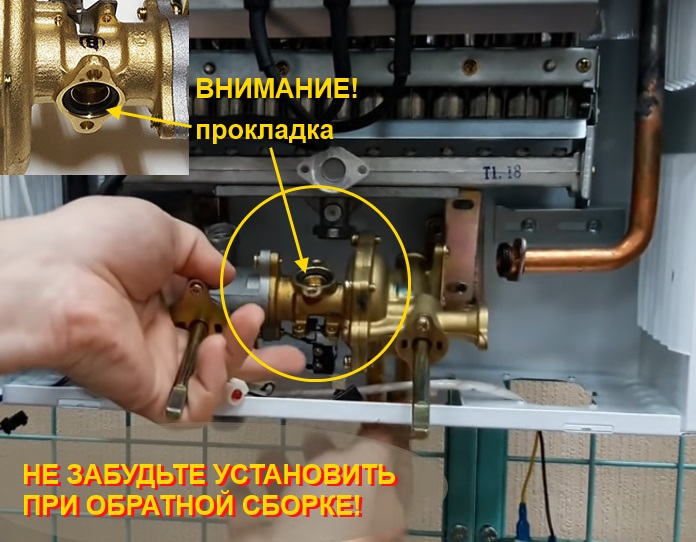
Installing the cover on the base, tighten the screws. We install the assembled gearbox in place (also in reverse order), not forgetting the gaskets on the nozzles and on the connection of the gas-water unit with the platform of the gas burner leg.

Testing a repaired assembly
After installing the repaired frog, we check the operation of the water part without connecting the gas by opening the hot water tap.
We observe:
- if drops appeared on the compounds;
- whether the flow rate is the same when turning on hot and cold water separately;
- Does the ignition device of the burner click?
- whether the rod moves normally when opening and closing the valve.
If not everything goes as it should, double-check your work. However, sometimes the reason may lie not only in the water node.
Only after the mounted frog has passed the test can gas be supplied to the column. But do not forget about safety regulations when using a column. And if there is a smell of gas, you should immediately shut off its supply, arrange ventilation and call gas specialists.
Conclusions and useful video on the topic
You can learn how to repair a frog in a Chinese water heater from the following video:
About repairing the VU of a Vaillant 24 \ 2 GRXI geyser is simple and clear in this video:
The Bosch GC water feature can seem very complicated. However, many parts cannot be replaced individually, so you will have to buy the assembly as an assembly. It’s good to dismantle and assemble the assembly simply:
The video explains why you should not delay the replacement of stem seals when you notice the appearance of droplets. It is shown how to disassemble the stem, replace the seals and reassemble:
In general, the device of any water block of a household gas column is quite reliably designed and implemented. If the installation was carried out correctly, and routine inspections with timely replacement of consumables are carried out regularly, then problems with the operation of the speakers do not happen often. To repair the heater water unit, a specialist is not always needed gas company. Many types of work can be done independently.
If you have any questions during the repair process that could not fit the scope of the article, or you want to share your solution to the problem, write about it in the comments, add unique frames for your own repair, and give useful recommendations to other users.
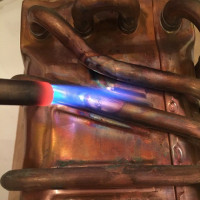 Do-it-yourself repair of a gas column heat exchanger: the main stages of soldering a copper radiator
  How to replace the gas column membrane: reasons + repair instructions
 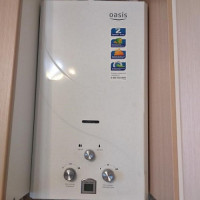 Oasis gas column repair: an overview of typical breakdowns and recommendations for their elimination
 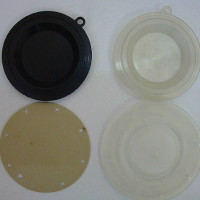 Membrane for a geyser: purpose, principle of operation + replacement instructions
 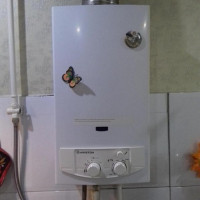 The principle of operation of a gas column: features of the device and operation of a gas water heater
  Replacement of a geyser in an apartment: replacement paperwork + basic norms and requirements
  How much does it cost to connect gas to a private house: the price of organizing gas supply
  The best washing machines with dryer: model rating and customer tips
  What is the color temperature of light and the nuances of choosing the temperature of the lamps to suit your needs
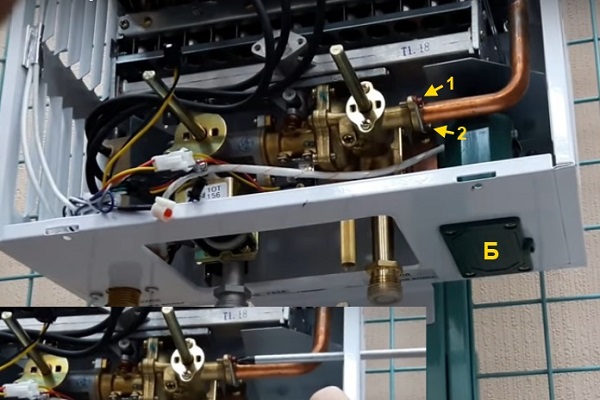