Do-it-yourself repair of a gas column heat exchanger: the main stages of soldering a copper radiator

Flowing water heaters running on natural gas are quite reliable devices that rarely fail. Due to minor malfunctions that occur during operation of the device, a large number of inconveniences can occur. In such cases, you should call the master to your home or repair the gas column heat exchanger with your own hands to save money.
For the master, this procedure will not take even 5 minutes, but you still have to pay for the call. It is quite simple to fix a number of breakdowns that occur in this device. And how to detect a breakdown and independently repair the gas column, its heat exchanger and all its components - we will talk about all this in our article. We give detailed soldering instructions, providing the material with visual photos and useful videos.
The content of the article:
How is the water heater arranged and working?
To learn how to repair a geyser, you must first understand how it works and how it works.
Units can be of the following types:
- With an open combustion chamber or atmospheric.
- With a closed combustion chamber orturbocharged. They are also called inflatable.
In the atmospheric column, the necessary combustion of gas, the air comes from the environment in a natural way. It enters the device through the opening, which is located at the bottom of the column. To exhaust the combustion products, a chimney with natural draft is mounted.
Turbocharged or inflatable columns from atmospheric ones differ in one feature: their combustion chamber is closed, and the built-in fan provides forced draft. Air inflow and its removal is carried out forcibly through a coaxial chimney (double-walled).
The gas water heater can be found in general terms by looking at the following illustration.

Below will be presented the principle of operation of a modern gas burner with an automatic ignition system:
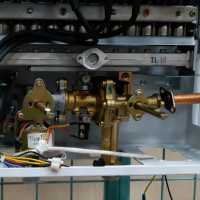
- The column starts to work when the tap of the mixer is opened. The water flow passes through the water supply unit and the heat exchanger of the gas device.
- Inside the column body is a membrane of the water regulator, which pushes the rod under the influence of pressure arising from the water. This allows the stem to compress the spring of the mechanical gas valve in the block so that the fuel has the opportunity to get to the burner itself.
- At this stage, the electromagnetic valve circuit closes, which occurs when the button is released by the rodmicroswitches. The valve provokes the start of gas in a special tube, which is flowing. Gas enters the already open spring valve.
- Pulse device trips. It delivers a discharge to the electrodes that are near the burner. Sparks form, as a result of which ignition begins. This allows you to heat the water passing through the heat exchanger.
The electromagnetic circuit consists of 3 sensors that are connected in series. These include a draft, overheat, and flame sensor. When the last element of the chain fixes fire - at this moment the formation of sparks ends.
In more detail the principle of operation of the column we examined in this stuff.

Signs of heat exchanger failure
After you learn in more detail about the principle of operation of the gas column, you can consider the important points necessary to successfully prevent damage to the radiator.
So, there are several conditions when it is necessary to repair a faulty gas column heat exchanger, since the unit itself starts to automatically shut down:
- The flow of water stops and there is no pressure. In this case, the water regulator releases the push rod, which causes a shutdown.microswitches.
- The last element of the electromagnetic circuit, that is, the ionization sensor, ceases to “see” the flame. In this situation, the corresponding signal is not supplied, due to which the path to the gas is closed by a magnetic valve.
- The chimney ceases to form in the chimney. The electromagnet stops working, the electromagnetic circuit is broken and the fuel supply is no longer present.
- Overheating sensor stops functioning. This component of the circuit is installed directly on the heat exchanger.
After we figured out the nuances of the gas column and possible problems that indicate a radiator breakdown, we’ll talk about how to repair it. But first, other malfunctions are to be ruled out.
Elimination of other column malfunctions
Most often, you may encounter a situation where the column does not initially ignite the flame. First you need to determine what specifically led to this. After all, the problem may not be at all in the heat exchanger, but, for example, in dead batteries. Therefore, diagnosis is indispensable. Moreover, part of the breakdowns can be eliminated with one’s own hands, and in some cases gas service specialist.
External inspection of the water heater
Competent diagnostics will allow you to quickly perform repairs on your own.

There are a number of elementary actions that should be performed before setting off to explore the inside of a water heater:
- Battery Replacement and cleaning the power contacts.
- Checking chimney draft and presence pressure in the cold water system.
- Fuse check (for speakers with turbocharged). You can turn the plug in the switch to change the phase arrangement - relevant for imported models, as they are quite sensitive to this.
- Strainer cleaning. This is a sump that can be found on a pipe that supplies cold water. Often, the mesh is a structural component of the water node.
- Observe the ignition electrodes. To do this, just open the hot water tap, after which sparks should form. If the camera is closed, then you can listen to the body. Characteristic sounds should be heard by the type of clicking of charges.
The above actions may not always help. Then you have to look inside the column, for which you have to remove the case.

Troubleshooting inside the column
If external inspection and battery replacement did not help, then you can start troubleshooting directly inside the device.
To do this, it is necessary to remove the casing of the heater and in turn check the main components. It is better to perform all actions with an assistant. He should be asked to open hot water, and he himself needs to monitor the movements of the stem. The duties of this element include the impact on the pressure plate to move it away from the button microswitches.
In the case when the pusher does not perform any movements, then with a probability of 100% the problem lies in the water block. If this problem occurs, you must disassemble the unit to clean and change the membrane in it.
Also, the stem may press on the plate, but the button will remain pressed. In this case, check the water regulator for scale. It should be found and cleaned.
If all the above elements work in normal mode, the button is squeezed out, but sparks do not form, then in this situation the culprit may be microswitch. To verify this, you must disconnect its connectors and clamp the two terminals with a screwdriver. If sparks begin to form immediately in this case, the switch is out of order and should be replaced.

The solenoid valve may also fail, due to which gas will not be supplied. To do this, check each of the sensors in the circuit by alternately shorting it. You can also usemultimeter forringing.
Heat exchanger repair procedure
If traces of leaks are found inside the structure, then the problem is much more serious. Leakage may form from a copper radiator in a household gas column, which may result in tube deformation. It can also appear due to irregularities in the operation of the water unit, which is typical of automatic gas columns. Such a violation indicates a malfunction of the gearbox, because of which the column may completely fail.
Hard water from the city water supply, improper connection (grounding), frequent overheating of the column contribute to the fact that scale begins to form on the walls of the pipes of the heat exchanger. The material of the radiators is not particularly strong, so fistulas quickly appear on the surface of the pipeline and heat exchanger.
With this problem, owners of modern gas columns very often encounter. This is due to the fact that such devices use thin copper, often of poor quality.To fix the problem, you can perform normal soldering at the site of formation of the fistula.
Stage # 1 - draining water from the radiator
It is worth noting that you can not immediately go to soldering. First you need to make sure that the column is disconnected from gas and electricity.
Also, it must be disconnected from the water supply, completely empty the heat exchanger, which contains a sufficient amount of coolant. If you ignore this simple precaution, the incoming heat will be constantly removed due to liquid.

All liquid from the heat exchanger cannot be removed using a tap. Therefore, unscrew the nut that is superimposed on the pipeline. Now it remains to get rid of the residue. Why you can use an ordinary vacuum cleaner or compressor, and you can also manually blow air using a garden hose.
Stage # 2 - soldering of copper pipes
When the heat exchanger has been completely emptied, you can begin to solder. But how to solder a heat exchanger in a gas column in places of fistula formation? This is quite simple to do, as the whole process is well debugged. If you have never done this before, we recommend that you read the instructions for soldering copper tubes.
To begin with, you should take an emery with fine grain and treat it with the desired area. Fistula cleaning should be performed until no oxides remain. Determining their location is not difficult, since such copper has a greenish tint.
After cleaning, wipe the desired area with a cloth soaked in cleaning agent. Now you can proceed directly to tinning. For this, each individually selects solders for himself. You can also take the advice of professionals who recommend using POS-61. It remains to take a soldering iron from 0.1 kW of power and rosin as a flux.
In the absence of rosin, you can use aspirin. It is sold in a pharmacy. It will be effective in situations where it is necessary to work with a problem place that cannot be cleaned to the end.

When the soldering is done on the heat exchanger of the gas column in the required place, evenly distributing the solder layer over the area, it is necessary to increase the thickness of the homogeneous mass to 2-3 mm. Thus, the fistula completely closes and no longer appears.
In addition to the main part of the heat exchanger, it is necessary to inspect the entire pipeline. Green oxidation can also occur on copper tubes. If this problem is not corrected, then in the future it will lead to the inevitable appearance of microcracks.
It is worth noting that soldering is possible even if the smallest problem points and areas are detected. It is immediately necessary to tin and solder these places. If this is not done, then possible problems will occur once every few months.
Soldering should be done even where it is impossible to get it. In this case, remove the radiator and disassemble it to get to the problem place.
Stage # 3 - troubleshooting after soldering
It is not always possible to detect all possible defects during a visual inspection. Even sanding does not always give the desired result. In this case, special diagnostics that are performed under pressure can help.
To do this, apply a water stream inside the radiator assembly. You can use a shower rubber hose that bends well. One side of the hose should be connected to the water supply channel. The second edge - with a radiator tube.It remains only to block one of the edges of the tube with a locking valve.

Now you need to start the faucet, which feeds the water heater. During this procedure, it is important to carefully monitor the heat exchanger and all tubes. If there are barely noticeable cracks on the surface, they will immediately become visible. At the places of their detection, water droplets will form. The remaining areas will be dry.
Thus, it will be possible to detect all the problem areas requiring repair, and to solder them. At the same time, you can rinse the radiator, saving it from scale.
If there is a lot of damage, or the pipe material is too thin and can not be soldered, then you will not be able to do without large financial investments. In such a situation, the purchase and installation of a new heat exchanger will be necessary. And if the desired model is quite expensive, then you may have to think about choosing and buying a new column.
Conclusions and useful related videos
In this video you can clearly see how the soldering of the heat exchanger is performed:
A video on how to repair a column heat exchanger with a digital display using soldering:
It is not necessary to resort to independent repair of the geyser, if there is no self-confidence. First of all, it is important to understand the principle of the device and adhere to safety precautions. If you do not follow the rules, then you can endanger yourself and loved ones who live with you.
Do you have any questions about the repair of the heat exchanger that we did not touch on in this material? Ask them to our experts in the comments section - we and other site visitors will try to help you.
If you want to share the successful experience of soldering a copper radiator column yourself, tell our readers about it, add unique photos of the repair process - the feedback form is located below.
 Repair of a water column of a geyser: assembly of a node, major breakdowns and detailed instructions for repair
 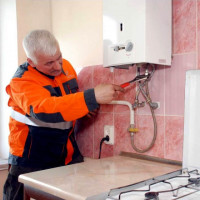 Do-it-yourself gas column installation in an apartment: requirements and technical standards for installation
  Replacement of a geyser in an apartment: replacement paperwork + basic norms and requirements
  Do-it-yourself vector gas column repair “Vector Lux”: common breakdowns + tips for fixing them
  Oasis gas column repair: an overview of typical breakdowns and recommendations for their elimination
 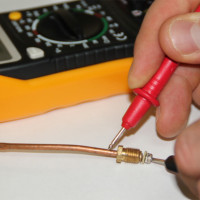 Thermocouple for a gas column: design and principle of operation + self-inspection and replacement
  How much does it cost to connect gas to a private house: the price of organizing gas supply
  The best washing machines with dryer: model rating and customer tips
  What is the color temperature of light and the nuances of choosing the temperature of the lamps to suit your needs