Do-it-yourself attic insulation from the inside: step-by-step instruction on insulation + tips for choosing materials

The internal insulation of the attic has an indisputable advantage - the ability to conduct thermal insulation works regardless of the season. However, this approach has several important nuances, ignoring which can negate all efforts and financial investments. Easier to prevent unwanted consequences than to eliminate them, agree?
We will tell you how to act in order to prevent mistakes. In the article we described the features of the use of different heat-insulating materials, gave tips on choosing the best insulation, and also told how to avoid the appearance of condensation in the roofing cake.
The detailed technology of attic roof insulation will help you to do all the work yourself, without the help of specialists.
The content of the article:
Selection of required materials
There are a lot of heaters. However, not all of them are recommended for installation in a residential attic. The attic is characterized by a fairly high humidity due to the rise of heated air from the lower floors of the cottage. Plus, one should not forget about environmental friendliness and material safety.
If the attic is non-residential, then due to natural ventilation through the vents, spotlights and dormers, the steam quickly erodes from it into the street. As a result, condensation does not form inside, and the rafter system is not exposed to the negative effects of excess moisture.
In the attic the situation is different. When it is insulated, it is necessary to create an obstacle for heat to go outside and to reduce air exchange with the street. As a result, all the steam remains inside the attic rooms.
Therefore, if the insulation is not protected reliably from moisture, then it will not last long. After all, any heat-insulating material after wetting partially or completely loses its properties.

When choosing a heater, it is necessary to evaluate it:
- thermal conductivity;
- vapor permeability;
- volume weight;
- flammability;
- soundproofing;
- environmental safety.
If you select too heavy material, then the rafters will be overloaded. And the attic is often equipped from a non-residential attic. Rafter beams, in this case, are not designed for excessive additional loads. To try your luck here is not worth it.
In terms of thermal conductivity, most of the heaters on the market are similar. It is only necessary to choose their thickness correctly to achieve the required thermal insulation parameters.

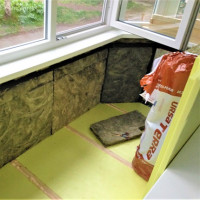
Of the entire range of thermal insulation materials, the most suitable for attic attic insulation are mineral wool (basalt) and extruded polystyrene foam. Moreover, the first option is more preferable than the second. Mineral wool is not combustible and has better sound insulation.
It is not worth taking glass wool because of its predisposition to crumbling. Small particles of glass are very dangerous for humans. And regular polystyrene is also not recommended in the attic. Compared to EPS, it is more combustible and environmentally harmful. In addition, it will have to be laid in a thicker layer.
Dew point problem
Ideally, the roof in the attic should be insulated from the outside at the stage of forming the roofing pie. However, often, this is done the other way around from the inside, when the house is already covered with a roof. And there are certain problems.
The correct and ideal roofing cake is several layers of different materials laid on top of the rafters tightly on top of each other without gaps. Such a sandwich ensures that Dew point will be located on its outside. As a result, all condensate formed outside will quickly evaporate into the atmosphere.

Making insulation from the inside, after installing the roof, it is impossible to form the model roofing cake described above. Press the insulation to the roof so that there is absolutely no void between them, it will not work.
But steam always moves in the direction of cold air. And then, each of the cavities formed will accumulate condensation and moisture in itself. And this is a direct way to damage the insulation material and wooden elements of the rafter system.
With internal attic insulation, the dew point has to be displaced into the space between the laid roof and the insulation, leaving an additional 5-10 cm clearance for ventilation. Only such a technology and such a pie will avoid the moisture of the insulating material.

To reduce the amount of water vapor in the insulation, it should be installed using a vapor barrier film. Mounted vapor barrier inside the attic on top of the insulation material.
Steam must first collide with this film and for the most part remain in the room. The less it gets into the insulation layer, the better.
Roof insulation technology
To warm the attic from the inside correctly, you need to create a pie of five layers, starting from the roof inside:
- Ventilated air duct.
- Windproof waterproofing from vapor permeable membrane.
- Insulation between the rafters.
- Vapor barrier.
- Lining the ceiling of the attic.
The vapor barrier is made of glassine, polyethylene or polypropylene film.The best option is special membranes, in which one side is rough and the other is smooth. For these materials, the risk of condensation directly on them is reduced to almost zero.

For the organization of wind and moisture insulation, membranes are suitable:
- porous;
- two-layer film;
- three-layer superdiffusion;
- perforated.
Superdiffusion membranes will last the longest and most effective. However, they are more expensive than other options.
At the same time, it is recommended to use perforated fabrics and films when insulating a residential attic with insulation only as a last resort. They are more designed for waterproofing cold sloping roofs in non-residential attics.
When installing with insulation in a warm room, these materials in severe frosts are often covered with hoarfrost, which reduces their vapor permeability to nothing.
Layer # 1 - ventilation subroof vents
Before you start insulating the attic from the inside with your own hands, you first need to treat the rafters with antiseptics and flame retardants. Only then will it be possible to begin the formation of a heat-insulating cake.

If the heater is knocked down from the bottom of the rafters, then the inner space of the attic will be reduced. The thickness of the heat-insulating pie often reaches 30–40 cm. If you take these centimeters from above and from the sides, the room may be too low and small.
In this case, the installation option with the lining of the lathing under the rafters and laying of insulation on it eliminates the appearance of cold bridges. If you insert mineral wool or EPSS between the beams, then they themselves and the gaps formed near them in the heat-insulating layer next to them will draw heat from the attic.
In order for ventilation in the under-roof space to meet the requirements of SNiPs, deflectors or other openings for air outlet should be provided on the ridge.
Steam along with the air flow should rise to the highest point of the roof and go out completely. Moreover, this should happen without obstacles and as quickly as possible.
Before stuffing the membrane on the rafters, you must first correctly calculate the thickness of the insulation. If the thermal insulation layer is larger than the size of the rafters, then you will have to increase them with bars. The main insulation material should be inside this frame, and not protrude from it.
Layer # 2 - vapor permeable membrane
In the upper part of the formed roofing cake, there should be a material with high vapor permeability from the insulation to the street and high waterproofing in the opposite direction. The task of this membrane is not to prevent the escape of steam from the insulation, while not letting water and moisture into it, which can drip from the leaky roof.

The best material for this vapor-permeable layer, which also performs the functions of wind-moisture protection, is superdiffusion membranes. They are not blocked by dust and ice formed from condensate in severe frosts.
Laying of such membranes is carried out by horizontal strips with an overlap of 10-15 cm of the upper row to the lower one from the outside. As a result, you should get a single canvas, if water drops drip through the roof from the street, they would flow down without getting into the insulation.
The joints of the rows of membranes from the inside of the attic are glued with mounting tape.It should be taken under the same brand as the vapor-permeable film.
The adhesive composition and membrane material from one manufacturer are selected so as not to harm each other and to stay securely glued for many years. If you take them under different brand names, then problems are possible.
Layer # 3 - the main insulation
The thickness of the insulation is selected in accordance with SNiP 23-02-2003. For this, appropriate calculations are carried out, which take into account climatic conditions, design features and roof devices, as well as the characteristics of the insulating material and the inner lining of the attic.

Thermal insulation manufacturers give in the instructions for the material sold and post detailed recommendations on determining this thickness on their official websites. It is best to focus on these calculations.
Installation of insulation is carried out from the inside of the attic over the installed vapor-permeable membrane. If mineral wool is selected, then it must be cut into pieces 2-3 cm wider than the gaps between the rafters or bars of the crate. The minvata should enter between them with a slight pressure and stay there due to pressure.

EPSP will have to be laid on top of the rafters, and not between them. The plates of this insulation are mounted end-to-end to each other. If you put them inside the rafter beams, like mineral wool, then through the holes will appear in the heat-insulating layer.
Some craftsmen fill such gaps with foam from a cylinder. However, this is not worth doing. This can lead to membrane damage due to the chemical reaction of the components of the sprayed foam and the vapor-permeable film material.
It is better to take 10-25 cm from the attic from above and from the sides to the crate with EPSS, rather than get a layer of protection with through holes.
Layer # 4 - vapor barrier film
On top of the insulation on the inside of the attic should be installed vapor barrier of glazed glass or polypropylene or polyethylene film. The task of this layer is not to let water vapor out of the room into the insulation. It is laid as well as the very first vapor-permeable coating.

In addition to the usual film, you can also take foil. An additional layer of foil will reflect most of the heat energy back to the attic, reducing heating costs. In this case, the installation of such a film is made by “aluminum” inside.
The vapor barrier is fastened with stapler brackets or studs with a wide hat. And in the places where the film adjoins the cables, pipes and design elements of dormers, it should be additionally strengthened with a special one-sided tape with a heat-reflecting coating.
Layer # 5 - Ceiling
At the end of the attic insulation, the crate is stuffed under the lining. It is made of bars 15–25 mm thick so that a small ventilation gap remains above the vapor barrier.

Lathing bars on the one hand are intended for fastening the sheathing material, and on the other hand, they additionally fix the vapor barrier membrane and press it against the insulation.
The skin itself can be painted or whitened. There are a lot of options for finishing it. You can also not fasten drywall and chipboard at all, but immediately fill the lining on the crate.
A description of different methods for attic roof insulation is provided in this article.
Conclusions and useful video on the topic
An attic insulation technology overview:
Condensation due to improper vapor barrier and how to get rid of it:
With self-insulating the attic from the inside, when the roof is already covered, it is important to choose the correct thickness of the insulating material. And even more important is to carry out the correct installation without breaking the vapor barrier and wind and moisture insulation.
If the protective films on both sides of the insulation will have holes, then it will get wet and stop protecting the house from the cold.
Have experience attic attic inside? Or want to ask questions on the topic? Please comment on the publication, share your knowledge and participate in discussions. The feedback block is located below.
 Do-it-yourself warming the balcony: popular options and technologies for warming the balcony from the inside
  Attic roof insulation: a detailed instruction on the installation of thermal insulation in the attic of a low-rise building
  How to insulate a loggia: options + instructions for installing a do-it-yourself warming system from the inside
  Insulation of a private house outside: popular technologies + material review
 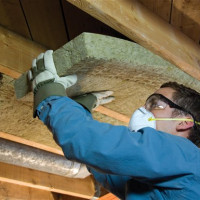 Insulation of the ceiling in a private wooden house inside and out: choosing the best material and the nuances of installation
 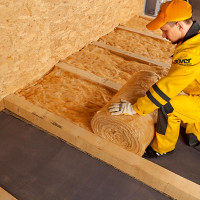 Insulation for the floor in a wooden house: materials for thermal insulation + advice on choosing insulation
  How much does it cost to connect gas to a private house: the price of organizing gas supply
  The best washing machines with dryer: model rating and customer tips
  What is the color temperature of light and the nuances of choosing the temperature of the lamps to suit your needs
  Replacement of a geyser in an apartment: replacement paperwork + basic norms and requirements