Warm water floors on a wooden floor: features of laying the system on a wooden base

Underfloor heating, few can be surprised. The time has passed when it was considered an attribute of super-comfortable housing. Today it is mounted everywhere to make your home even more warm and cozy. Owners of wooden buildings could not install such a system, since traditional laying technologies do not allow this.
With the advent of the flooring system, it is possible to lay warm water floors on a wooden floor without any problems. We will talk about all the popular options for installing a floor heating system for overlapping lumber. Independent home masters with us will find a lot of useful tips.
The content of the article:
Water floor: how does it work?
Water-type floors are a very practical way to heat your home. The system is a liquid heating circuit mounted under the floor.
Traditional technology assumes that the pipes are in a concrete screed. A boiler is usually used to heat the coolant supplied to the circuit. Standard models warm the liquid to 60-90ºС, which is unacceptable for a warm floor.
If you let the coolant with this temperature into the circuit, the floor will heat up to 45-60ºС. Walking on it will be impossible. SNiPs regulate the temperature acceptable for a warm floor. It is no more than 30ºС.
To obtain such a value, it will be enough to heat the liquid in the circuit to 35-45ºС. Therefore, the water floor system includes mixing unit. Here, hot liquid from the boiler heat exchanger and cool liquid from the return pipe are mixed.
There is another simpler option. If you use a condensing type heating boiler, you do not have to install the mixing unit.
Design features of such boilers suggest the possibility of heating coolant to relatively low temperatures.In some cases, the heated coolant is taken from a centralized system, but this requires special permission, which is not always possible to do.

Thus, the liquid entering the heating circuit, and this may be a solution of antifreeze or water, heats the floor. He, in turn, heats the air. The result is a fast and at the same time very uniform heating of the room.
A significant plus is the most favorable temperature distribution in the room for a person. Cool air accumulates in the upper part, and warmer in the lower part. It is such a microclimate that living organisms regard as comfortable. In this case, convective flows, inevitable in the presence of point sources of heat, are not observed.
Due to this, there is no transfer of dust and microorganisms. The advantages include the minimum operating costs. All this makes water floors popular among users. Comparative analysis of water and electric underfloor heating systems given in the article, which we recommend that you read.
Features of the flooring system
The traditional version of the water-type floor involves the installation of pipes in the screed. Pour it with a solution of concrete with special additives that increase its thermal conductivity.
As a result, the concrete cushion becomes a kind of heat accumulator, which makes it possible to use such heating as efficiently as possible. However, the traditional arrangement has disadvantages.

The most obvious is that the concrete screed is too heavy. When the density of the solution is about 2000 kg / sq. m it gives a significant additional load on the base and bearing.
For reinforced concrete slabs, such a load is quite feasible. For wooden floors - beyond. For this reason, the traditional way of laying is prohibited in such cases. It uses the so-called flooring system.
It is made in the form of a low flooring, inside which pipes are located. For its arrangement, wood is most often used, but polystyrene floorings manufactured industrially have appeared relatively recently.
Pipes are placed in grooves, where they are fixed. It is known that wood conducts heat very poorly. For this reason, wood systems cannot be an effective source of heat.
To correct this drawback, metal heat-conducting elements are inserted into each groove. They also strengthen the design. There are similar parts in polystyrene flooring with metal inserts, the material of which is also a poor heat conductor. Thus, a reliable and durable heating system is assembled.
Its advantages over the traditional counterpart can be considered:
- Lightweight flooring, which even wooden floors can withstand.
- Relatively simple assembly, especially when it comes to industrial models of flooring.
- No need to wait for the concrete to harden. Finishing work can be done immediately after installation.
- Full maintainability. To carry out repair work, it is enough to raise a fragment of the flooring to provide access to the area with a malfunction.
Another indisputable advantage of the flooring system is its multivariance, which makes it possible to implement its most diverse modifications. Most of which are homemade products. The main disadvantage of the flooring scheme is its quick cooling. The floor heats up in a short time and gives off heat just as quickly.

Actually, the heat reserve is limited to that which is in the liquid coolant in the pipes. Therefore, when the boiler stops, the room will soon cool down. For this reason, decking systems are more often used as an addition to main heating, especially in cold regions.
The device of the floor heating system
When laying the flooring system, a kind of multi-layer cake is obtained, we will consider each layer in more detail.
Design requirements
The first layer of cake is a properly prepared base. It can be any overlap that is pre-aligned. SNiPs regulate the absence of significant differences in elevations, protrusions and roughnesses. The wooden floor should be flat, without protruding boards.
Each plank should be well fixed and should not bend. The maximum permissible deviation from the horizontal is 2 mm, distributed over 2 m of area in any of the existing directions.
Insulation layer device
To prevent heat leakage, it is necessary to equip the insulating layer. Material for its implementation is selected individually, based on operating conditions. It must be moisture resistant, fireproof compatible with other building materials.
It is desirable that additional insulation is provided. If possible, the thinnest, but effective material is selected.
Pipe Fixing Option
On the insulation, the flooring itself is laid under the pipes. There are many options here. It can be polystyrene mats with special bosses for pipes. Such mats produce single and duplicated insulation.
In the latter case, the insulating layer may be superfluous. As a flooring, sheets of lumber with sawn grooves for pipes can be used. They are also manufactured industrially. Home-made floorings made of battens, bars, etc. also take place.
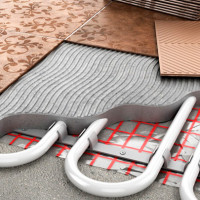
Heat transfer pipe
Then fit into the prepared fasteners and grooves heat pipe. For a snug fit and create a heat shield, the parts are placed inside a special aluminum profile.
If there is none, you can make similar elements of galvanization or wrap each part with dense foil. It is optimal to lay an additional layer of foil over the mounted pipes.
Finishing base construction
Lay the foundation on top of the pipes under the floor. It is selected depending on which topcoat will be laid.
If it is planned to install tiles, ceramic or PVC, as well as linoleum or carpet, moisture-resistant drywall is laid on the metal elements of the wooden flooring. If polystyrene mats were used to equip the flooring, GVL is placed in two layers.

Do not lay drywall under the laminate on the wooden floor. Instead, foamed polyethylene or a cardboard backing that absorbs excess moisture is placed on aluminum plates.
Instead of GVL, you can use moisture-resistant grades of particleboard or plywood. A good solution is glass-magnesium sheets, which also conduct heat well, which is absolutely not superfluous when installing a heating floor.
Water flooring options
Flooring under the water floor can be made in a variety of ways, which is especially popular with home craftsmen. Consider several options for such designs.
Option number 1.Implementing a turnkey solution
This is the easiest way to execute. In a hardware store, a flooring kit is purchased. There may be two varieties of such a solution. The first is polystyrene mats equipped with pipe mounts.
They can be duplicated with a layer of insulation. In this case, they can be laid directly on the base. The main advantage of such mats is extremely simple installation. However, they are not strong enough to mount the flooring directly on the mats.
Under soft coatings, as well as under the tile, two layers of GCR will have to be laid. Flooring can also be assembled from modules made of chipboard. On them factory excavations are applied under the pipes with a certain step of the system. The modules are equipped with fasteners, metal heat-distributing plates and pipes.

A lock connection is provided for connecting parts to each other, which greatly facilitates assembly. Such designs are strong enough and do not require additional reinforcement. Their main disadvantage is the high cost.
Any of the ready-made solutions requires careful preparation of the foundation. If it is an old floor, a thorough audit is carried out. Spoiled areas are discarded and repaired. Boards are firmly fixed, elevation changes are removed. Then all debris and dust is removed, and the base is primed.
After it dries, the insulation is laid and fixed, if necessary. The next step is laying the mats. A suitable adhesive is applied to the outside of each of them, usually “liquid nails”, and the plate adheres to the base. It is important that the glue adheres well and holds the mat firmly in place.
If it is planned to lay the flooring from chipboard, it is assembled in strict accordance with the instructions issued by the manufacturer. After the pipe channels are ready, start laying. Laying underfloor heating pipes may be produced by a “snake”, “snail” or any other suitable method.
Elements are connected into a single system and connected to the heating system. Next, pressure testing and testing of the operability of the water floor is carried out, after which they begin to install the floor covering.
Option number 2. Lagging
Work begins with the preparation of a wooden base. If it is an old floor, all necessary repairs are carried out. Then you need to lay the logs, on which a warm water floor under a wooden floor will lie. Prepared lags are set strictly in level with a distance between the elements of the order of 0.6 m.
This is the best option, you can put parts with a large distance. But in this case, thicker boards will be required to form the flooring.

Beams are securely fixed to the base. Then, between them with lags, a base is arranged on which the insulation will be laid. To do this, boards, plywood, chipboard or any other suitable material are knocked to the beams.
If you want to save money, you can nail corners or slats, on which the insulation coating will rest, to the lags instead of the base. But you need to understand that in this case it should be tough and not loose. Insulation is laid on the prepared base. It can be polystyrene, high density stone wool, polystyrene, etc.
After the formation of the insulating carpet, they begin to manufacture the flooring. To do this, take boards with a thickness of at least 0.03 m. They begin to be screwed to the beams.The first is fixed at a distance of 0.02 m from the wall surface, a similar gap is also performed when all other parts are fixed.
An important point is the choice of the width of the boards fixed to the floor. It should correspond to the width of the metal distribution plates, which will subsequently be inserted into the resulting grooves.
The pipe will be laid "snake", which implies the need to perform grooves for its turns. To do this, leave special gaps with a width of about 0.15 m through an equal distance from each other.

In practice, it looks as follows. Two boards are screwed with a distance of 0.5 cm from the wall, the next two - at a distance of 5 - 7 cm. And so on until the end of the row.
On the opposite side of the base, those boards that were fastened against the wall are screwed in at a distance, and those with a gap - close. Thus, a groove is formed under the bend of the pipe. After the entire flooring has been laid, proceed with the installation of the heat distribution plates.
They are inserted into the grooves formed by the boards, and securely fastened with brackets or ordinary nails. It is optimal for the sides of adjacent plates to close.
Then a solid heat transfer screen will be formed. Now you can start laying pipes. It is easier to do this together. One worker will unwind the bay, and the second will deal directly with the laying.
The part with a small effort is as if pressed into the groove of the heat distribution plate. The loopback pipe is best drawn along the wall under the floorboards.
After the entire circuit is laid, check the installation again and connect it to the heating system. Be sure to pressure test the water floor. Then you can begin to prepare for laying the flooring.
Option number 3. Rail construction
Start by preparing the ground. As in previous versions, it should be leveled and strengthened. Then any suitable insulation is laid on the base.
The simplest method of laying a water floor is a "snake", so it is used most often. For a rail construction, this will be the best option. An exact floor plan is drawn to determine the dimensions of the parts.

It marks the areas where the equipment serving the water floor will be installed and the places of pipe supply. Then, with strict observance of the selected installation step, guides are drawn. The number of necessary parts is calculated, and their sizes are determined.
Now you need to prepare the guides. They are cut out of any suitable and accessible material. Then you can proceed with installation. Details must be laid on the foundation in strict accordance with the developed plan.
Each guide is placed on a rough base and securely attached to it with screws. Between the parts there must be channels necessary for the installation of pipes. In sections of the turn of the highway, the sharp corners of the guides must be rounded so as not to accidentally damage the pipes.
After all the rails are fixed to the base, begin to lay the foil. To do this, take a material with a thickness of at least 50 microns. Sheets are pressed into the channels, carefully bending around each recess. Literally “laying out” each channel with foil.
So that the sheets do not budge, they are fixed to the rails using a stapler. For better heat transfer, it is advisable to wrap the pipes with the same foil before laying, but this is not necessary.

Then, a pipe is laid inside the prepared channels.To fix it in place in some areas, it is attached to the slats or to the floor with metal plates. At the end of the installation, the water floor is connected to the heating system and compulsory pressure testing is carried out. If she did not reveal any leakage, proceed to preparation for the installation of the finish coating.
These are only three options for installing a warm floor type. In practice, there are many more. Home craftsmen adapt them to their conditions, selecting available materials and suitable technologies.
With rules, formulas and an example of calculating a floor heating system will introduce next article, which we highly recommend reading.
Conclusions and useful video on the topic
Video # 1. One of the options for a lay system:
Video # 2. Compare concrete and floor water floor:
Video # 3. We lay the water floor on a wooden base:
It is possible to lay the water floor on a wooden base only by the laying method. Concrete screed, even the lowest, it will not stand. The simplest of all options for arranging flooring is the use of ready-made polystyrene mats or wooden guides.
They can be purchased at any store. The only drawback of this solution is the high cost, but the installation is simple and very quick. Lovers of independent work can simply assemble the flooring from improvised materials. It will turn out cheaply and quite efficiently.
Please write comments in the block below. Tell us about how you built a floor heating system in your or neighboring house with a wooden floor. Share useful information, ask questions, publish photos on the topic of the article.
 Underfloor underfloor heating: step-by-step installation instructions
 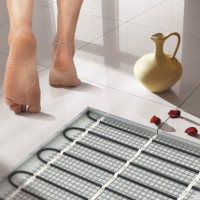 Which warm floors are better: water or electric? Comparative review
  Underfloor underfloor underfloor heating: types, features of choice, laying rules
  Laying schemes for a warm water floor: analysis of the most effective installation options
 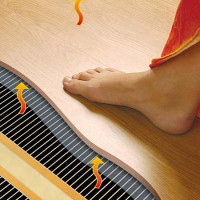 Underfloor heating under the laminate on the wooden floor: which system is better + installation instructions
  Heated floor under linoleum on a wooden floor: step-by-step installation instruction
  How much does it cost to connect gas to a private house: the price of organizing gas supply
  The best washing machines with dryer: model rating and customer tips
  What is the color temperature of light and the nuances of choosing the temperature of the lamps to suit your needs
  Replacement of a geyser in an apartment: replacement paperwork + basic norms and requirements
Everything is described in sufficient detail, but it will be very difficult to make and install such floors yourself and without practice. When you start doing, everything is not as simple as it is written, there are many nuances. Installed together with godfather, took a lot of information from here. We regretted that we had not consulted any specialist live, would have spent less time and effort on the installation.
Michael, but this is the essence of such publications that you can learn in detail about the standard process if you want to do it yourself. It is clear that everything cannot be predicted, but if you call a specialist, he already needs to pay, then there will come an understanding that you cannot do what the master advises, let him do it. So, the principle of maximalism works here: either themselves or the master.
You would know how many people have to finish or remodel these warm water floors. People generally rarely adequately assess their strength in repair.
After laying the underfloor heating system, is it necessary to lay, for example, plywood under the laminate?
Hello. No, it doesn `t need. It is necessary to fill the screed.