The furnace for working out of the pipe: how to make an effective furnace for used oil from improvised materials

For a motorist, drained oil is ordinary waste, and for a good owner, affordable and valuable fuel. For example, you can build a furnace for working out of a pipe and use it to heat a garage or other utility room.
You must admit that such a solution is economically advantageous, since it results in double savings - on the purchase of fuel and a heating unit. Do you want to build a stove for working out, but you doubt that it will turn out to be implemented? We will help you in this matter.
The article describes the construction of the unit, as well as a step-by-step work plan with a detailed description of each assembly phase. Following the instructions, you can personally build and commission the stove.
The content of the article:
Features of the device of the stove
The design of the furnace is not much more complicated. ordinary potbelly stove.
The device includes the following main elements:
- lower chamber for fuel;
- perforated pipe;
- upper chamber;
- chimney.
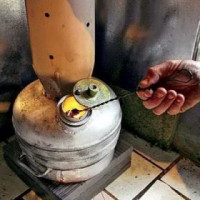
You will also need auxiliary parts, such as a protective nozzle for the chimney, a device for safe refueling, a reinforcing belt, etc. The used oil is poured into the lower chamber and set on fire. Here it burns partially at a relatively low temperature.
Then the heated oil vapor and gases from its combustion rise up the perforated pipe. Here they are saturated with oxygen and enter the upper tank. During the afterburning, such fuel gives a lot of heat. Be sure to make a vertical chimney.
Work order
When figuring out how to make a furnace on waste oil from a metal pipe, one must take into account the high combustion temperature of this specific fuel. It will take a fairly thick metal. It is convenient to use sections of a metal pipe as a housing for combustion chambers. This is easier than making a square metal case.

But sheet metal is needed for the manufacture of other structural elements. Do not do without a welding machine and other tools. The metal parts should be quite thick, about four to six millimeters.
There are many ready-made drawings, according to which you can make an effective furnace for development. It is not necessary to follow them to the millimeter. It is enough to find a pipe with thick walls and about a suitable diameter.

But the proportions must be observed. Combustion chambers are wide and short, and the pipe connecting them is narrow and long. The closer to the place of fuel combustion, the thicker the metal should be. To connect the chambers and the chimney pipe, a 100 mm pipe is suitable.
Step # 1: making a fuel tank
They usually begin with a lower tank. This is perhaps the most complex structural element, since it needs to make a cover.
The work is performed as follows:
- A piece with a height of 100-115 mm is cut from a wide pipe.
- Cut out two circles for the bottom and cover, the second should be a little larger.
- The bottom is welded to the walls.
- In the upper circle make a hole for the pipe with holes.
- A strip of metal is cut, the width of which is 60 mm, and the length is equal to the circumference of the walls of the housing.
- The strip is welded to the second metal circle, the lid is ready.
All welding work must be done carefully, the seam should be smooth and completely tight. To make the cover correctly, it is better to wrap the strip of metal around the bottom of the chamber and secure it with clamps. After that, a vertical weld is performed.

The resulting ring is removed from the housing. Now you can weld a metal circle with holes to it to make a lid.
Here you need to make another hole for pouring fuel with a diameter of about 100 mm or a little less.

It will take a movable metal cap to fill the oil and regulate the flow of air that is needed for combustion.
Step # 2: installing the perforated pipe
The optimum length of this element is 360 mm. They retreat from the bottom edge by about 20 mm and begin to drill holes of 9-10 mm. In one row, 8 holes are made at an equal distance. The next row is done with a shift, so that the perforation was staggered.

It is enough to make six rows, but more can be done. Near the upper edge, leave about 50-60 mm of solid metal. It is better to chamfer the edges of this pipe, so it will be easier to weld.
The number of holes should not be too large, otherwise heat will escape through them, and the amount of air with which oil vapor is mixed will become too large. If the holes are not enough, it is not difficult to make additional ones.
Step # 3: upper combustion chamber device
Now you need to make the afterburner. To do this, cut another piece about 110 mm high from a wide pipe. For the bottom, a steel circle of 4 mm is made, but a six-millimeter metal is placed on top. Then make holes for attaching the perforated pipe and for the chimney.

Inside you need to put a small divider of six-millimeter metal measuring approximately 60 by 7 mm. It is welded near the hole for the chimney. Such an obstacle will slow the movement of gases along the afterburner to leave more thermal energy in the room.
It remains to attach the circles to the walls of the combustion chamber. It is more convenient to weld the upper part first, it is heavier, then put a rectangular jumper, then the lower part.
Step # 4: final assembly of the unit
When all the elements are ready, it's time to assemble the device. First, the perforated pipe is welded to the bottom of the afterburner. The pipe should stand strictly upright; its position should be verified using a level.
Then they grab the pipe to fix the correct position. After that, a weld can be made. Then, in the same way, a flue pipe is welded to the corresponding hole.
The assembly technology of the chimney for the furnace at the return is similar to the arrangement of the chimney for a stove, for more details, see this article.
Now the fuel cap is attached to the structure. The legs should be made below, they can be cut from the corner. After that, the stove can be considered finished.
How to improve the design?
The efficiency of such a device can be significantly increased if you add some elements. To make the fuel chamber as airtight as possible, you need to weld a round bar to its lower part.

It is placed where the vertical edge of the lid ends. As a result, even a small gap between the container and the lid will be closed.
The problem that you need to think about in advance is topping up fuel. If such an oven has already been ignited, then it is impossible to add the used oil directly to the chamber through the hole. It is necessary to wait until the existing portion of oil burns out.
This is not always convenient, so it makes sense to create an additional fuel tank. This is a small container of arbitrary shape, which is mounted next to the lower chamber of the stove. From below, you can weld two corners to the bottom of the fuel chamber and an additional tank.

In addition, you will need a small tube. On the bottom panel of both tanks, holes are made for this pipe, and then it is welded.
So the fuel chamber and the additional tank turn into communicating vessels. On top of the tank you need to attach a removable cover. This will allow you to determine the fuel level in the main tank and safely add oil when necessary.
The perforated pipe is not mounted on the lower tank in the center, and this makes the structure a little unstable. To strengthen it, you can simply weld a parallel metal rod to the upper and lower chambers.
Such furnaces are usually used for garage heating and other similar rooms, therefore they are not expected to have a particularly aesthetic appearance. But still it makes sense to clean the surface and cover it with heat-resistant paint for metal. This will reduce the effect of corrosion processes and extend the life of the device.
A useful addition is a protective screen, which is installed between the primary and secondary tanks. It will help to avoid overheating of the fuel during the operation of the stove, especially if it is intended to be used for a long time.

Another good advice does not apply to the stove, but to the condition of the room in which it is supposed to be used. You should take care of insulation.
Although used oil is almost free fuel, the less it takes to heat an object, the easier it is to use a stove. Of course, it is better to carry out the insulated from the outside of the garage, for these purposes it is well suited extruded polystyrene.
Installation and test ignition
The place for installing the stove must be selected as far as possible from objects and materials sensitive to heat. The device is really very hot. If handled improperly, it can damage property and even cause a serious fire.
There should be a non-combustible base under the device. Do not put such a device in places of active movement of air currents. Under the influence of a draft, the flame can blow out, and this is dangerous. Ready and installed in a suitable place, the oven is connected to a vertical chimney.
Then carry out trial ignition. To do this, pour oil into the fuel tank, and add about 100 ml of liquid for fireplaces or other similar composition from above. At first this liquid will burn, but soon the oil will boil, the device will begin to make noise. This means that the furnace is made correctly, it can be used for its intended purpose.

The oil must be defended for some time before being poured into the tank so that unnecessary impurities settle down and do not get inside. Only two-thirds of the capacity should be filled, then the primary combustion process will be more efficient and safe.
From time to time it is necessary to clean the inside of the fuel tank from accumulated contaminants. The lid is removed and the remaining oil is simply drained, deposits are removed, etc. From time to time you need to tap a perforated pipe and chimney to remove collected soot and soot.
Conclusions and useful video on the topic
An interesting option entirely from a narrow pipe:
The working-out stove is a simple and quite effective device. When making it, you need to adhere to the basic proportions, and during use do not forget about safety.
Have experience manufacturing a waste oil stove? Please tell readers about your method of assembling a heating device. Comment on the publication, participate in discussions and add photos of your homemade products. The feedback block is located below.
 How to make a potbelly stove on waste oil with your own hands: a review of the best homemade products
 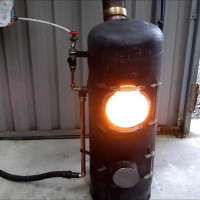 How to make heating on waste oil with your own hands: schemes and principles of arrangement
 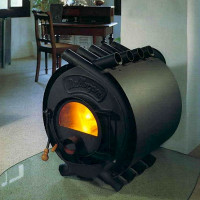 How to make a Buleryan oven with your own hands: step-by-step instructions on how to make
 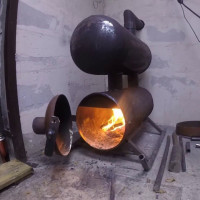 DIY garage oven: an overview of the best homemade options
  DIY miracle oven for a garage in a diesel fuel: step-by-step instructions for the construction
  Do-it-yourself gas bath stove: manual for the installation and installation of a gas stove
  How much does it cost to connect gas to a private house: the price of organizing gas supply
  The best washing machines with dryer: model rating and customer tips
  What is the color temperature of light and the nuances of choosing the temperature of the lamps to suit your needs
  Replacement of a geyser in an apartment: replacement paperwork + basic norms and requirements
And what is the efficiency of this miracle unit? I'd love this to my garage, but my hands are growing from the wrong place. Has anyone come across similar appliances on sale?
Of course there are such stoves on sale. A lot of homemade products of fairly good quality on Avito and similar sites, and factory ones are on sale in stores. Brands Multeat, Polarus, Borzo, maybe some more are. But you need to understand that store-bought ones will cost decently more expensive than home-made products, and the main advantage of such a furnace for working off is its low price. Efficiency varies depending on the design, but, in general, is high.
Hello. As correctly noted in the comments above, there are such stoves on sale. But if you want to save money, you can buy a stove from a private trader. Sometimes they sell products that were not required and were not in use or home-made.With b / y, of course, you should be careful, the safety of the elements should be checked carefully, however, as with homemade products. Of course, the warranty period most likely will not be, but the price is half as low. Here it is up to you to decide. In our city there is a craftsman who cooks stoves from cylinders and sells, he has a proven reputation, they buy without fear.
The efficiency of such furnaces is usually from 75%, depending on the design, but it should be noted that the efficiency is more an abstract concept. The heating power also depends on such factors as the area of the room, its insulation and so on. That is, a stove can create a steam room in one room, and in another it can be completely useless, so warm your hands. The choice is based on these factors, do not forget to consult with the seller when buying and check the device.