Replacing the nozzles in the Hephaestus gas stove: a detailed guide for replacing nozzles

Have you noticed yellow flames while the burner is on? Soot began to appear on the dishes? And you absolutely do not understand what is happening? The problem is widespread, it is solved simply. We will tell you how to replace the jets in the Hephaestus gas stove and discover the technological details.
In the article presented by us, you can familiarize yourself with the principle of operation of gas equipment, as well as with the purpose and specificity of the device nozzles. To understand what causes the problems, we’ll figure out what the jets are for. Consider what nozzles are.
Our recommendations will help you to easily change gas supply devices for the cooking process. You will learn how to care for household equipment. After reading, you will be able to independently assess the situation and understand whether it is worth changing or better to just clean it.
The content of the article:
The principle of operation of the gas stove
From the gas main or from the cylinder under the action of pressure, gas is supplied to the gas pipeline, which is an integral part of the gas stove. Further, the fuel passes through the nozzle, enters the burner body, where it mixes with air and only then ignites, passing through the dividers.
The main gas differs from the balloon gas in pressure parameters - this is the main and most common reason for the replacement of nozzles. In other cases, most often you can limit yourself to simple maintenance, without resorting to replacement.
What is a jet?
The jet is one of the main components of a gas stove. It provides the supply of blue fuel to the burner in sufficient volume and the required pressure. Without a nozzle, a gas stove would not have been possible at all.

By its shape, the nozzle resembles a bolt, in the head of which a passage hole is arranged.The diameter of the hole must correspond to the pressure of the supplied fuel and the power of the burner.
It must be taken into account that the pressure of the main gas and the cylinder is significantly different, therefore the diameter of the nozzle for these types of fuel will be different.

To ensure the most efficient operation of the stove, to eliminate the allocation of harmful products, smoking factor, to normalize fuel consumption, it is necessary install nozzlesThe sizes and diameters of the outlet openings correspond to the requirements of the manufacturer of the gas stove.
Types of jets and their main characteristics
Hexagonal nozzles or nozzles with external thread and longitudinal internal bore. The vast majority of them are made of bronze.

On the end part there is a marking that displays information about the nozzle throughput. Units - the volume of gas in cubic centimeters that the nozzle can skip in 1 minute.
The jets can be of two types - for natural gas (characterized by a large hole diameter and a shortened body), for liquefied gas (characterized by a smaller hole diameter and an elongated body, which is associated with higher pressure).
The pressure in the cylinder exceeds the pressure in the gas line, this explains the smaller diameter in the head of the corresponding nozzle. The power of the burner is determined by its size, therefore, the diameters of the holes in the corresponding nozzles will be different.
The diameter of the hole in the nozzle should correspond to the gas pressure:
- Large burner - 1.15 mm (20 Bar); 0.6 mm (50 bar); 1.15 mm (20 Bar); 0.75 mm (30 Bar).
- Medium burner - 0.92 mm (20 Bar); 0.55 mm (50 bar); 0.92 mm (20 bar); 0.65 mm (30 bar).
- Small burner - 0.75 mm (20 Bar); 0.43 mm (50 bar); 0.7 mm (20 bar); 0.5 mm (30 bar).
- Burner in the oven - 1.2 mm (20 Bar); 0.65 mm (50 bar); 1.15 mm (20 Bar); 0.75 mm (30 Bar).
It must be taken into account that the incorrect operation of the nozzles can be caused not by a change in the type of fuel, but by a banal clogging of the outlet. In this case, you can clean the nozzles without resorting to replacing them.
Nozzle cleaning technology
Occasionally have to change nozzles or clean them. The recommended frequency of the procedure is once a year.
Clogged nozzles impair the quality of the flame, leading to a decrease in the amount of heat generated. In addition, fuel consumption increases, which is undesirable for owners of liquefied gas equipment. The said fact will not suit the homeowners with installed gas meters.
To clean the nozzles you will need:
- Universal remedies - soda or vinegar, dishwashing detergent;
- Dishwashing detergent;
- Toothbrush;
- Thin wire or needle.
Work begins with the removal of soot, soot and grease from the area of the nozzle. The nozzle must be unscrewed and soaked in a detergent, in a solution of soda or vinegar.

The outside can be brushed with a toothbrush using a normal household cleaning powder. The nozzle bore should be cleaned with a needle, sometimes purging with a pump or compressor is justified.
The cleaned and dried nozzle must be replaced. It should be noted that if there is a gasket under the jet, it must be replaced.
Injector Replacement Instructions
If cleaning the nozzles does not give results, or you decide to switch from one type of blue fuel to another, then replacing the nozzles is simply necessary. Keep in mind that universal nozzles do not exist. Each model has its own characteristics.
Therefore, if the task is to re-equip the Hephaestus plate, then you need to buy a set of jets just for the unit of this brand. You can purchase such a kit in almost any specialized gas equipment store. If not available, you can always contact the official manufacturer or his representative.
Preparing the plate for nozzle replacement
Preparations for the replacement of nozzles in the Hephaestus gas stove begin with shutting off the main gas supply tap or shutting off the valve on the cylinder. Next, remove the grill and remove the burners. All these works are simple and do not require any tools.
If you look inside the holes that opened after removing the burners, then we will not see the jets themselves. This is due to the structural features of the plate. In most modern models, it is much easier to get to the jets. But in our case, everything is a little more complicated - it requires the dismantling of the plate table.

To dismantle the table, you need to unscrew the screws with a Phillips screwdriver. In various models of Hephaestus plates, the number of screws can be different. But they are all on the top of the table, in front and back of it. After unscrewing the screws, the table simply rises.
Sometimes, due to the ingress of fat, the table is not so easy to remove, it seems that it has become attached to the body. In this case, it should be pry off with a screwdriver or a strong knife. After removing the table, the case and the table itself must be thoroughly cleaned of contaminants.
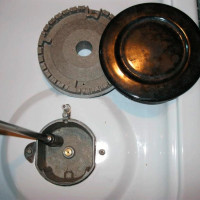
After removing the cover, we will see two metal strips, which are a kind of guides and are called traverses. The housings of each of the four burners are attached to the traverse.
All nodes have the same device. The only difference is the length of the pipeline through which gas is delivered to the tip and from there through the nozzle it enters the burner.

The burner body is rigidly attached to the pipeline, ensuring the reliability of the entire structure. The device is not complicated, but it needs to be understood so that in the future there will be no problems with the dismantling of nozzles and their subsequent installation, as well as with Hephaestus plate repair if necessary.
How to remove the jet?
There is an opinion that you can change the nozzle in without removing the table. This requires only a special tubular wrench. Yes, this is possible, but only in modern models with other design features.

If you look carefully at the design, we will see that in our stove the piping tip is fixed in the burner body, so you cannot get to the nozzle without removing the table.
What keys are needed to remove the jet?
An 8 mm open-end wrench fits the nozzle head; you can try just turning the nozzle out. But this is a futile undertaking, usually the nozzle sticks during operation so that the tip simply turns around the pipeline.
It begs the desire to fix the nut of the tip with another 14 mm wrench. The train of thought is logical and correct, but this is impossible, since the burner body becomes an obstacle.
How to separate the nozzle with nozzle from the burner?
To gain access to the nut of the tip, it is necessary to release the tip itself from the burner body. The only obstacle is the latch in the form of a curved plate.

Simply squeeze the plate and pull it with a little effort. After removing the retainer, simply press on the pipe, so that the tip just goes down, easily leaving the burner body.
Ways to extract a jet
There are two ways to remove the nozzle from the tip. In the first case, it is enough to hold the tip nut with one key, and turn the nozzle out with the other. If for some reason it is not possible to easily turn out the nozzle, then you can resort to the second method.
It is more comfortable to work if the nozzle with the tip is in the hands and not fixed on the pipeline. Simply pull the tip towards you and it will free itself from the pipeline. Now you can greatly facilitate the work. The tip nut can be clamped in a vice and the nozzle can be easily turned out without fear of damaging the pipeline.

Each of the nozzles for the Hephaestus gas stove, like any nozzle for any other brand and model of the stove, has its own marking. Therefore, it is not necessary to remember the location of the nozzles when removing them from the tips. There will be no problems with subsequent installation.
Piping O-rings
The design of the nozzle and its connection with the tip does not provide for the use of any sealing tapes. However, a gas leak guard still exists. It should be noted that after removing the tip from the pipeline, the rubber ring usually remains inside it.

So that it does not get lost during the removal of the nozzle, it must be removed from the tip and installed on the pipeline. If the nozzles are already being replaced, then it is advisable to purchase a set of rings with them in order to carry out their replacement too.
Jet Installation Procedure
After completing work on removing the nozzles from the tips, you can immediately proceed with their installation. All work is performed in reverse order.
First, use the key to screw the nozzle into the tip. After that, put the tip on the pipeline, lift it to the burner body and install it, while returning the retaining plate to its original place.
On this, the replacement of the jets in the burners of the gas stove can be considered complete, it remains only to reinstall the table and fix it with screws.
Replacing the nozzle in the oven
As well as in the case of the replacement of nozzles in the burners, you can not do without preparatory work. Getting to the jets in the oven is also not so easy. And if in the case of burners we had to dismantle the table, then to replace the nozzles in the oven we need to either disassemble the floor, and in the difficult case, remove the left side wall.
Let's go in order - the nozzle is located in the nozzle body behind the plate wall on the left side. To get to it, you need to open the bottom drawer lid, fully open the oven door and pull the floor toward you - it should easily come out.
Replacing the nozzle from the oven
The oven burner is a curved tube fixed with two screws that need to be loosened. The nozzle is located inside the nozzle body.

If it is not very attached, then it can simply be turned out using a pipe wrench and set a new one in its place.
Replacing the nozzle after dismantling the oven wall
If it is not possible to turn out the nozzle, then you need to unfasten the left side panel, fixed by three vertically located screws. After dismantling the wall, we will gain access to the pipeline secured with a nut.
From this position, you can try to grab the jet with an open-end wrench and try to unscrew it. If here it is not possible to cope with the removal of the nozzle, then you need to unscrew the nut, unscrew the two screws and separate the housing with the nozzle from the wall of the oven.

Now the sticky jet can be removed from any convenient position. It is best to process the threaded connection with some universal tool (for example, VD-40), leave it for a few minutes and only then turn the nozzle out.
It remains to install a new nozzle in the nozzle and perform work on fixing the housing to the wall of the oven and assembly in the reverse order.
Conclusions and useful video on the topic
Replacing the jets in the Hephaestus gas stove:
Jets are the main element of a gas stove; they are responsible for the pressure and volume of incoming fuel, providing an optimal combustion mode.
In Hephaestus slabs it is not so easy to replace the jets as in modern models of more popular manufacturers. However, with strict adherence to the operating instructions, they will not cause particular difficulties. And any person can do the replacement; special knowledge or special tools are not needed here - enough care, accuracy and observance of elementary rules.
Tell us about how you changed the nozzles in the plate with the Hephaestus logo with your own hands. Share the nuances of the process known to you. Please leave comments in the block below, ask questions, post thematic photos.
 Replacing the nozzles in a gas stove: purpose, structure and detailed instructions for replacing nozzles
  How to ignite an oven in a gas stove “Hephaestus”: ignition rules and the principle of operation of a gas oven
  Thermocouple in a gas stove: principle of operation + instruction on replacing the device
  How to connect a gas cylinder to a gas stove: standards and connection guide
 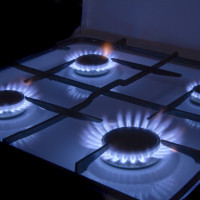 Remaking a gas stove for bottled gas: how to rearrange nozzles for working on liquefied fuel
  How to increase the power of the gas burner and improve the flame on the stove: an overview of popular ways
  How much does it cost to connect gas to a private house: the price of organizing gas supply
  The best washing machines with dryer: model rating and customer tips
  What is the color temperature of light and the nuances of choosing the temperature of the lamps to suit your needs
  Replacement of a geyser in an apartment: replacement paperwork + basic norms and requirements