Repair of gas stoves Hephaestus: the most common breakdowns and methods for their elimination

Call a professional gasman to repair the slightest malfunction of the stove is inconvenient, agree? You need to meet him at home during business hours, often - wait for your turn, and even pay for work and a call to your home. So isn’t it better to learn how to repair Hephaestus gas stoves yourself?
After reading our article, you will be able to repair the stove yourself and carry out preventive maintenance so that the kitchen assistant works like new. We will tell you how to disassemble a gas stove yourself, we will name the most frequent breakdowns. For the same malfunctions that you can fix yourself, we will give detailed repair instructions.
The content of the article:
How to get to the internal equipment?
For self-repair and access to all the details you have to learn disassemble a gas stove Hephaestus, but in most cases it will be enough to remove or raise the table.
It’s not difficult to figure out how to remove the top cover from the Hephaestus gas stove:
- Remove the hotplates. Fold them in the same way as they were located on the stove, so as not to confuse the two average power and not to guess when assembling.
- Unscrew the screwswith which the table is fixed. Most often there are two of them - under the front burners, but on some models they are placed on the front side. It may also be 2 screws under each burner.
- Gently lift the table topso as not to chip enamel. If it still does not give in, check for self-tapping screws on the side surfaces.
- Place an emphasis under the raised table. If the table is completely removed, lay it side by side horizontally so as not to damage the enamel or glass from falling.
It often happens that one of the bolts is stuck and does not lend itself. In this case, bend the washer and cut off the head of the self-tapping screw with a hacksaw.

To repair handles and control buttons, access to gas taps, you may need to remove the front panel. It is usually fixed with two bolts from the bottom or sides, but on some models it is fastened to the latches. Note that the front panel is removed with the top cover raised and the gas enable flags removed.
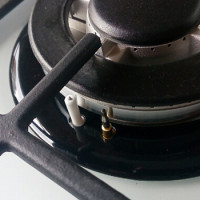
The oven burner is closed by a pan. If you put it forward, you will have access to the burner itself, the gas control sensor and the piezo-ignition candle.
Repair of electric ignition of a plate Hephaestus
If you turn the knob, hear a characteristic hiss, press a button, and the gas does not light up - it means there is a problem with the electric ignition of the Hephaestus gas stove, and you can try to fix it yourself.
If characteristic clicks are heard, then somewhere the system is triggering, there is no spark only on the burner used. If there are no clicks, then the button or the block-generator of electrical impulses is broken.
One burner electric ignition does not work
It happens that characteristic electric ignition clicks audible, and one of the burners still lights up only from a match, so the problem is in the candle or wire from it.
First of all, check the condition of the candle - it can be covered with a layer of dirt and grease.

A layer of fat with dust on a candle can act as an insulation that a spark cannot break through. Try to thoroughly wash the candle by removing the burner, and finally - degrease with alcohol or acetone. Pat dry with a paper towel or toilet paper, let it dry completely, put the burner back in place and check that it works.
If cleaning does not help, you should look for the problem further. Lift the stove table and inspect the wire that goes from the candle to the generator block, while trying to press the auto ignition button. Perhaps the wire touches the foil on the heater insulation, or pipes, and a spark breaks out in this place? It will be better seen in the dark or dusk - close the window, turn off the light.
If there is a spark somewhere other than a candle, wrap electrical tape around this place and move the wire so that the spark is only on the candle near the burner.
If this does not help, carefully inspect the candle over its entire height: maybe the ceramic insulation cracked on it, because of which the spark jumps lower than necessary? If so, replacement of this part will be required. Before doing this, be sure to unplug the stove.

To remove the candle, remove the rubber gasket from it, squeeze and pull out the crocodile clip under the candle, and then find and remove the corresponding wire from the generator block. After purchasing a new part, repeat the steps in reverse order.
Electric ignition does not click
If no burners light up from the button, there are no characteristic clicks or the button is not pressed, it is not a matter of candles. In the latter case, it is obvious that the button will need to be cleaned or replaced; if there is no such certainty, you need to check the unit's functionality.
To do this, do this:
- Unplug the stove from the outlet, raise the table and find the unit to which the wiring from the candles and the auto-ignition button go.
- Remove all wires from its connectors, remove from the mount (bolts or latches).
- Insert two long connectors on the edge along a long length of cable, and into the remaining jacks, pieces of wire of the same length, stripped of insulation on both sides.
- Place the free ends of the short wires in a row or square, at an equal distance from each other.
- Plug the long end of the wire into a power outlet.
Sparks between free ends and rhythmic discharge sounds should appear.If so, the block is working, the problem is in the button or wiring. If not, take it for a sample and go to the store for a new one.
When connecting, the main thing is not to confuse the other two power wires with the rest. Usually the plug on them is thicker, and the connectors for them are at the edge of the block. Burner wires can be interchanged. If the unit is working, the problem is in the button or wiring.

Wash the button well first - it often sticks and stops working due to the accumulation of fat under the skirt. It is convenient to use a spray of fat, or remove the button from the panel.
Read more about why piezo ignition on a gas stove does not work. read on.
Gas Control Failures
Such a breakdown often introduces hostesses into a stupor: a burner or oven is ignited as usual by turning and pressing a knob, but goes out as soon as you release the knob. The gas control system automatically shuts off gas if the burner goes out or the knob is turned, but not pressed - to protect against children.
Usually it is enough to keep the handle pressed for 3-5 seconds, the manufacturer recommends 10-60 seconds to be sure. If even after a minute of holding the handle, the burner goes out, then the leakage protection system is malfunctioning.
Gas control can only be installed in the oven or on all burners. The tip of the thermocouple is brought out near the burner, it is metal and quite thin, it quickly warms up from the burning gas. Heat from it is transmitted through a copper tube to the gas control sensor installed in the faucet behind the burner control handle. As soon as the heat ceases to flow, the sensor magnetic valve opens, shutting off the gas supply.
It happens that the gas control sensor does not work on the practically new Hephaestus stove. The reason is simple: at the factory, the nut for fastening the thermocouple to the sensor in the gas supply valve to the burner was slightly tightened.

Open the cooker table, find where the copper tube is attached to the faucet (behind the burner control handle) and tighten this nut all the way.
Over time, on the sensor thermocoupleslocated near the burner, soot and scale may form. As a result, it heats up more slowly and does not work correctly. It’s easy to fix the problem - clean the sensor with a thick cloth or null sandpaper. Coarser material is not recommended: if there are scratches on the candle, the next time it will clog faster.
The reason why the oven immediately goes out in the Hephaestus gas stove is usually also due to problems with the thermocouple, but another option is possible in the oven.
The oven burner is large, and the sensor is located at its very edge - at the first gas nozzles. It happens that the flame does not reach the sensor, or it warms up too weakly. Try bending the sensor with a screwdriver, or unscrew the fastening screw and push the thermocouple forward a little.
When none of the 3 proposed solutions helps, the thermocouple needs to be replaced. It is fastened with a nut on one side and a clamp on bolts on the other. After removing the defective part, be sure to take it with you to the store - for a sample.
Usually a thermocouple is inexpensive, but if you are ready to give up gas control on this burner, there is a free solution: connect directly, bypassing the sensor.

To connect directly, do this:
- turn off the gas;
- unscrew the thermocouple - a copper tube from a gas tap with a sensor;
- with a key 17, unscrew the sensor housing from the back of the crane;
- the sensor looks like a plug with a rod on a spring. Lock it and insert it into place;
- screw the sensor housing into place, tighten. Screw in the thermocouple;
- open the gas in the riser, check for leaks with soap suds.
Errors in the assembly of the valve threaten with a gas leak and the possibility of an explosion - be careful and be sure to check the gas valve for leaks after assembly.
Burners burn weakly
It happens that no matter how you turn the knob, the burner burns only at minimum power. If you do not take any measures, over time it may stop burning completely. Most likely, the reason is that the nozzle supplying gas clogged.
Runaway food rarely gets into the nozzle, because during cooking it is protected by the upper part of the burner. Most often, cleaners, especially those based on soda, become a clog.
Cleaning the nozzle is easy enough: first you need to remove the top of the burners and raise the table, in some cases it may be necessary replacement of nozzles on the stove. The burner nozzle is a small part, the top of the gas pipe, with a thin hole in the middle.
This hole must be carefully cleaned. This is best done with a toothpick. It is not recommended to use metal objects for cleaning, so as not to damage the hole.

In order for the cleaned dirt to fly out and not wake up in a gas pipe, we recommend that you periodically open the gas supply to this burner - literally for half a second, but at full power. For safety, you need to open a window or turn on the hood.
You can read more about how to increase the power of a gas burner. in this material.
Problems with burner knobs
Gas handles on the burner are one of the most necessary parts, without them it is impossible to use the stove. Behind the outer flag with the skirt that you turn, there is a gas tap, into which a gas control sensor can be integrated.
Electric ignition, built into the handle, is rarely found in Hephaestus stoves - it is usually brought out with a separate button.
Over time, the handles may stop turning, begin to jam or scroll. What to do with it, we will tell further.
The handle pushes and rotates poorly
Such a problem is not uncommon, if you start it, the handle may completely stop turning. The cause is usually the fat that has accumulated between the flag, skirt and the front panel of the plate.
Hot, it splashes during cooking and easily flows into all the cracks, and then cools, thickens and turns into a kind of glue.

To get rid of the problem, the flag with the skirt needs to be removed from the stem and washed thoroughly. The handle needs to be pulled over - it is simply tightly mounted on the rod, without latches or other clamps. For convenience, you can grab it with pliers, preferably through a non-slip rag, of those that are sold for cleaning.
The skirt usually flies itself after handle removal, but if it does not rotate with a flag, it can be fixed with a latch. In any case, you can pick it with a knife. Remember its position, so that during assembly the latches close to the panel or to the flag.
In many models, the handle has a reinforcing metal plate, do not lose it. Having washed all the parts, as well as the front panel under the handle, put everything back in place. Remember to insert the spring if you had one.
Checkbox scrolls or jumps
Such a problem is rarely found in Hephaestus plates, but it still happens. The reason usually becomes that a metal plate has dropped out of the flag and is lost, which clings to a recess on the rod.
You can cut such a plate from a metal lid for preservation and insert it into a special groove, or buy a new flag.If on your model the handle is completely plastic and its inside is lapped, only buying a new one will help.
The handle pivots tight
It happens that even after the flag with the skirt is perfectly washed, the handle still turns tight. The reason is that grease has developed on the gas taps.

If you decide to lubricate the gas taps yourself, buy a special graphite grease for this. Shut off the gas supply to the stove. Then remove the handles and the front panel - how to do this, we described above.
In Hephaestus plates, the stem is fixed in the tap with a flange connection, in order to remove it, it is enough to unscrew the 2 bolts on the sides. Wash the stem immediately from grease and dust.
Then the spring and the plug of the crane are removed - the latter and needs lubrication. This is a cylindrical part with a through hole and a saw cut on its side, through which gas is supplied to the burner. Lubricate the cork very little, the layer should be invisible, but palpable to the touch. It’s more convenient to put a little grease on your finger and rub the cork.
After assembling the crane, do not rush to reinstall the front panel. First, put a flag on the stem without it, open the gas and apply soapy water to the tap. If no bubbles appear anywhere, wipe dry and assemble the stove.
How to fix the Hephaestus stove timer?
You can only remove and repair the mechanical timer yourself, it is better to consult a specialist with an electronic one. The alarm mechanism looks like a big metal tablet.
To get it, remove the handle, lift the plate table and unscrew the fasteners. Then open the timer housing, blow and brush off the dust with a brush, grease the pendulum and gears.

Try turning the knob while starting the timer. Started ticking? So you can assemble and install in place. No? Try to take it to a watch repair shop, or buy a new one.
Oven door
Most often, there is only one claim to the oven door: it does not close well. A well-adjusted door should be slammed to hold a sheet of paper.
Otherwise, the gap is too large, which means that heat loss will be higher, dishes will be cooked unevenly, and the top panel and plastic handle will turn yellow. Problems can be prevented by timely repairing and adjusting the Hephaestus gas stove oven door.
The manufacturer uses 2 types of hinges for fastening the oven door - on the latch, collapsible, or solid, screwed on.
The first ones are easily removable: it is enough to lift both latches, close the door and pull up and slightly towards yourself. Then the door can be conveniently washed, or immediately returned to its place, already in the correct position. After inserting the door into the grooves, pull it up a little, and then fully open and lower the latches.
To adjust the door on one-piece hinges, the screws securing them to the door must be loosened, but not completely unscrewed. Then loosen the door so that the hinges snap into place and tighten the screws.

In addition, over time, it may be necessary to replace the rubber seal - it dries up and cracks due to temperature. It is fixed on hooks, held under tension, so the only problem that may arise is the search for a suitable new gasket in stores.
In addition to repairing the door, it may be necessary to remove the glass in order to wash it from the inside or replace the broken one. The outer glass at the bottom is inserted into the metal guide, and on top is pressed by the door handle. To remove it, it is enough to unscrew 2 or 3 screws holding the handle on the oven door - just hold the glass so that it does not break.Do not forget to wash and dry the handle itself, otherwise drips from it will stain the glass during the assembly process.
The inner glass attaches differently, depending on the size. Small on top and bottom are bolted with large washers. To remove the inner glass, which occupies almost the entire door, you need to unscrew the fasteners on the lower end of the door.
Conclusions and useful video on the topic
We suggest watching a video on how to eliminate the most common malfunctions of the Hephaestus plate.
Cleaning the gas burner nozzle:
How to disassemble and wash the handles on the front panel:
Now you know more about your stove and its repair, and you will no longer call the gasman for every little thing. However, we recall that any repair associated with the dismantling of the gas pipeline — lubricating the faucets, replacing burners or nozzles, replacing the gas control sensor in the tap — is best left to a professional.
Did our article solve your problem? Perhaps you encountered other malfunctions of the Hephaestus plate or repair methods? Write your stories and questions in the comments.
 Repair of a gas stove Gorenje: frequent breakdowns and methods for their elimination
 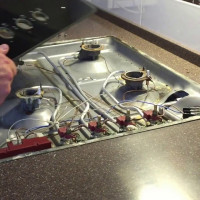 Do-it-yourself gas stove repair: common malfunctions and how to fix them
  Do-it-yourself marching gas burner repair with piezo ignition: common breakdowns and their elimination
  Malfunctions of the Darin gas stove: frequent breakdowns and methods for their elimination
  Why the burner does not work on the gas stove: common causes and methods for eliminating them
 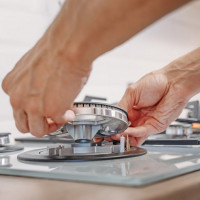 Why piezo ignition on a gas stove does not work: causes of breakdowns and methods for their elimination
  How much does it cost to connect gas to a private house: the price of organizing gas supply
  The best washing machines with dryer: model rating and customer tips
  What is the color temperature of light and the nuances of choosing the temperature of the lamps to suit your needs
  Replacement of a geyser in an apartment: replacement paperwork + basic norms and requirements
Is it possible to interchange the burners (flame diffusers)? Gefest cooker 3100-07.
Hello, Alexander. Firstly, it’s not possible to simply take and change the flame dividers on the Gefest 3100-07 stove in one motion. Since they have different diameters and accordingly different distances of the holes for the piezoelectric elements. For a good example, I’ll attach the photos so that you understand what it is about.
You will have to remove the lid and change the position of the burners on the gas stove, unscrewing each individually which you want to replace. But here another problem arises - each burner on the lid has its own connector, which imposes restrictions.
In this case, you will have to look for a cover with a suitable arrangement of burners, choosing among other models, but not the fact that they will work. Conclusion - one cannot just take and change flame dividers on a Gefest 3100-07 stove; the task is feasible, but it takes a lot of time.
After cleaning the gas burner nozzle, the problem persists. Maybe nozzles of different diameters are installed on each burner?