DIY gas torch from a blowtorch: a manual for the manufacture and operation
Today, the transition to blue fuel is trending. Gas is used in the internal combustion engine of cars instead of gasoline and diesel. He replaced firewood and coal in heating boilers. It’s worth a try translating propane-butane and a hand tool, right?
Let the first in the arsenal be a gas burner from an injection-type blowtorch. She will keep all the functionality of the "donor". Along with the provision of standard features, the homemade product will gain new useful qualities.
We will talk about how to make this equipment useful in everyday life with your own hands. We will introduce you to the design features and differences of the burner from a conventional blowtorch. Compliance with our recommendations for safe operation will eliminate risks and dangerous situations.
The content of the article:
Blowtorch design
If you already have a blowtorch, you probably know how it works and by what principle it works. But it will be useful to briefly recall some points so that disassembly does not cause unexpected difficulties.
At the same time, we will determine the terminology, because home craftsmen often call parts in a popular way, and instructions are given in a more technical language.

Most blowtorches for domestic use belong to the nozzle, or else, the injector type. Such a lamp has a housing that simultaneously serves as a reservoir for liquid fuel. This is the largest part of the device.
A heating bath is fixed on the housing and the upper part, the burner, is screwed through the fitting. The burner is second in size after the casing.
Its main elements:
- an evaporator in which, as a result of heating, liquid fuel is converted into gaseous;
- a nozzle directing a gas stream to the ejector, at the exit of which it ignites, forming an open flame;
- adjusting screw to enhance or reduce flame.
Fuel from the tank enters the burner through a siphon tube.A pump is also included in the tank. There are other details, but they will not be part of the updated burner, so there is no need to consider them.

We showed a photo and a diagram of a blowtorch having a typical design, but specifically your model may have slight differences.
What is the difference between a gas torch and a blowtorch?
Blow torches work on liquid fuel: gasoline, kerosene, alcohol. As the name implies, the fuel for the gas burner will be liquefied petroleum gas, namely the propane-butane mixture, which is contained in red cylinders.
Changing the design and switching to gas gives the following advantages:
- convenience of use increases;
- increased security;
- scope of application is expanding;
- operating cost is reduced.
When working with a blowtorch, you are holding in your hands not only a burner, but also a tank with a flammable substance. The weight of a 2 liter blowtorch with a full tank is about 4 kg. The height and width are respectively more than 30 cm and 20 cm. With these characteristics, the maneuverability of the hand tool is extremely low.

For a gas burner, a tank is not needed. By removing the most voluminous part of the blowtorch, you get a compact and lightweight device that will help you perform various types of work, including in hard-to-reach places.
However, you do not have to hold in your hand a container of gasoline or kerosene directly near an open flame, since thanks to the long hose you can position the gas cylinder at a sufficient distance from the workplace.
At an ambient temperature above -20 ° C, the gas burner does not require preparation before use. Just open gas cylinder valve, adjust the flame power and you can cook, solder, warm up ... Even in a 5-liter cylinder, the supply of gas is enough for many hours of continuous operation.
Unlike a gas burner, a blowtorch needs preliminary preparation, regardless of external conditions. It is necessary to pour gasoline or kerosene into the bath and set it on fire to warm the evaporator. Only with sufficient heating the first portion of the liquid fuel entering the evaporator will go into a gaseous state.
The consumption of liquid fuel is 0.6-0.8 liters per hour. Considering that you can refuel a 2-liter blowtorch only ¾ of the tank volume, the fuel supply is enough for 2 hours. Then you will have to take the canister again and add fuel to the tank, but before that you still need to wait until the lamp has completely cooled.
Recall that it is impossible to open the tank at a cold lamp, otherwise there will be a contact of a hot burner and gasoline vapors, which is fraught with ignition and explosion. Only after the lamp has cooled down can you pour fuel into the tank and the bath and repeat the entire preparatory procedure, including heating and pumping air with a pump, which will take about 10 minutes.
A blowtorch during normal operation exudes a smell of gasoline, which is not only unpleasant, but also harmful. When working on liquid fuel, soot with soot quickly clogs holes in the burner and settles on external surfaces, dirtying hands and clothes.
Gas is the cleanest type of fuel, so a gas burner needs to be cleaned less frequently. There should not be a smell of gas during use of the burner in principle, and its appearance indicates a malfunction of the apparatus, which requires an immediate cessation of operation and elimination of the causes of leakage.
Assembly and testing in stages
Consider several options for assembling a gas burner, and each of them will require its own materials and tools. The minimum set includes a grinder, a wrench, an FUM tape, a brush, a handle, 2 fittings with nuts and clamps.
Without fail you will need gas hose 10-20 meters long, LPG bottle (propane-butane) gearbox to it and actually a blowtorch with a working torch.
When working, use personal protective equipment: glasses and gloves. In no case do not smoke: firstly, easily flammable fuel residues may be in the tank, and secondly, when handling gas equipment, which includes liquefied gas cylinders, safety measures must also be observed.

Having prepared the tools and materials, you can proceed directly to the conversion of one device into another.
The main stages of the process:
- disassembly of the blowtorch;
- preparation of parts for assembling a gas burner;
- gas burner assembly;
- tests.
Unscrew and remove the pump immediately. In the future, it will not be needed. Unscrew the entire top of the blowtorch, i.e. the burner assembly. It will become the basis of a new, already gas burner.
It is advisable to clean the burner parts of an already used lamp from soot and soot. The nozzle is cleaned with a special needle, which usually comes complete with a blowtorch.
If there is no such needle, use a wire that easily fits in diameter into the nozzle hole. Use the same needle or wire to clean the fuel pipe. Brush soot is cleaned from the outside.
Having made four incisions with a grinder, a fitting with a siphon tube is removed. The part of the body that will remain on the fitting when it is cut out is removed with the help of a grinder, the area under it is cleaned of chipping. After processing, the fitting is screwed into the nozzle of the burner, sealing the connection with aluminum gaskets.

You can do without cutting the fitting out of the case, replacing the "native" siphon tube with a new metal tube. The end of this tube is welded to the nut, which is previously screwed onto the nozzle of the burner. The resulting weld is cleaned with a grinder equipped with a flap disc.
By attaching one end of the tube to the gas burner, the other end is attached to the hose. But before that you need to put a pen on the handset to use the device as convenient as possible.
The handle is made of a wooden bar, which is grind on a lathe to give a rounded shape. For this purpose, you can also use a hacksaw and a cutter. In the center of the bar, a through longitudinal channel is drilled under the diameter of the tube. To avoid chipping, the surface of the handle is protected with sandpaper or a polishing machine.
If you do not want to spend time grinding the bar, make a handle from a wooden handle from a shovel, chopper or other garden tool. A longitudinal hole is also drilled in a cut of a suitable length, and the sections are cleaned. You can use other improvised materials, the main thing is that they are not easily inflammable and, in order to avoid burns, have low thermal conductivity.
The next step is to attach the hose to the tube. If the diameter allows, the hose is pulled directly onto the tube and fixed with a hose clamp. But it is better to connect the hose through the fitting. To do this, it will be necessary in advance, even before you attach the tube to the burner, cut the thread at its second end.
This can be done on a lathe or using a die (lehrki) - a manual thread-cutting tool.It is recommended to chamfer the end of the pipe and then apply a small amount of engine oil to it to facilitate winding the die.

An FUM tape (fluoroplastic sealing material) is wound on the threaded end of the tube to seal the connection, and a fitting is wound. A hose is put on the fitting. The second end of the hose is also connected via a fitting to the reducer of a household cylinder with propane-butane.
Before connecting, the fittings are purged to remove debris. Perform all manipulations with the gas cylinder with the valve closed. The hose must be integral. Never use interconnected hose sections.
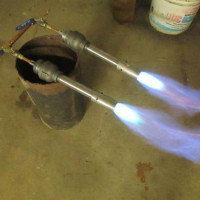
Having assembled a gas burner, it is required to test it. Apply soap foam to threaded and welded joints. Slightly unscrewing the cylinder valve, apply gas. If bubbles do not form, there is no smell of gas, which means that the connections and gas lines are tight.
Do not check for gas leaks by holding open flames to the problem area.
Now it remains to test how the burner functions, and you can use it for its intended purpose. When testing, do not set the adjusting knob immediately to the maximum value. Check how the device functions under moderate conditions and only add power if the result is positive.
Safety measures when using
Remember about the explosiveness of liquefied petroleum gas, including propane-butane mixture and others gas mixturesused in gas equipment. For both testing and further use of the gas burner, observe the safety rules.

It does not matter if the burner is made at the factory or made by one’s own hands, the following negative consequences are possible with improper use and improper handling of the gas cylinder:
- the occurrence of a fire;
- gas cylinder explosion;
- getting a burn.
A burn can be obtained not only from an open flame, but also by touching heated surfaces. To minimize risks, install the gas cylinder strictly upright on a flat surface, in a well-lit place, but not in direct sunlight and not in the aisle or doorway.
The distance from the cylinder to an open flame should be at least 10 meters, and from heat sources - at least 1 meter. Protect the cylinder from bumps and drops. Do not attach more than one burner to it.
Check the gearbox on a quarterly basis, the torch on a monthly basis, and the hose on a daily basis. The need for daily inspection of the hose is due to its vulnerability - even a slight mechanical impact can lead to ruptures, cracks that will become a gas leak, which should be excluded.
The risk of gas leakage also increases if the nozzles and tubes become dirty, so you need to clean them regularly. For inspection and maintenance of the burner, first disconnect it from the gas bottle.

Do not heat a frozen gear unit with an open flame. Use the burner outdoors or in well-ventilated areas. Disconnect the electrical network if you are working near electrical appliances, do not pinch or bend the hose, do not wrap it around the belt, etc.
When finished, be sure to tighten the cylinder valve and put on the protective cap on the cylinder.
Scope after alteration
Gas burners are used in household and agriculture, during construction and repair work, in the repair of vehicles and equipment,
In addition to the listed areas, gas appliances are used for the following purposes:
- installation of heat shrink tubes;
- melting solder before soldering;
- heating of metal water pipes;
- heating bitumen for roof repairs.
In addition to the above, the apparatus serves to remove the paintwork by burning the surface, for welding materials with a melting point of about 1000 C. Using it, you can cook or heat food directly on the construction site, boil water for tea.
Conclusions and useful video on the topic
A detailed story and a visual demonstration will help to better understand all the features of the process and then repeat it yourself:
Guidelines for twisting the top of the blowtorch, cutting the siphon tube from the housing, and assembling the gas burner:
As the catch phrase says, how many people, so many opinions. By analogy, we can say: how many home craftsmen, so many ways to make homemade burners. The following video confirms this;
It is easy to make a gas torch from a blowtorch. You can get by with the simplest tools that a homemaker will probably find. With minimal skills, all work will take no more than 30-40 minutes. As a result, you will almost for free get the apparatus you need in the household, and at the same time, satisfaction from successfully completed work.
If you have experience in assembling a gas burner or upgrading existing equipment, please share it with visitors to the site. Stories about hand-made manufacturing, useful tips, photos of the process you can leave in the box below. In it, ask questions on obscure and controversial points.
 Do-it-yourself Injection Gas Burner: Blacksmithing Manual
 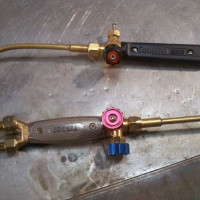 DIY propane gas burner: step-by-step instructions for assembling home-made burners
 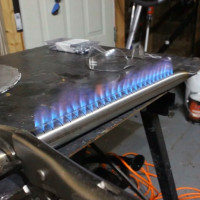 Do-it-yourself gas burner for a sauna stove: how to make a home-made device
 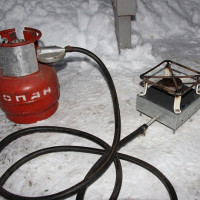 DIY gas stove: the best options for homemade tiles from improvised materials
  Gas cylinder ramp: device + DIY manufacturing example
  Do-it-yourself marching gas burner repair with piezo ignition: common breakdowns and their elimination
  How much does it cost to connect gas to a private house: the price of organizing gas supply
  The best washing machines with dryer: model rating and customer tips
  What is the color temperature of light and the nuances of choosing the temperature of the lamps to suit your needs
  Replacement of a geyser in an apartment: replacement paperwork + basic norms and requirements