DIY assembly of the electrical panel: the main stages of electrical work

The electric current that has long been accustomed to it acts as a kind of basis for housing comfort and household life. It is difficult to imagine a modern house without equipping it with electric potential.
But all the difficulties electricians begin to appear only at the moments when they have to deal directly with the owners of apartments or houses. For example, assembling an electrical panel is at first glance a simple matter, but in practice it turns out to be a rather complicated process.
Moreover, the complexity is doubled in relation to self-taught electricians who are not familiar enough with the intricacies of wiring and electricity in general. Therefore, we consider the topic of assembling an electric shield as one of the steps in the practice of beginners.
The content of the article:
The definition of "electrical panel"
Before we consider the installation process of the electric panel itself, as well as the process of its assembly, it will be correct to understand this system itself. In practice, various interpretations of the name of the shield are used, but the essence of the design from different names does not change.
The purpose, in this case, is obvious - to take a centralized electric potential and distribute this potential to individual sections of the territory, in particular, the territory of an apartment or a residential building.

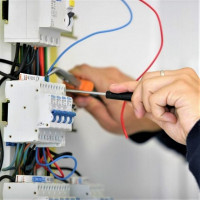
In addition to the distribution function, the installation of the electrical panel provides the functionality of protecting segments of the network section by mounting inside the cabinet of the switchboard circuit breakers and other protective devices.
Also, the design scheme may include the implementation of control functions - installation of devices that perform:
- current frequency tracking;
- voltage level control;
- checking for phase, etc.
As a rule, the functionality of the electrical panel is determined by the level of complexity of the electrical network, as well as the technological (household) equipment included in the operating area.

Despite the relatively small dimensions of the structure, which is a characteristic feature of household networks, the installation of a home switchboard is an important process that should be given special attention.
Low quality connections, the use of switching circuits not previously calculated, as well as the rejection of the use of reliable grounding elements are unacceptable here.
Calculations and charting
To figure out how to assemble a household electrical panel, you must first draw up a diagram of this design. In turn, the compilation of the circuit is preceded by calculations, with which electrical equipment is selected.

The electrical components that make up the internal contents of the electrical panel are usually represented by the following set:
- circuit breakers;
- safety pads;
- contact tires;
- packet switches;
- accessories, e.g. staples, clamps, bushings, etc.
Despite the relatively low requirements for household electrical installation, in comparison with the industrial version, the principle of energy distribution remains unshakable. That is, each consumption group is built by a separate segment of the common network.

A house or apartment with modern equipment traditionally contains equipment of sufficiently high power. For example, electric stove, microwave, washing machine.
Equipment of this class is connected as a separate group when installation is carried out inside the switchboard. Accordingly, this group requires an individual switching and locking unit.
For such a group, a total calculation of power consumption is made taking into account the safety factor. In other words, the power data taken from the passport for electric cars are summed up.
A safety margin of approximately 30% of the amount received is added to the amount received. As a result, there is a value of power by which electrical equipment is selected for mounting the group unit - a bag, a switching machine, a safety block.

In a similar way, any other group of a separate network segment is created, for example, separately for sockets, for lighting, for a floor heating system, etc.
For standard apartments, the creation of a large number of groups is not relevant. It is usually limited to two, maximum three groups. But for suburban real estate, multi-group schemes are quite commonplace.
Step-by-step installation process
Installation and flap assembly can be done on their own.But this will require knowledge and electrical installation skills.
Moreover, connecting the switchboard to power lines is possible only by a professional electrician who has the appropriate access to carry out these works. Unauthorized connection is dangerous for health and life, and is fraught with big problems, including fines.
But you can prepare the box, purchase the necessary machines and other accessories on your own. How to do it right, consider in more detail.
Stage # 1 - Preparing to Install the Cabinet
Installation from scratch usually implies the presence of a niche already prepared by the builders in the wall and all electric cables and wiresbelonging to the apartment (home) scheme.
Such a “landscape” usually looks like a niche cut into the wall of a rectangular, where you first need to pick up a cabinet of appropriate (suitable) sizes.

If there is no prepared place, you will have to make a niche with your own hands or apply wall-mounted installation.
In the second case, marking of the installation site is made taking into account the overall dimensions of the electrical panel. In principle, these are standard construction works that do not pose any special difficulties.
Cabinets for an electric panel are assembled from materials that are strong and strong, but relatively light.
Typically, for the manufacture of the box is used:
- thin-walled (1-1.5 mm) sheet metal;
- metal connecting corners;
- screws and nuts.
In most cases, a ready-made box is purchased, because the assortment on sale is huge, including plastic products. The classic form of construction is a rectangle or square.

The outdated cabinet designs suggested installation inside the rear panel based on dielectric materials (ebonite, textolite, etc.), where electrical equipment was mounted. In principle, such a scheme for everyday life is acceptable to apply in modern conditions.
Stage # 2 - internal filling of the control cabinet
Modern architecture is somewhat different. The cabinet is completely made of metal, and inside, on the rear wall, metal traverses (DIN rails) are also installed.
All technical equipment is "put on" these traverses:
- machine;
- RCD;
- switch;
- other wiring accessories.
According to modern standards, any of the above elements has a design for installation on a DIN rail. It is also useful to sign all devices installed on the rail, and additionally draw up a diagram with the signatures of all electricity consumers in the apartment / house.
Of course, you can move away from these rules, given that mounting on traverses simply provides ease of installation / removal of equipment. But then you should consider options for reliable mounting.

In addition to din-rails, inside, usually in the lower part, one or two insulated plates with screw clamps are mounted - a bus for neutral and grounding conductors. Additional buses can be used for contact groups of low-voltage equipment - relays, modems, etc.
It is recommended to make the drawer of the electric cabinet spacious, as far as the dimensions of the niche cut out in the wall allow.The equipment should be placed inside rationally, in such a way as to conveniently maintain and remove in case of replacement.
That is, the assembly of the box, again, should be preceded by the calculation of the required space for installing the components of the assembly. Any electrical cabinet must be equipped with a door and a lock.
Stage # 3 - performing wire entry
The failed power line, as well as conductors and cables, taken directly from the apartment (house), must be routed inside the assembled cabinet. Accordingly, a sufficient number of holes on the upper and lower sides of the box will be required.
The diameters of the holes should provide free pulling of cables (wires). In addition, each hole must be equipped with a protective insulating ring (rubber, plastic).

As a rule, clamping clamps are installed at the inlet and outlet of the cable, by means of which the conductor is firmly fixed to the cabinet wall during internal installation and / or to the base plate (plate) on which the cabinet is fixed during outdoor installation.
Also on the side or bottom wall of the structure is the interface of the grounding bus. A hole is drilled for a bolted connection or a ready-made one is used, if such is provided on the box body. An earth bus is connected to this connection during installation.
Stage # 4 - fixing the shield to the wall
All the above actions are more convenient to perform outside the zone of the main installation. Namely:
- assembly and preparation of the cabinet;
- installation of traverses (DIN rails);
- placement and fastening of zero tires;
- preparation of through holes;
- placement of communication equipment;
- installation of a door and a lock.
Experienced electricians advise to fix in the selected area of the construction niche an already prepared, assembled and even partially equipped box.
A construction project usually involves the introduction of anchors to secure the electrical panel. If there are none, you need to prepare a reliable base for fasteners.

There are many options for manufacturing anchor elements. For example, a simple way is to install a pair of sufficiently powerful metal corners vertically or horizontally, at a distance of the height or width of the cabinet. An electric cabinet is already attached directly to the corners.
Stage # 5 - connecting devices to the mains
Next, the shield is fully equipped with the required electrical equipment, all working cables are inserted inside and connected in accordance with the compiled diagram.
Last in the area of the electrical panel is the input of the power line with the subsequent connection to the input package switch. From the batch switch, a centralized line is connected already to the opening circuit breaker.

Before applying voltage, all group switches are set to the off position. Already after switching on the packet switch and the introductory machine, group machines are connected in series, starting from low-power equipment.
Conclusions and useful video on the topic
A video showing the work of assembling an electrical panel “from scratch” is an effective aid to a beginner electrician.
It is recommended that you familiarize yourself with the video training in order to significantly enrich your personal knowledge box in this way:
It is quite acceptable to build an electric panel with your own hands. Another question is whether this makes sense, given the variety of finished products on the market. You can pick up a box of any configuration - for a variety of construction projects.
But in order to qualitatively and correctly complete the assembly of the shield, including the installation of automatic machines, meters, switches and other equipment, you need knowledge and considerable electrical installation experience.
And to enter the supply line and connect consumers to it, you need a professional electrician with permission to perform this kind of work.
If you have the necessary knowledge or had to assemble an electric panel yourself, please share valuable advice with our readers. Tell us, maybe there are some subtleties that we did not mention in this material? Leave your comments in the box below.
 DIY electrical panel exclusion: current diagrams + detailed assembly instructions
 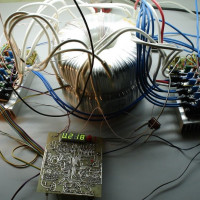 Powerful do-it-yourself voltage regulator: circuit diagrams + step-by-step assembly instructions
 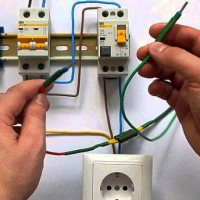 Rules for connecting an RCD to a single-phase network without grounding: the best schemes + operating procedure
 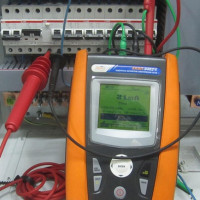 Rules for connecting RCDs to a single-phase network with grounding: briefing on the work
 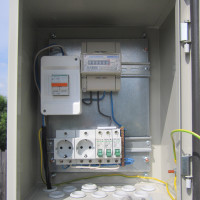 Box for electric machines: types of boxes and their features + the nuances of selecting and filling the box
 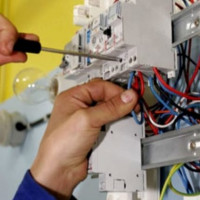 RCD for a water heater: selection criteria + schemes and connection rules
  How much does it cost to connect gas to a private house: the price of organizing gas supply
  The best washing machines with dryer: model rating and customer tips
  What is the color temperature of light and the nuances of choosing the temperature of the lamps to suit your needs
  Replacement of a geyser in an apartment: replacement paperwork + basic norms and requirements