How to install and connect an outlet: a step-by-step guide

You can solve the problem of replacing or installing the outlet on your own, without involving electricians. Having made certain efforts, it is easy to refute the widespread belief that only specialists can carry out electrical work.
We will tell you how to choose a socket for arranging home wiring or replacing a damaged device. The article submitted for consideration describes in detail how to connect the outlet and prepare the necessary tools. Based on our recommendations, you can easily cope with the installation and connection of wiring products.
The content of the article:
Typical outlet types
The reasons for which you have to change the outlet can be very different - from full-scale repairs to ordinary breakdowns. Faced with such a problem, you have to choose the right product in the store or on the market.
Manufacturers offer a variety of models in shape, color, purpose. It is difficult for an inexperienced person to decide so immediately what exactly he needs.

Sockets, offered by many manufacturers, differ not only in appearance, but also in the type of installation. Depending on how the wire is laid, you will need an appropriate outlet.
According to the location relative to the wall on which the electric point is being installed, there are 2 types of sockets:
- built-in;
- waybills.
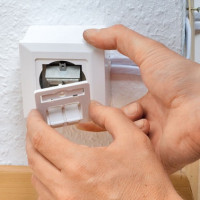
Built-in is used for installation in drywall walls, walls made of brick, or concrete. The main distinguishing feature of such outlets is their electrical parts, like the entire wire, are immersed in the wall. To do this, a special gutter, a stroba, is cut through the wall using a perforator. It contains wires enclosed in a corrugated pipe.
A special recess is cut under the socket with a diameter corresponding to the diameter of the mounting box. This hole may be slightly larger, but in no case should it be allowed to be smaller. The sockets should not be deformed during installation.

Built-in models are in demand among residents of megacities and other settlements. They are popular in homes and apartments with young children. These outlets fit perfectly into the interior, thanks to the rich color palette offered by manufacturers.
Overhead sockets differ from the built-in sockets in their appearance - they are completely outside. Their electrical mechanism is hidden only in a decorative box screwed over the wall. Wires also go over the wall, covered with a special overlay.

Primarily patch outlet used for installation in houses with wooden walls.
Depending on the internal structure of the working mechanism, sockets are:
- with a screw clamp, when the wire inserted into the socket mechanism is fixed between the plates connected by a screw. In case of flattening of the wire during use, just tighten the screws;
- with spring terminals. Here, the contact hole for the wire is expanded by pressing a special key. Over time, when the mount weakens due to deformation of the wire, it is necessary to remove the flattened part with pliers and reconnect.
From what wiring the socket will be used for, two and three contact ones are allocated. Two-pin - these are sockets without grounding. Their main advantage is lower cost.

Three-pin - with grounding. They are installed in rooms where you will use electrical appliances that need grounding - computers, washing machines and others.

Before purchasing an outlet, you need to pay attention to its rear wall. It indicates what load and number of phases it is designed for. Most often, the current value corresponds to 16A, and the voltage is 220 volts. However, to connect the electric stove, most often it is necessary to bring a separate line and set three phase outlet.

The time has passed when there was no special choice of outlets and what was on the shelves of shops was bought. Now manufacturers, competing with each other, in order to attract more customers are developing various types of outlets.
For home use, you can choose the option that is most suitable for a particular room, for example, for arranging electric points in the bathroom, in the pool or in the combined bathroom, and for installation within the entrance group of a private house.

Outlets in which openings are closed with special overlays - protective curtains, young parents like to install. This allows you to further protect their growing children who are interested in studying the surrounding objects.

Outlet models equipped with a current indicator, a timer that can be programmed as needed, or options with a plug ejector are also very attractive.

In the product family for the device of electric points there is a special group - retractable sockets, with the features of the device and installation which we recommend that you familiarize yourself.
Construction and components
In order to thoroughly understand how to properly install a new outlet at home, you need to study a little its components. All sockets are sold pre-assembled. Therefore, during its installation you will have to unwind everything yourself.
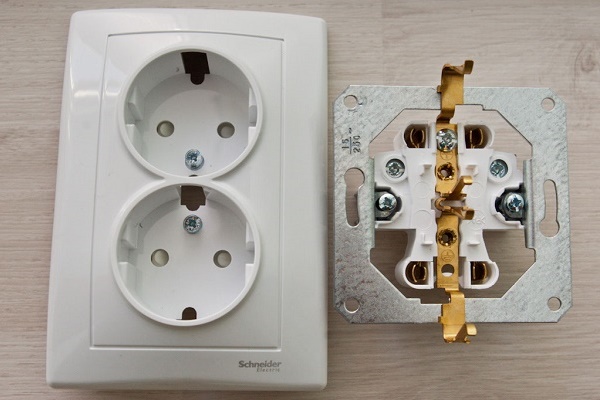
The main components of the outlet are the base, the conductive part, and the decorative front panel. The base is made of ceramic or high quality plastic. All elements are attached to it - conductive parts and a face plate.
Ceramic substrates are considered more reliable, but they require especially careful installation, because in case of damage you will have to buy a new outlet.
Decorative cover is designed to hide all the working elements. It serves as a reliable insulator of the working part from external influences. Some models provide the ability to easily replace this part of the outlet.

The working part of the outlet consists of spring contacts and terminals to which electrical wires are connected. One of the important contacts is grounding.
Conductive elements are made of brass or bronze. The latter are better, but are extremely rare. Therefore, you should choose options from tinned brass - they are more reliable than ordinary brass, better solder and last longer.

Standard installation steps
In order for the outlet to work for a long time and not create any problems, you need to carefully consider its installation. It is important to do everything correctly and consistently, without rushing. Only in this case can a good result be guaranteed.
Preparation before installation
The preparatory phase of installation begins with the purchase of the desired model and the required number of outlets.It is important to consider where they will be installed and select the models that are most suitable in a particular room.

Then you need to take tools that can come in handy during the installation process. This is the construction level, the socket itself, screwdrivers for tightening fasteners and screws, a construction knife or stripper for stripping insulation, pliers, a special screwdriver for checking voltage, electrical tape.

If you have to not just replace the old outlet with a new one, but install an additional place for connecting electrical appliances, then an extensive set of materials and tools can come in handy.
You will need a podrozetnik (mounting box), a puncher for making recesses for the working mechanism, nozzles for the punch of the desired diameter, a ruler / tape measure, a simple pencil, building gypsum mixture.

Power outage - a guarantee of safety
The most important thing in any electrical work is a power outage! Without this, installation is not permissible.
Depending on what is installed in a particular apartment or house, you need to unscrew the plugs if a counter with plugs is installed or set the levers to the “off” position if there is an electrical panel with circuit breakers.
Then you need to make sure that the work area is really de-energized. To do this, you have to take a prepared indicator screwdriver in advance and check for the presence of voltage in the wiring to which the socket will be connected.

Choosing a power outlet
Having chosen the appropriate outlet models and having prepared the necessary tools, it remains to be decided how to make the correct outlet connection.
There are different power outlets to the mains:
- sequential when sockets are connected one after another;
- parallel, if each outlet has its own wire from the junction box;
- mixed, that option when some sockets are connected in one, and the rest in another way.
It is simple to determine the type of connection - if an additional place for connecting to the mains will be used for the operation of powerful devices - you should choose a parallel circuit. For low-power electrical mechanisms, it is convenient to prefer a serial circuit.

Installation Box Installation
After making sure again that the workspace is de-energized, you can proceed to the next installation step. If this is not a replacement for the old outlet, then it remains to be noted exactly where one or more additional outlets will be located. For this, a ruler / tape measure and a pencil are useful.
If you planned replace a damaged outlet or redo the device, then you need to act in a different sequence, described in detail in our proposed article.
When choosing a place for the future location of outlets, you should focus on convenience during their future use. For outlets, try to withstand the following distances:
- from the floor - not less than 30 cm;
- from the ceiling - not less than 20 cm;
- from the window - not less than 10 cm;
- from the baseboard, under which the wire is hidden, - 0 cm.
If the sockets are placed too high or low, it will be extremely impractical. On the rules for the location of sockets and switches in accordance with European standards in detail written here.

Having marked the places where to install the sockets, you should make holes for mounting boxes. They, depending on the material of the walls, come in different diameters. Here you need to focus only on your situation. The main rule is that the hole should not be smaller than the socket.
The mounting boxes themselves are made of plastic, very rarely of metal. Plastic of good quality, non-combustible. It provides reliable insulation of the wires that will be located in such a box. The shape of the sockets is round, oval, and even square. Although it is most convenient to work with round plastic boxes.

The sequence of the installation stage of the podrozetnik depends on the condition of the walls and the individual characteristics of the dwelling.
The most common situations are:
- full-scale repair of the premises. In this case, grooves are cut in the walls, a cable is laid in them that will power the sockets of the entire room, holes are made for mounting boxes;
- the walls are already finished with a decorative coating, and the electric cable is recessed into the wall. In such a situation, with the help of a knife, it is necessary to carefully release ready-made holes for the installation of mounting boxes;
- the walls are finished, the cable is laid under the baseboard or hidden in the outer insulating box. Then you need to install external outlets;
- the walls are finished, the cable is not laid. Here you have to choose the most optimal installation option.
Convenient if you have to make only a hole for an additional outlet. Decorative overlay - the front part will cover the consequences of work.
Otherwise, if you do not need to damage the external wall decoration, you will have to approach the installation process creatively. One option is to use an overhead installation method, when the wire has to be run over the wall, packing it, for security purposes, in protective and decorative channel.

Also a convenient option is to install the outlet immediately above the baseboard, hiding the electric wire under the baseboard. In this case, you also have to use the invoice model.
In the prepared hole for the outlet, you need to install the installation box by threading the laid power cable into it. This hole must be thoroughly cleaned of dust and debris. You can use a vacuum cleaner or brushes. In the cleaned hole, the socket is securely fixed.
To do this, the prepared gypsum mixture is applied, and the mounting box with the threaded cable is immersed in the hole with the mixture. All work continues after the solution has set - it will take no more than 10 minutes.

In this way, one or more socket outlets are installed, as well as a mounting box for a dual outlet. If you have to install a number of outlets, then the installation boxes are installed in a row strictly horizontally or vertically - as planned by the owner of the room.
Most often this is a horizontal option. In this case, the single sockets are placed tightly to each other. They are necessarily connected to each other, and their horizontalness is checked by the building level.
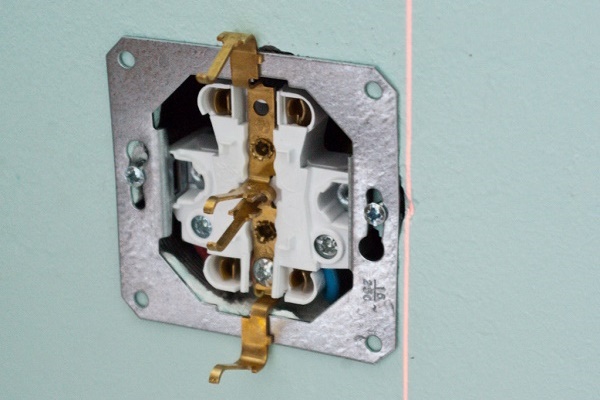
Connection and device verification
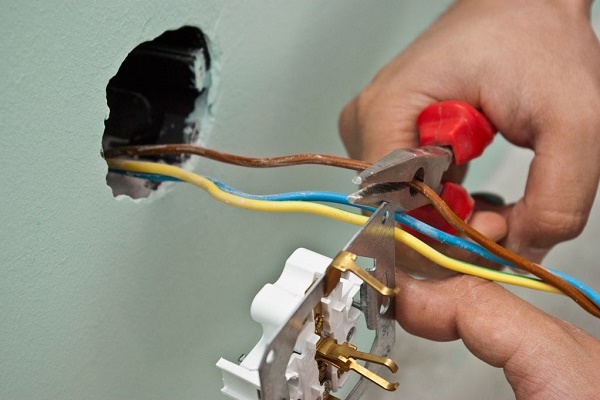
After fixing the box, work begins with the power cable coming out of it. First, first you need to cut off the extra piece, leaving about 7 cm from the edge of the undergrowth. Remove the braid from it - the upper insulating layer that combines the internal wires.
Inside you will find 3 wires of different colors - blue, white and yellow-green. This is the most common color composition used for marking. Instead of white, it can be brown, red, black and another.
Secondly, the wires need to be freed from the individual insulating layer by carefully removing it with a stripper or knife at a distance of about 1 cm. Now, work remains on connecting them to the working mechanism ground outlets.
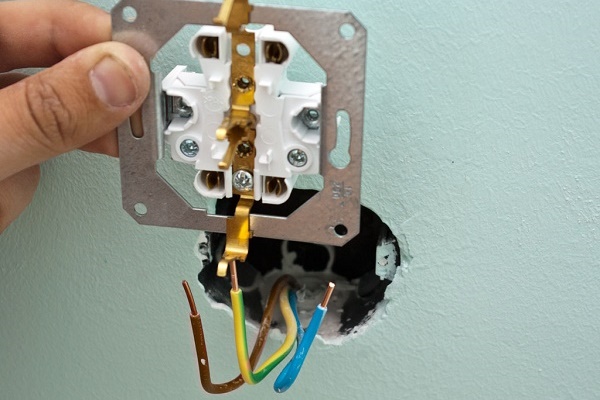
Yellow green is the color of the ground conductor. It must be connected to the central ground contact.

Blue or blue-white is a working zero. This wire will connect to the extreme terminal of the working mechanism of the outlet. The remaining wire, most often it will be white or beige-brown, must be connected to the second extreme contact.
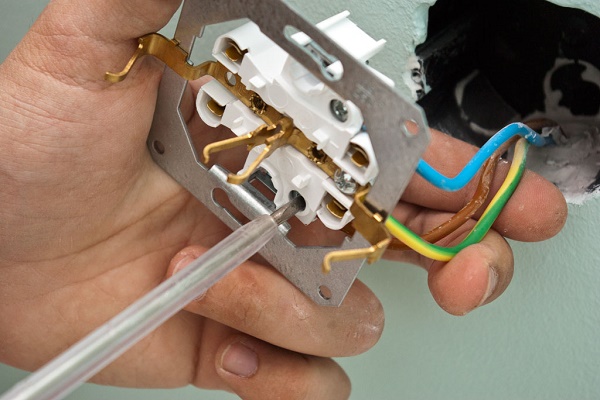
Depending on the type of outlet, the connection is made by pressing a special key if spring-loaded terminals are used in the mechanism, or is fixed between the plates with a screw clamp.
For fixation in a screw clamp, the sections of wires cleared of insulation are pre-bent so that they look like a small half-ring. Thanks to such preparation, it is easier to work: the wire will not slip out during the fastening period from under the screw. It is necessary to bend clockwise.
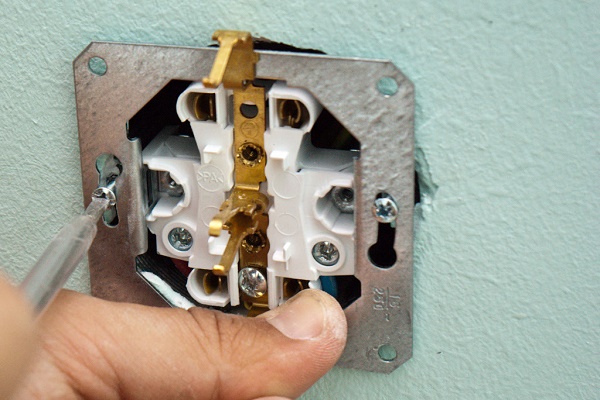
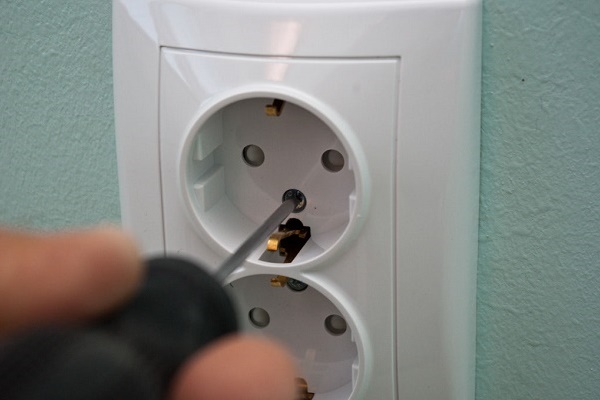
When all the contacts are connected, carefully bend the wires and carefully place them together with the working mechanism of the outlet inside the mounting cup. Then carefully screw the mechanism to the socket with the screws on its edges.
These screws will allow you to tightly fix the working part of the outlet. It is important not to overtighten the mounts so that nothing breaks.

If everything is securely and horizontally fixed, you can proceed to the final stage of wiring - screwing the decorative lining. To do this, tighten the central screw without pulling it.

Now the socket is connected in compliance with all safety rules. You can tighten the plugs or turn on the levers on the flap and check its operation. If all the actions were performed sequentially and correctly, then the new working outlet will happen to its owner for more than one year.

The need to install an additional outlet may arise completely unexpectedly - the old one will fail or the new furniture will close free access to one of the existing ones.
Possessing information about the nuances of installing and connecting the outlet, you can easily cope with this work yourself.
How to properly connect the power outlet is described in detail. in the next article.
Conclusions and useful video on the topic
Video # 1. Walkthrough in video format about installing the outlet:
Video # 2. A detailed and understandable video to help masters planning to install outlets with hidden wiring:
Video # 3. A warning clip against hazardous grounding methods, sometimes used by home craftsmen. If your neighbor advised something like this, it is better to refuse:
Having become acquainted with the main nuances and stages of installing the outlet, you can do this type of electrical work with your own hands.Everything that seemed unfamiliar and from this incredibly complex became clear and simple.
It is not necessary to call an electrician and ask him to connect an additional outlet, when this work can be done independently, pleasantly surprising your loved ones.
Want to share the experience of an independent electrician? Have a desire to provide information useful for home masters? Please write comments in the block below, ask questions, leave a photo on the topic.
 How to connect an Internet outlet: a step-by-step installation guide
 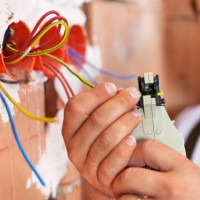 How to install and connect an outlet with grounding: learn to ground the outlet
 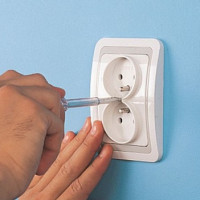 How to connect a double outlet: installing a double outlet in one socket
 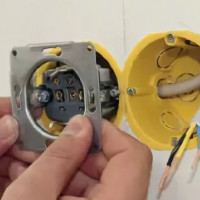 How to install a socket in drywall: installation rules and tips for installing a socket
 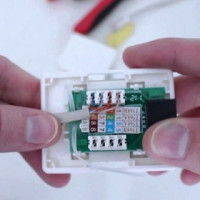 How to connect a telephone socket: connection diagram and installation rules
 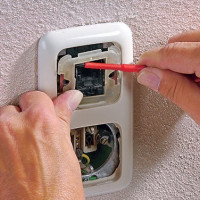 A socket with a switch in one housing: how to connect a socket with a switch
  How much does it cost to connect gas to a private house: the price of organizing gas supply
  The best washing machines with dryer: model rating and customer tips
  What is the color temperature of light and the nuances of choosing the temperature of the lamps to suit your needs
  Replacement of a geyser in an apartment: replacement paperwork + basic norms and requirements
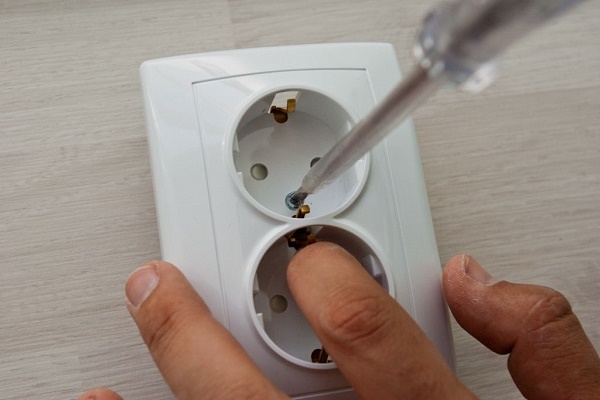
When choosing an outlet do not be greedy. Take those that not only look beautiful, but those that are reliable at the same time. The case of the mechanism must be made of ceramic, and the contacts are brass, the plastic is not brittle. The socket box should also be made of high-quality non-brittle plastic. The nest must sit tight. If you transfer the outlet, lay the wires at a right angle so that you yourself do not run into them during the next repair.
If you install the outlet in a barn or garage, take the sockets of the “Soviet” design: they are unpretentious, but reliable.
I wandered around “Electrics” here, did not find an article with my problem, I am writing here, maybe someone will help. So. He made a separate line for the water pump and water heater. I put a 20 A switch for each device. After some time, the one on the pump began to be cut down. They advised to change to 30 A. But when replacing it turned out that the problem was in the switch itself - the contacts were burned. Question: is it not risky to leave 30 A? After all, it gives too much margin for operation. In general, what are the tips for min-max A for a 1 kW pump? Thank.
If the word “circuit breaker” means an installed machine that is knocked out of the network, then I would say that 20 A and 30 A for 1 kilowatt is too much. Especially if the connection was on a separate line for the pump and water heater. If the machine is connected purely to the pump, then 6-10 A will be enough. If they are both connected to the same line, then 10-16 A (depending on the capacity of the water heater itself).
I repeat, for 1 kW 30A the delay will be large. And another point, charred contacts, is something abnormal. I would change the wire to a thicker section, and would check the devices for breaking current. Better yet, I would call a specialist who will already be oriented on the spot.